How to Add Google AdSense to Your WordPress Website in Easy Steps?
Running a website-oriented online business is expensive. Hosting fees, site management tools, security measures, digital advertising — the costs add up. In this blog, we will tell you how to add Google AdSense to your WordPress Website so that you can monetize your website and make money out of advertisements.
You might be wondering, what was that last one? Digital advertising…can’t ads also make websites money?
Absolutely. Ads are a quick, lightweight option to monetize your WordPress website and generate passive income for your business. Of course, the world of advertising is complex. To monetize your WordPress site, you’ll want a service to keep you out of the weeds, like Google AdSense.
AdSense dominates the digital advertising space — it’s used on over 10 million websites, and it might just work for yours. In this post, we’ll learn about Google AdSense, how it can drive revenue to your business, and how to install AdSense on your WordPress website.
What is Google AdSense?
Google AdSense is the most trustworthy and best platform run by Google that allows website owners to earn money online by showing ads such as images, text, and video.
These ads will be displayed according to your targeted audience, website niche, and content.
The best part of adding Google AdSense is that the website owners and bloggers don’t need to invest their hard efforts in earning. But yes the major con of Google AdSense is that it takes time to approve your website or blog.
How Does Google AdSense Work?
Google AdSense offers CPC which means you can earn money every time an ad is clicked by the user of your website. You will earn money as per click that varies on different factors. In addition, Google administers the relationship with advertisers. They collect money from them and share 25% or more with you.
Apart from CPC there are other ad models such as PPC, pay per thousand clicks and many more. To know more, check out our guide on how to earn money online from WordPress website.
Now, let’s see how to add Google AdSense to your WordPress site in 4 easy steps.
How to Add Google AdSense to Your WordPress Website?
Create Google Adsense Account
If you have a Gmail account, you already have a Google Adsense account as well. If not, you’ll first need to sign up for a Google account.
After that, follow these steps to sign up for Google Adsense.
- Go to the Google Adsense website.
- Click Get Started in the top right to open the account sign-up page for your website.
- Enter your website URL and email address.
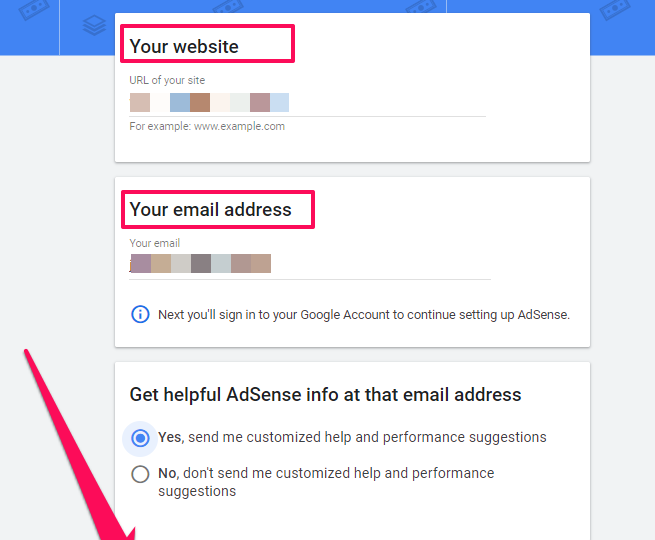
- Click Save and continue.
- On the next page, choose your country and accept the Terms & Conditions.
- Click Create Account.
- On the welcome screen of your account, click Get Started to go to the Payment address details page.
- Choose your account type (individual.), add your full name, address, and phone number, then click Submit to complete the account set up.
In the next step, you’ll add your site and get your tracking code.
Add Your WordPress Website To Google Adsense
In this step, you’ll need to submit the website on which you want to display ads for Google Adsense approval.
Here’s how to do it:
- In your Adsense account’s side menu, click Sites.
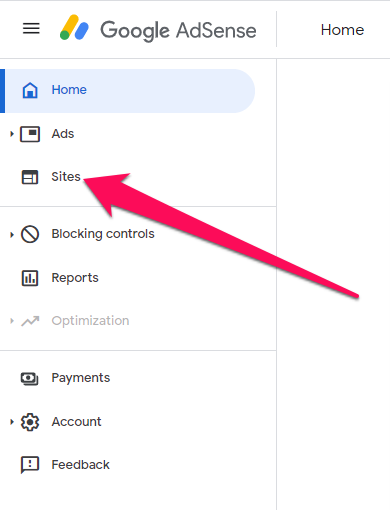
- On the next page, click Add Site.
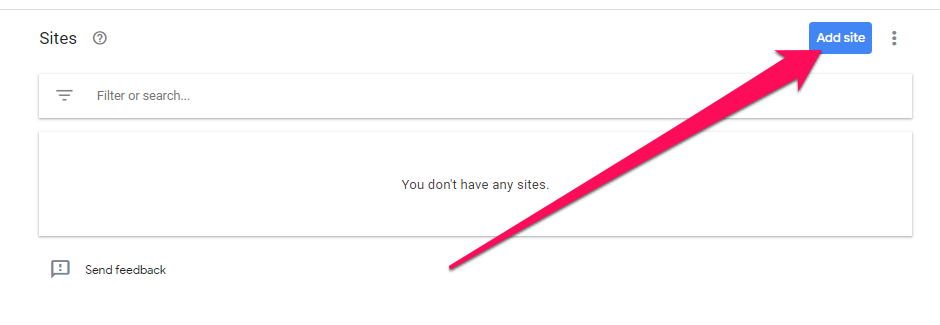
- Now add the URL of the site where you want to display ads.
- Click Save and continue.
- On the next page, copy your site’s unique Adsense tracking code.
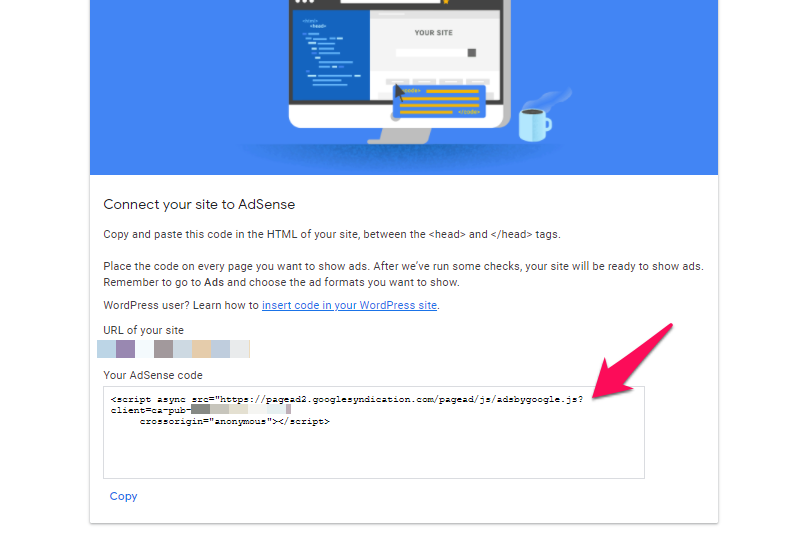
Before clicking Request Review, you’ll need to copy the Adsense code to your WordPress site.
Add Google Adsense Code To Your WordPress Website
There are different ways to copy the Adsense code to your WordPress site.
Let me explain them one by one.
Using A Plugin To Add Google Adsense Codes
The safest method of adding the Adsense code to your WordPress site is by using a plugin. Because with this method, your code will stay unaffected even if you change your site’s theme. There are many plugins for this purpose, but we’ll use Advanced Ads to demonstrate.
- Download and install Advanced Ads to your WordPress site
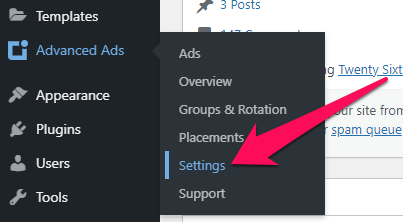
- In your WordPress site’s dashboard, go to Advanced Ads → Settings.
- In the plugin’s admin section, click the Adsense tab.

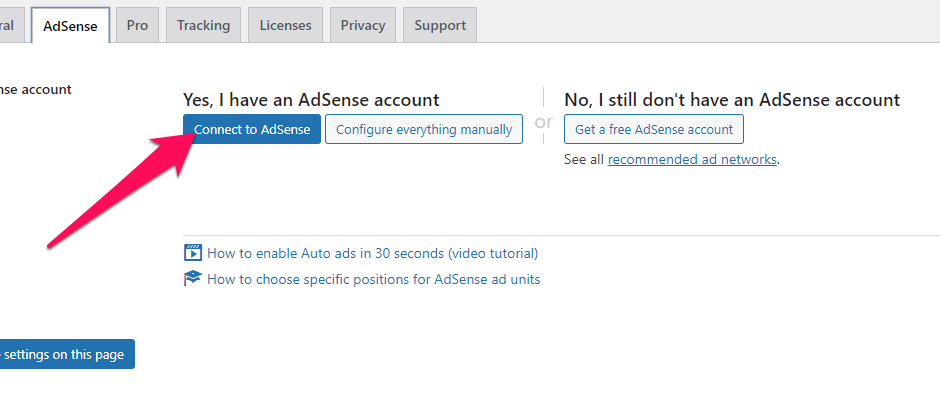
- On the next page, click Connect To Adsense to start the process of connecting your Adsense account to your WordPress site.
- Choose the relevant Google account to connect Adsense with your WordPress site.
- Click Allow to grant permission.
- Click Allow once more to complete authorization.
- You will be redirected to the plugin’s dashboard page, but this time it will have all the information from your Google Adsense account.
- To add the Google Adsense verification code to your site, enable the check box next to Verification code.
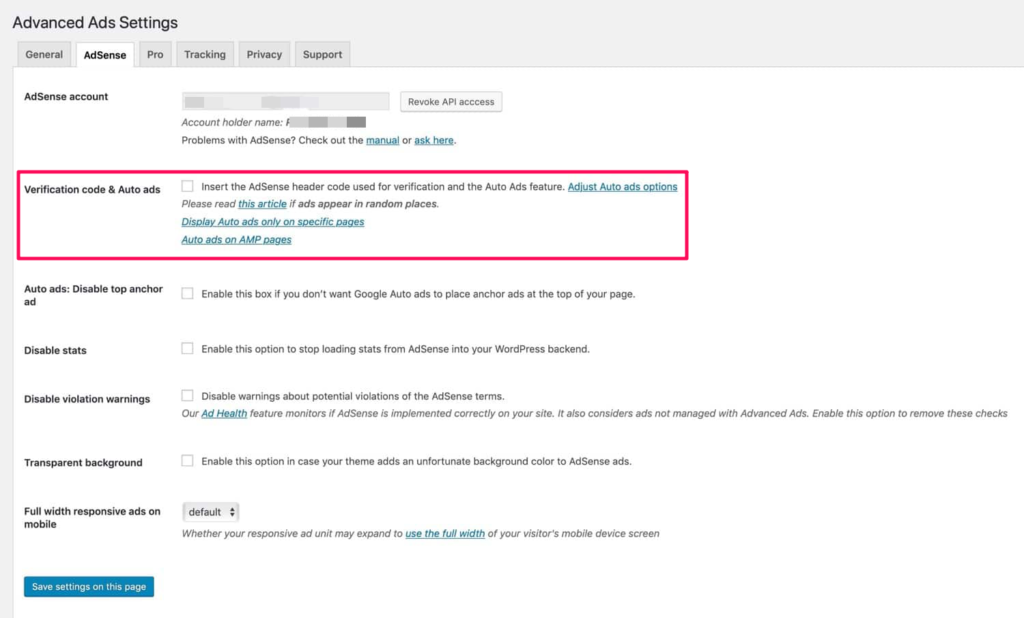
- Click save settings to finish the setup
- Advanced Ads will fetch the tracking code from your Google Adsense account and copy it to your WordPress site’s header code. You don’t need to change the code manually.
- Now go back to the Adsense window we left in the previous step and click Request Review.
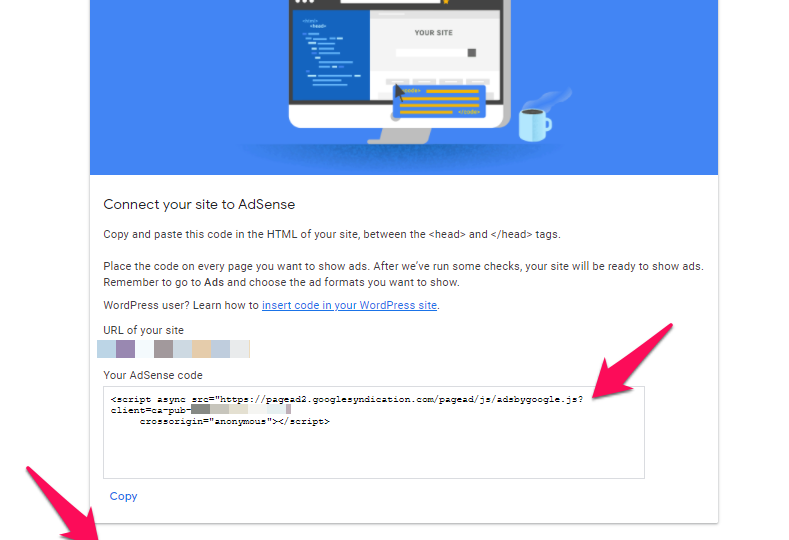
- If you’ve added the code correctly, you should see the confirmation message from Google Adsense.
- Your account has been successfully submitted for review.
You should get an approval email soon (unless your site is entirely new or doesn’t fully comply with Adsense policies).
Manually Adding Google Adsense Codes
You can also manually add the Google Adsense code to your WordPress site by copying it to your site’s code. However, we don’t recommend this method because most users simply add the code to their site’s header.php file. There’s nothing wrong with this method if you never plan to change your website theme. But if you change your theme, you’ll need to reinsert the code. But there’s a workaround to this problem.
Here are a couple of ways you can manually add the Adsense code to your site:
- Adding Code To Your Website’s Header
You need to copy/paste your Google Adsense code to every page you want to display ads.
In WordPress, instead of pasting your code separately to every page, you can add it to your site’s header.php file since WordPress loads this file on every page of your site. But instead of directly editing header.php, we recommend using a plugin called Header and Footer Scripts.
Here are the steps to add the Google Adsense code to your WordPress site’s header.
- Login to your WordPress site’s dashboard.
- Download and install the Header and Footer Scripts plugin.
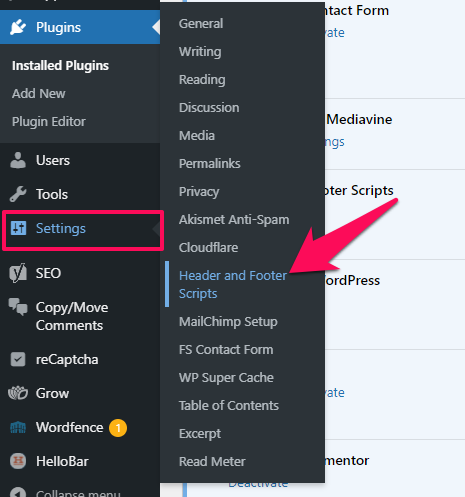
- In your WordPress dashboard, go to Settings → Header and Footer Scripts.
- Copy/paste your Adsense tracking code in the box titled Scripts in header.
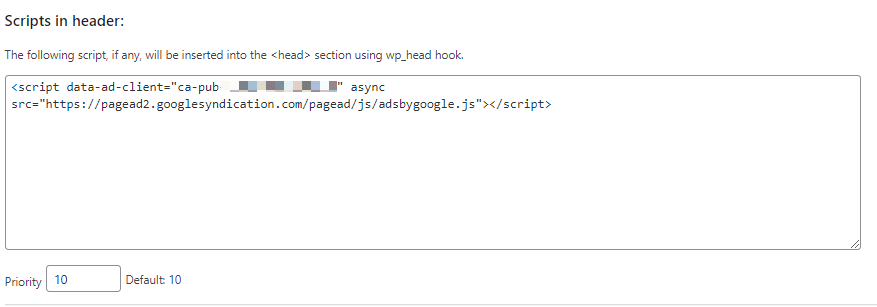
- Click Save Settings.
That’s it, you’ve successfully added the Google Adsense script to your WordPress site’s header.php file without tinkering with the code directly. Now, go back to your Adsense account and submit your site for review.
- Adding Code To A Widget
If your theme has a sidebar, you can add the Adsense code to your site’s pages using a custom widget.
Here’s how to do it.
- Log in to your WordPress site’s dashboard.
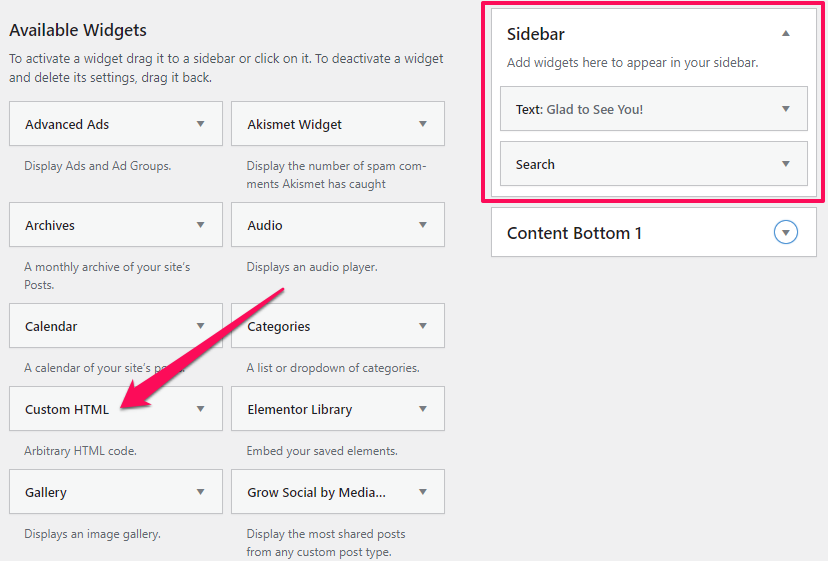
- Go to Appearance → Widgets.
- On the Widgets page, click on the Custom HTML widget and drag it to the Sidebar section.
- Paste your Adsense code in the Custom HTML text box.
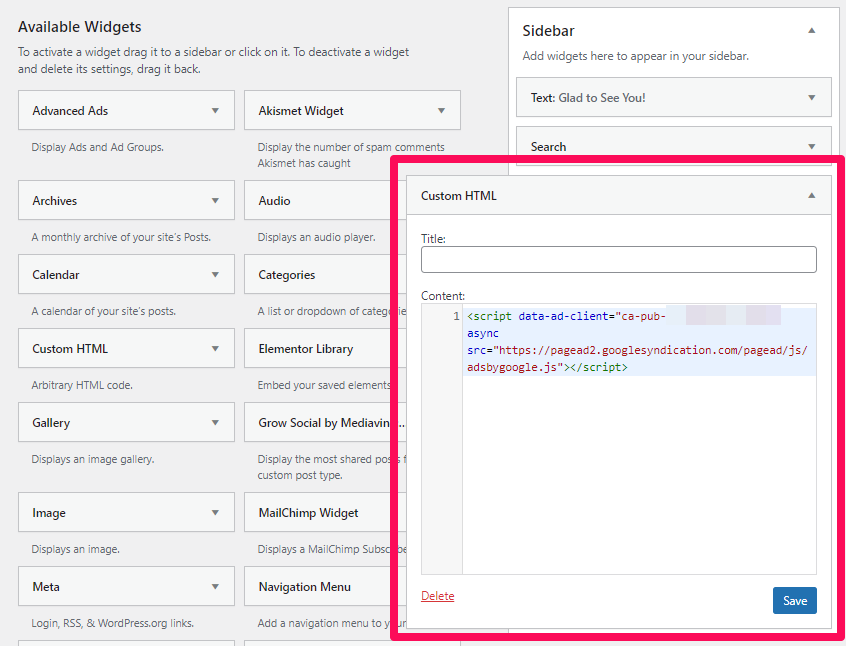
- Click Save.
- You’ve successfully added the Adsense code to your site’s sidebar.
- Go back to your Adsense account and submit your site for review.
Create Ad Units For Your WordPress Website
After Google Adsense approves your site, you can start displaying different types of ads in your content. Adsense gives you various options for creating ads and allows you to display them anywhere on your site.
Here’s the process for creating an ad for your WordPress site.
- Sign in to your Google Adsense account.
- On the homepage, click Ads
- In the Ads section, go to the By ad unit tab. Here, you’ll see three different ad types: Display ads, In-feed ads, In-article ads.
- Click on Display ads to open the ad creation page.
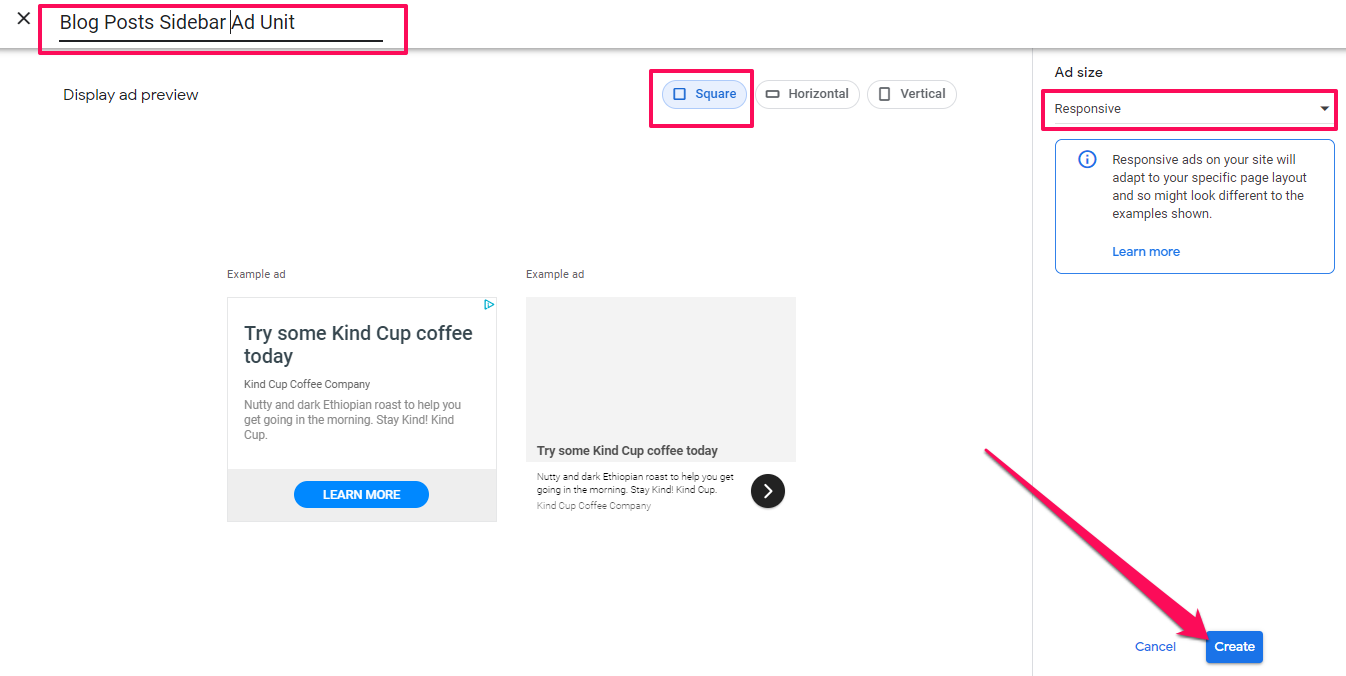
- Give your ad unit a name, choose the ad layout (square), and from the Ad size menu, choose Responsive if you want your ads to adapt according to the visitor’s device.
- Click Create.
- Copy the ad unit’s code by clicking the Copy code snippet.
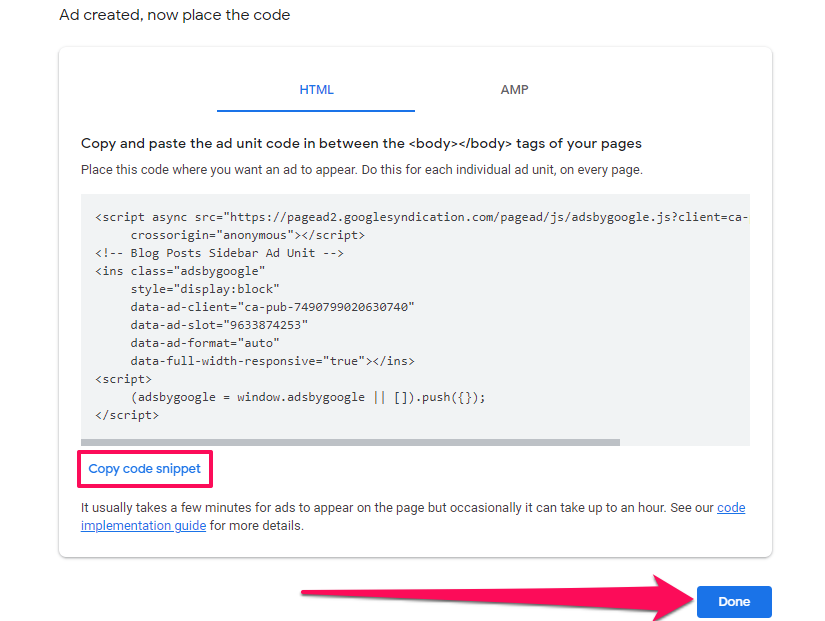
- Paste this code anywhere you want to display the ad on your site. For example, if you’re going to display this ad in your site’s sidebar, use a Custom HTML the same way we did when adding the Adsense tracking code in Step 3.
Once you copy and paste the code to your site, the ad might take a few minutes to appear. You can view your ad unit stats and edit its appearance from the Ads section in your Google Adsense account.
Conclusion
Creating WordPress website is so easy. Learn how to create wordpress website in 5 minutes from our guides. Adding Google AdSense to WordPress and displaying ads can help you make a new stream of money and could be your perfect side-hustle. Especially, if you have high traffic and your site isn’t designed to sell your own products or services.
To link WordPress to your Google AdSense account you have a few options to choose from:
- Use a plugin.
- Add the code manually to your theme’s header or footer.
Now you know everything you need to start cashing in some money from Google AdSense. We hope this blog helped you in gaining knowledge and hands-on experience on the same!

So basically, do we need to to upgrade to a Business plan? As a newbie, can you let us know how to add the Adsense code (for Google review – not the ad unit yet). Thank you.