How to Add HTTP Security Headers in WordPress? (4 Easy Ways)
Do you want to make your WordPress website to be highly secure? Then, you just need to add an extra security layer in the form of HTTP security headers. But, why? Choose from the various successful ways we listed on how to add HTTP security headers in WordPress.
On average, 73.2% of WordPress installations are vulnerable. And, around 30,000 new websites are hacked every day.
HTTP security headers help you block numerous malicious activities from impacting your website performance in this vulnerable situation. So, let’s understand in depth what HTTP security headers are and how to add them to your WordPress site.
What Are HTTP Security Headers?
HTTP security headers are secure protocols that prevent your website server from common security threats before they even occur.
Usually, when someone visits your website, your web server sends an HTTP header response to their browsers. This response informs web browsers about cache control, error codes, and other statuses.
Normally, a header response called HTTP 200 is issued once your website loads in the user’s browser. However, if things aren’t normal, the webserver will send different HTTP headers.
For instance, a 500 internal server error or not found 404 error code.
Here HTTP security headers can prevent all these common website threats like cross-site scripting, click-jacking, etc.
There are many HTTP security headers available that you can add to your site to protect it. Let’s check out some of the popular HTTP headers.
Popular HTTP Security Headers
- HTTP Strict Transport Security (HSTS) header intimate browsers that your site uses HTTP, and it requires a secure protocol to load.
- X-XSS Protection header helps to block cross-scripting errors from loading on your site.
- X-Frame-Options header protects your website against cross-domain iframes or click-jacking.
- X-Content-Type-Options tackles content mime-type sniffing.
- Content security header tells your browser to run resources from specific domains.
- Referrer header provides information about the previous web pages visited by the user.
How to Add HTTP Security Headers?
Ready to add HTTP security headers to your site? Then, luckily, you have plenty of different options to add HTTP security headers. So, let’s explore all the options in detail before selecting the most suitable one:
Using .htaccess file
If you have a good knowledge of the webserver level, you can easily add HTTP headers using the .htaccess file.
In this method, you have to edit the .htaccess file on your website. It is a server configuration file used by web server software like Apache or Nginx.
Here you have to first connect your website using an FTP client or the file manager app. Then, in your website’s root folder, you need to find the .htaccess file and edit it.
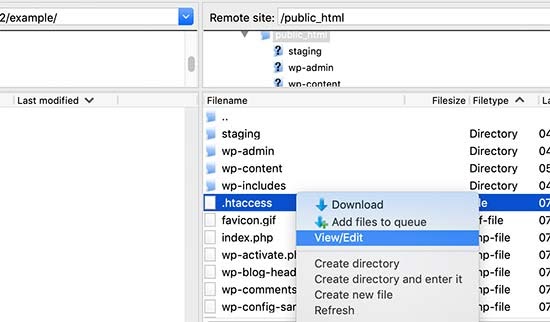
Now, a plain text editor will open on your screen. At the bottom, you can add code to the HTTP security headers on your WordPress website.
To add different HTTP headers (discussed above), you have to use different codes, such as:
HTTP Strict Transport Security (HSTS)
<!-- wp:paragraph -->
<p><VirtualHost 192.168.1.1:443></p>
<!-- /wp:paragraph -->
<!-- wp:paragraph -->
<p>Header always set Strict-Transport-Security “max-age=31536000; includeSubDomains”</p>
<!-- /wp:paragraph -->
<!-- wp:paragraph -->
<p></VirtualHost></p>
<!-- /wp:paragraph -->X-Frame-Options
<!-- wp:paragraph -->
<p><IfModule mod_headers.c></p>
<!-- /wp:paragraph -->
<!-- wp:paragraph -->
<p> Header always append X-Frame-Options SAMEORIGIN</p>
<!-- /wp:paragraph -->
<!-- wp:paragraph -->
<p></IfModule></p>
<!-- /wp:paragraph -->X-XSS-Protection
<!-- wp:paragraph -->
<p><IfModule mod_headers.c></p>
<!-- /wp:paragraph -->
<!-- wp:paragraph -->
<p> Header set X-XSS-Protection "1; mode=block"</p>
<!-- /wp:paragraph -->
<!-- wp:paragraph -->
<p></IfModule></p>
<!-- /wp:paragraph -->Referrer-Policy
<!-- wp:paragraph -->
<p><IfModule headers_module></p>
<!-- /wp:paragraph -->
<!-- wp:paragraph -->
<p> RequestHeader set X-HTTPS 1</p>
<!-- /wp:paragraph -->
<!-- wp:paragraph -->
<p> Header set Referrer-Policy "no-referrer-when-downgrade"</p>
<!-- /wp:paragraph -->
<!-- wp:paragraph -->
<p></IfModule></p>
<!-- /wp:paragraph -->Content Security Policy
Header set Content-Security-Policy default-src ‘none’; script-src ‘self’; connect-src ‘self’; img-src ‘self’; style-src ‘self’;
Using Sucuri
If coding isn’t your cup of tea, you can use WordPress security plugins like Sucuri to help you out. Sucuri helps you set HTTP security headers without writing any codes.
To execute this method, first sign up for a Sucuri account. It is a paid service with a Basic plan starting from $9.99/month. With Sucuri, you’ll get a server-level website firewall, CDN, malware protection, and more.
Once you sign up for Sucuri, install and activate the free plugin on your site. Simply follow this command line to install and run Sucuri —
Plugins > Add New > Sucuri > Install/Activate > Sucuri Security > Firewall (WAF) > enter Firewall API key.
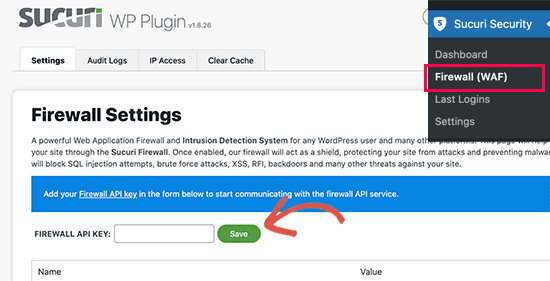
Now, you can find relevant information under your account that you can save as it is or edit. Then, move to your Sucuri account dashboard, click on the Settings menu and switch to the Security tab.
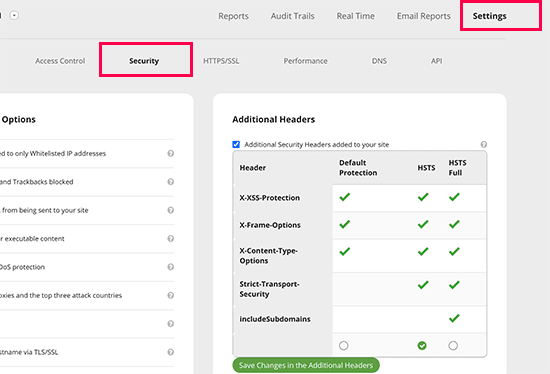
From here, you can choose three options — default protection, HSTS, and HSTS Full. You can check which HTTP security headers are available under which option.
Finally, click on the ‘Save changes in the additional headers’ button to save your changes. And, now Sucuri will add you selected HTTP security headers in WordPress.
Using Cloudflare
Is Sucuri expensive for you? No worries, you can use a basic free website firewall and CDN service — Cloudflare. Cloudflare’s free plan lacks advanced features, but you can buy advanced security features individually from Cloudflare.
The basic steps to install and activate Cloudflare are the same as the Sucuri (refer above). So, once Cloudflare is active on your site, go to the SSL/TLS page and then switch to the Edge Certificates tab.
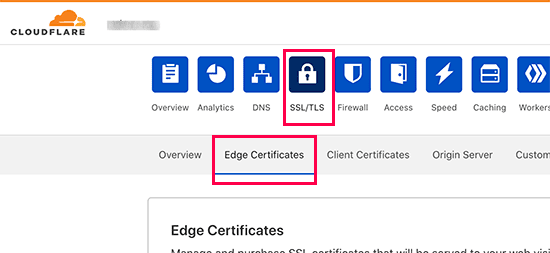
Scroll down to the HTTP Strict Transport Security (HSTS) section and click on the ‘Enable HSTS’ button.
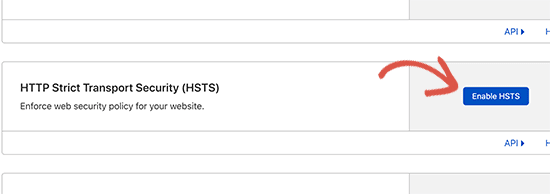
Now, a popup with instructions on what HTTP you must enable on your site will appear. Click on the Next button and add HTTP security headers options that will come on your screen.
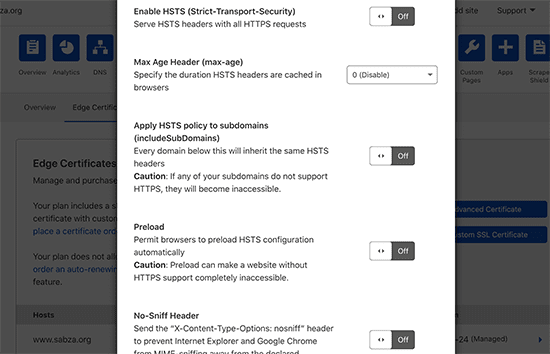
You can here enable HSTS, apply HSTS to subdomains, no-sniff header, and preload HSTS. Remember, this won’t add X-Frame-Options. Plus, Cloudflare doesn’t have a user interface to do that.
You can also do that by creating a script using the Workers feature. But, this isn’t a recommended method as it can cause unexpected issues for beginners.
Using Redirection
This is a bit less effective method as it relies on a WordPress plugin to modify the headers. But, it is the easiest method as you don’t have to go anywhere else besides your WordPress site.
For this, install and activate the Redirection plugin on your site. After the plugin is ready, go to the Tools > Redirection page and switch to the Site tab.
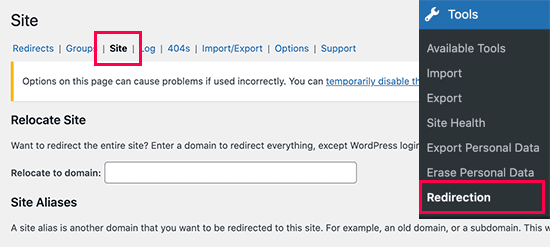
Move down to the bottom of the page to the HTTP Headers section and click on the Add Header button. Select the Add Security Presets option from the drop-down menu.
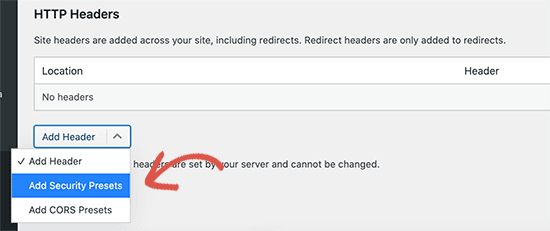
Now, the list of all the HTTP security headers preset will appear on your screen. You can make changes as per your needs and click on the Update button to save your changes.
Add Http Headers & Secure Your Site
That’s it, people. You can add HTTP security headers using any of the four methods and secure your WordPress site from loading errors. This is not the only way, check out our latest article on how to secure wordpress website to learn more.
However, once you have added HTTP security headers to your website, don’t forget to test them. You can use tools like free Security Headers to test your HTTP configuration in real-time. The tool can tell you which headers are sent by your site and which aren’t. If you don’t find essential headers on your site, you can easily activate them.
So, WordPress site owners, let’s start adding HTTP security headers to your site now. And, if you find this post helpful, don’t forget to share it with your friends on social media.

Leave a Reply