Ultimate Guide on How to Create XML Sitemap in WordPress
Do you know what an XML sitemap is and how can it help you and your website? Using a sitemap can bring positive changes and impact to your website. Creating a sitemap helps the search engine bots to crawl and lead your website in a much easier manner. This article will guide on how to create XML sitemap in WordPress and also explain the need for it.
What is an XML Sitemap?
An XML sitemap structures your website’s posts and pages in order, creating a hierarchy. Search engine crawlers then lead and understand the structure of your pages and how one content is leading to another. This help search engines to add your website to the Search Engine Results Page (SERPs).
When the bots crawl on your website without the help of a sitemap, then they use your website’s internal links to navigate. Thus, with the help of a sitemap, the process becomes easier as it has detailed information of your website’s pages, hierarchy and posts.
Why Do You Need an XML Sitemap?
With the help of an XML sitemap, you can lead the search engine bots or robots to crawl and lead your website’s foremost information in a much easier and organized manner.
If your website’s content is already visible on SERPs it’s fine. But, for a more fine and detailed bot crawling, using an XML sitemap is the best option. We highly advice you to add Robots.TXT file into WordPress too. This will tell search engine bots to crawl specific pages on your website and not all. It saves the bandwidth of the crawl bot.
Sitemaps are very important when you make or start a new blog or website. As your new website does not have any backlinks it makes it difficult for the search engines to find your content.
Many search engines such as Google and Bing enable new website owners to use a sitemap to find the content easily.
For the established website owners, sitemaps are equally important. As sitemaps allow you to highlight the parts of your website’s which are important and frequently updated. So that the search engines can guide the content accordingly.
What Does an XML Sitemap in WordPress Look Like?
To find an XML sitemap in WordPress you need to add a specific slug at the end of your website’s URL. A slug is basically the URL of your website which you add after your domain name. For example, in https://xyzshtg.com/how-to-create-xml-sitemap-in-wordpress, the part in bold is slug.
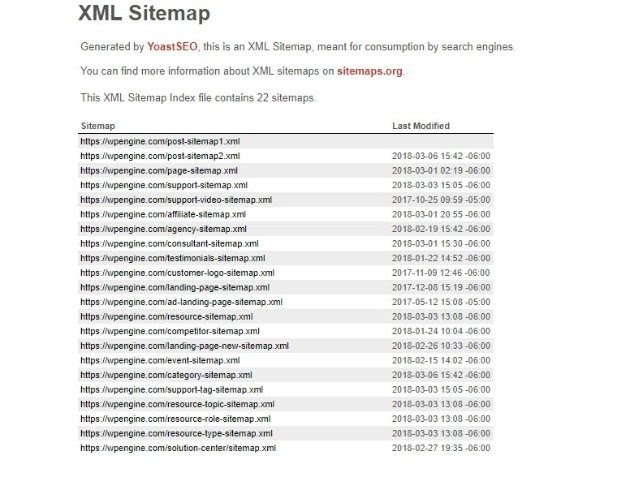
There are many popular slugs that can be used as page-sitemap.xml and sitemap_index.xml. etc.
How to Create an XML Sitemap in WordPress?
Now, there are two most common and popular methods to create an XML sitemap in your WordPress account.
- Creating XML sitemap in WordPress using Yoast SEO plugin
- Creating XML Sitemap in WordPress using Google XML Sitemap plugin
You can try and choose any from both. We are providing the detailed steps below for both the methods.
Method 1: Create XML Sitemap Using Yoast SEO Plugin
Using the Yoast SEO plugin is termed as the easiest method and also termed as the best WordPress SEO plugin. It also automates the updating of your sitemap.
Step 1: Install and Activate the Yoast SEO Plugin
- First, install the Yoast SEO plugin. Go to plugins section in the left sidebar of your WordPress dashboard. Search for Yoast and install it.
- After installing, for activation go to Yoast general settings for SEO and click on the general page and switch to the features tab.
- Then go down to the XML sitemap option and switch on the toggle.
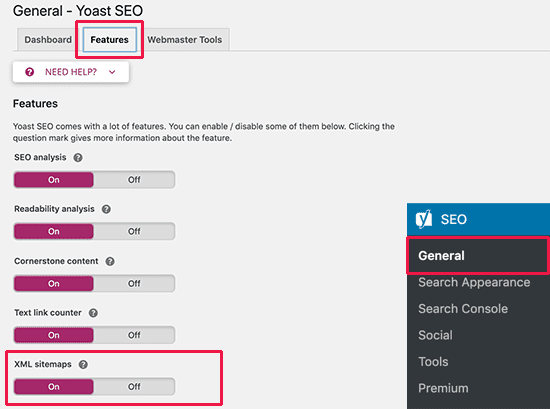
- Finally, click on the save changes button and store the changes.
Step 2: Verifying the Yoast SEO XML Sitemap
- Now, to verify you need to click on the question mark button present next to the XML sitemap option on the page.
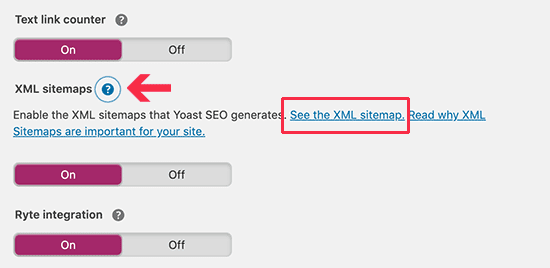
- Click on the “see the XML sitemap” link to see your live XML sitemap generated by the Yoast SEO.
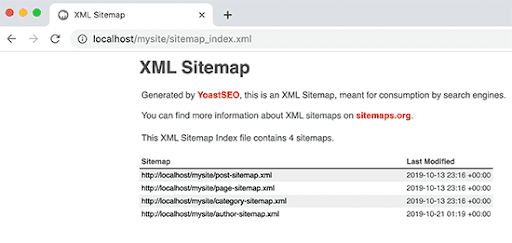
- Also, you can also find your XML sitemap by adding sitemap_index.xml at the end of your website’s address.
- There can be many xml sitemaps created for images, videos, and content on your website. But the sitemap_index.xml will be the parent sitemap.
Example,
Method 2: Create XML Sitemap Using Google XML Sitemaps Plugin
This is another effective method. With this method you can set the frequencies to update your sitemap and also tell search engines what pages to include and exclude.
Step 1: Installing and Activating Google XML Sitemaps Plugin
- First, you need to install the Google XML sitemaps plugin.
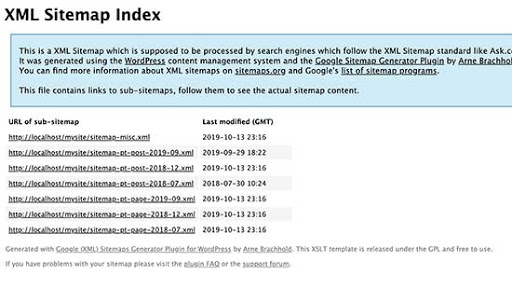
- After installing, for the activation you will notice that the plugin will automatically make an XML sitemap on your website.
- You will be able to see it by adding sitemap.xml to your website’s address.
Example:
Step 2: Reviewing the Plugin
- You need to go to the settings and to the XML sitemap page to construct the plugin.
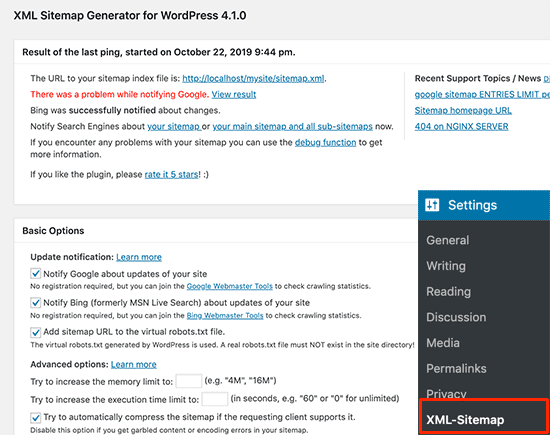
- Near the top of the page, you will be able to find the status information and it will also notify you if the plugin will be allowing the search engines to ping.
- Now, review the basic options as the default settings work according to the WordPress hosting environment. The review options can be notifying the search engines, increase the PHP memory limit etc.
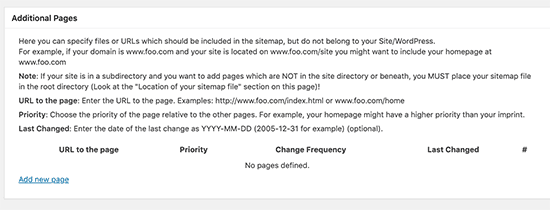
- Now, you will see the additional page section where you can manually add your pages to your XML sitemap.
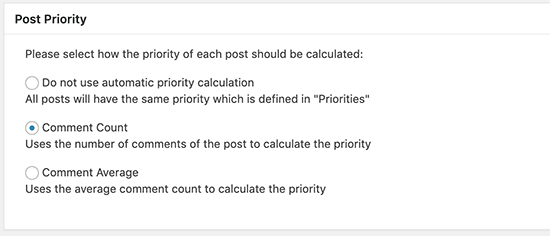
- Adjust the plugin, allot priority posts. By default it uses the number of comments to calculate the priority of the posts.
- The next two sections settings pages enable you to include and exclude the content from your WordPress sitemap.
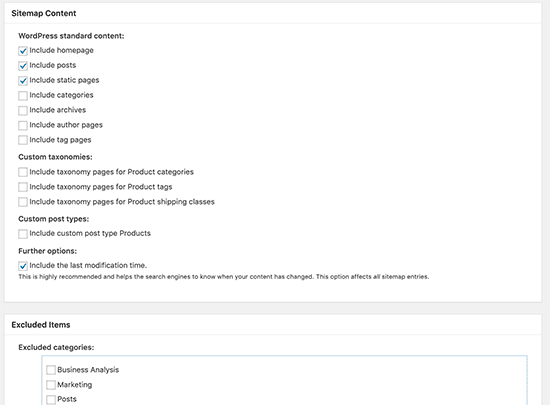
- Now, you will adjust the frequency and the priority of your content.
- After changing the values, the search engines may or may not choose to follow or ignore the tags based on their criteria.
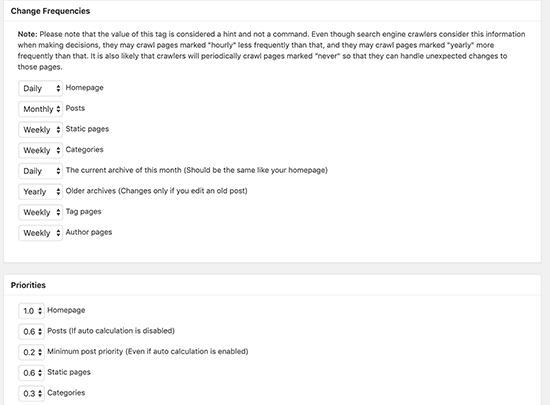
- Finally, click on the update option button, to save the changes.
Bottomline
Thus, if you want your website’s content to be found on the internet, create XML sitemaps. Tell search engines about the important pages on your website and stay focused on them to drive traffic.
These sitemaps are very beneficial as their main aim is to create a user-friendly website. They will also help your website to secure top ranking on the search engine pages which can lead to your website quickly.

Leave a Reply