How to Add Categories And Subcategories to Your Website?
Do you have multiple blog posts or products on your site? If yes, you need to know how to add categories and subcategories to your WordPress pages and blogs. This helps better organize your WordPress site for users. You see, categorizing is necessary for better SEO optimization of your content. It provides a proper structure and meaning to your site. Plus, it’s very easy to add parent and child categories in WordPress.
So, let’s not think anymore and start adding categories and subcategories to your WordPress content!
Why to Add Categories And Subcategories on WordPress?
WordPress lets you customize your pages and blogs in multiple ways. You can add or change an author on WordPress, change featured images anytime you want, and tweak your SEO game.
Similarly, you get options to change or add new categories and subcategories to your WordPress website.
Let’s take a small example to better understand why and when to add parent and child categories on your website.
Let’s say you have a fashion blog for both men and women. Here you might want to categorize your blogs by ‘Men’ and ‘Women’ so users can easily access relevant content.
For instance, if you have published an article about the best track pants for men. This post will be categorized under the ‘Men’ category.
But you also have articles on the best track pants for men under $100, $200, or $1,000. So now, to organize these blogs, you need subcategories for different price ranges like ‘Products under $100’. This will help your users to find the track pants right under their budget.
Also, adding subcategories help to reduce content duplication on your site. For example, you can uncheck the ‘Men’ category and publish your post under the ‘Products under $ 100’ subcategory.
This way, your post will appear under the subcategory but not under the main category. Later, your post will appear under archives of the subcategory only. This will make your site look semantic and also reduce its duplicate content burden.
How to Add Categories And Subcategories in WordPress?
You can easily insert new categories in WordPress while writing a post. Just follow these simple steps:
Add Categories
Open Categories Tab
You can add a category to your new or old post using the Categories tab. You can click on the Add New Post button or open any of your already published posts.
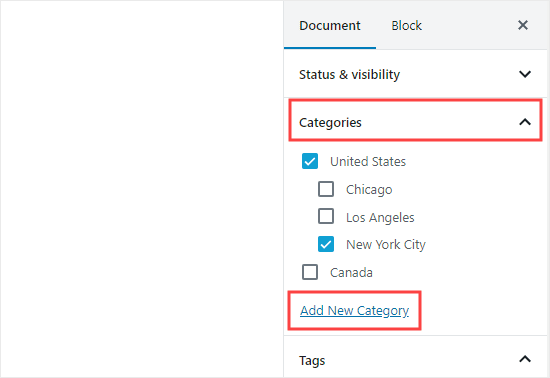
Once you are on the Block Editor screen, click on the gear icon to open the Options Menu. Next, expand the Categories section to view a list of all the categories present on your website.
Click on “Add New Category”
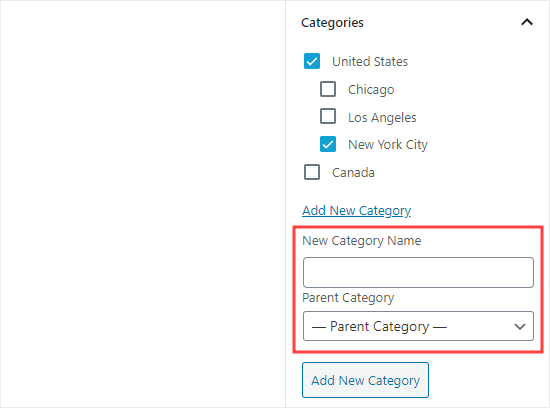
Below the list of existing categories, you will see the Add New Category link. Click on it, and now WordPress will open a new field to fill out.

Add Name & Create Category
Now, give a name to your category under the New Category Name field. If you are creating a parent category, you don’t need to make any changes under the Parent Category dropdown menu.

You just need to save your category, and WordPress will automatically assign it to your current post. You can uncheck the category if you wish.
Alternative Method
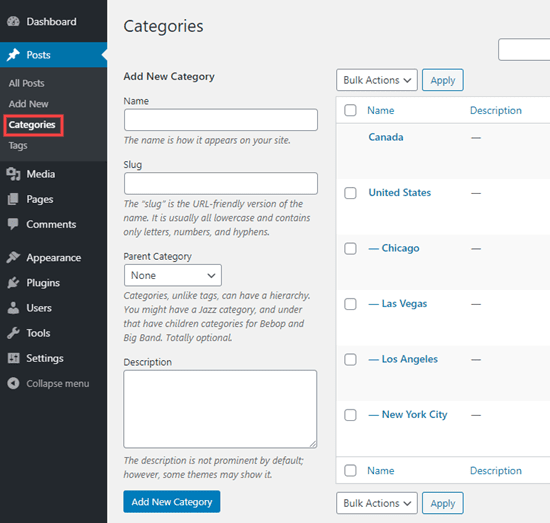
Apart from the Block Editor, there’s also an alternative option to add a new category on site. Simply go to Posts > Categories from your WordPress dashboard and create a new category.

This method is helpful if you want to create categories before uploading your content. With this method, you can also edit the slug, delete or rename a category.
How to Add Subcategories in WordPress?
The process of adding a subcategory is quite similar to how you have just added a parent category.
Open Categories Tab
Launch the Block Editor, open the Categories tab to expand the Categories section under the Post tab. You can also add a subcategory to your new or old posts.
Click on “Add New Category” Link
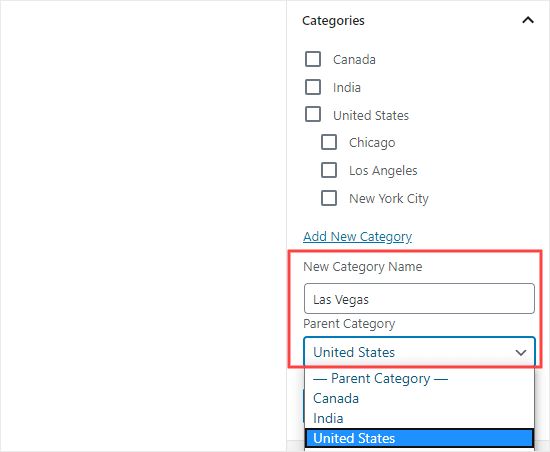
Once again, click on the Add New Category link below all your existing categories. This will also pop open two fields for you.
Select a Parent Category
This step is slightly different than adding a parent category. First, give a unique name to your subcategory, open the Parent Category dropdown menu and select the parent category for your subcategory. You just have to now save, and your subcategory will go live.

Alternative Method
The same Posts > Categories method also works to add subcategories. This method even lets you add subcategories to your subcategories. Under the Categories section, you can organize your entire content smoothly.
How Display Categories And Subcategories in WordPress?
After adding multiple categories and subcategories to your WordPress site, it is essential to properly display them for your users. For that, you can go to Appearances > Widgets to display categories on the sidebar or footer of your site.
By default, the widget will show all your categories in the alphabetical list. However, you can easily change it from the ‘Show hierarchy’ box in the widget if you don’t like it.
Also, you should nest child categories beneath parent categories for easy navigation.
You should also create a Custom Category Menu link using the WordPress navigation menu. This way, you can allow your users to easily navigate different categories and subcategories on your site. You can easily drag this menu to any part of your site.
Bottomline
Bloggers, we know you are busy producing fresh and SEO-driven content for your users. But in all your busyness, don’t forget to sort your content. That’s because if your readers can’t find relevant information quickly on your site, they will leave your page and increase your bounce rate.
So, to keep your readers engaged, arrange your content into proper categories and subcategories. Plus, folks, you have already learned how easy it is to add categories and subcategories to your new or already published posts.
So, let’s start organizing your content, but before that, don’t forget to like and share @reviewsnguides posts on your social media.

Leave a Reply