How to Add Schema Markup in WordPress & WooCommerce?
Have you ever searched for a product or service on Google and noticed that some search results have additional information, such as star ratings, pricing, and even images? This extra information is not just a coincidence, but a result of adding schema markup to a website. It is a powerful tool for improving the visibility and search engine optimization (SEO) of your website. It provides search engines with specific information about your content, making it easier for them to understand and present it to users in a more informative and visually appealing way. Learn below how to add schema markup for your WordPress & WooCommerce website.
If you have a WordPress website or an eCommerce store built with WooCommerce, adding schema markup can be a game-changer for your online presence. In this guide, we’ll walk you through the process of adding schema markup to your WordPress and WooCommerce sites, and show you how to leverage this powerful tool to boost your search engine rankings and attract more visitors to your site. Get ready to take your website to the next level with schema markup!
Understanding The Schema Markup
Schema.org is a collaborative, community activity with a mission to create, maintain, and promote schemas for structured data on the Internet, on web pages, in email messages, and beyond. It is a specific type of structured data that provides search engines with information about the content on your website. Essentially, it’s a way of adding context to your content so that search engines can understand it better and present it to users in a more informative and visually appealing way.
Benefits of Using Schema Markup on Your Website
- Help search engines better understand your WordPress and WooCommerce website’s content.
- Boost your brand presence online with a full Knowledge Graph featuring Google desktop searches.
- Appear in rich results like the coveted stars to increase your click-through rate.
- Make your website eligible for SERPs to get a better ranking.
- ECommerce products get a special Buy Now CTA right on the Google Search Results Page.
- Prepare your site for voice search via Alexa, Siri, and Google Assistant.
Additionally, schema markup can enhance the appearance of your search results. By including extra information such as star ratings, pricing, and images, your search results will stand out from the rest, making them more likely to be clicked on by users.
Types of Schema Markup
There are many types of schema markup that you can use on your website, depending on the type of content you have. Some common types are:
- Article: Used to mark up blog posts, news articles, and other similar content.
- Product: Used for eCommerce websites to mark up individual products and product listings.
- Local Business: Used to mark up information about a specific business, including its name, address, and phone number.
- Review: Used to mark up user reviews of a product, service, or business.
- Event: Used to mark up information about events, such as conferences, concerts, and festivals. This can include details such as the date, time, location, and ticket prices.
- Recipe: Used to mark up cooking and recipe-related content. This can include ingredients, cooking time, nutritional information, and ratings.
- Video: Used to mark up video content, including details such as the video’s title, description, duration, and upload date.
- FAQ: Used to mark up Frequently Asked Questions (FAQs) on your website. This can include questions & answers and can be especially useful for businesses and organizations that receive a lot of customer inquiries.
- Person: Used to mark up information about individuals, including their name, job title, and contact information.
- Organization: Used to mark up information about organizations, including their name, address, and contact information.
It’s important to choose the right schema markup that best fits your needs. By using schema markup effectively, you can help your website stand out in search engine results and attract more visitors to your site. Adding schema markup to your website may seem like a complicated process, but it doesn’t have to be. With the right tools and guidance, you can easily add schema markup to your WordPress and WooCommerce websites, and reap the benefits of improved search engine rankings and increased visibility.
Getting Started
Schema markup is an important part of optimizing your website for search engines, but it can be a daunting task to implement if you’re not familiar with coding. Thankfully, there are plugins available for WordPress and WooCommerce that make adding schema markup to your website much easier.
Check Your Website For Schema Markup
Before you start adding schema markup to your website, it’s important to check if there is any existing schema markup. You can do this by using Google’s structured data testing tool.
Schema Markup Testing Tool is a free tool provided by Google that allows you to check your website for structured data. This tool analyzes your website and shows you any existing markup, as well as any errors that need to be fixed. To use the tool, simply enter your website URL or the HTML code for a specific page, and click “Run Test.” The tool will then analyze your website and show you any structured data it finds, including schema markup. If the tool finds existing markup, it’s important to review it and make sure it’s correct. If there are errors or the markup is incomplete, you’ll need to fix it before adding any new markup.
It’s also worth noting that if you’re using a plugin that already adds schema markup to your website, you may not need to add any additional markup. Make sure to check your plugin settings and review the structured data using the testing tool before adding any new schema markup.
Choose The Method to Add Schema Markup
When it comes to adding schema markup to your website, there are two main methods to choose from: using a plugin or adding the markup manually. Using a plugin is the easiest and most common method, as there are several plugins available for WordPress and WooCommerce that can help you add schema markup to your website. Plugins like Schema Pro, Yoast SEO, and WP SEO Structured Data Schema make it simple to add schema markup to different parts of your website and often require little to no coding knowledge. Check out some amazing available schema pro discount codes to get up to 30% OFF on the plugin.
On the other hand, adding schema markup manually requires more technical knowledge and can be more time-consuming. However, it also gives you more control over the code and allows you to customize the markup to fit your specific needs. This method is best for those who are comfortable with coding and want more control over the schema markup on their website.
Ultimately, whether you choose to use a plugin or add schema markup manually depends on your comfort level with coding and your specific needs. If you’re new to schema or don’t have much technical knowledge, using a plugin is likely the best option. However, if you’re comfortable with coding and want more control over the schema markup on your website, adding it manually may be a better choice.
Install Using Plugin
Using a plugin is the easiest and most common way to add schema markup to your website. There are several plugins available for WordPress and WooCommerce that can help you add schema markup to your website, including Schema Pro, Yoast SEO, and WP SEO Structured Data Schema.
To use a plugin, simply install and activate it on your website. Then, you can use the plugin’s settings to add schema markup to different parts of your website, such as individual pages and posts, product pages, and category archives.
One of the advantages of using a plugin is that it often requires little to no coding knowledge. This means that even if you’re not familiar with HTML, you can still add schema markup to your website.
Install Without Using Plugin
While using a plugin is the easiest way to add schema markup, it’s not the only way. If you’re comfortable with coding and have some experience with HTML, you can also add schema markup manually to your website. To install, you’ll need to add the appropriate schema markup code to the HTML of your website. This can be done using a text editor or by editing the code directly in WordPress or WooCommerce.
One advantage of adding schema markup manually is that you have more control over the code and can customize it to fit your specific needs. However, this method requires more technical knowledge and can be more time-consuming than using a plugin.
If you want to add schema markup to WordPress or WooCommerce without a plugin, you can go to Schema.org to find suitable markups to add to your content. Mainly search engines use 3 different code languages:
- Microdata
- RDFa
- JSON LD
- Identify the pages or posts to which you want to add schema markup to. You can add schema to different types of pages, including product pages, blog posts, and landing pages.
- Determine which type of schema markup you want to add to your pages. You can find a list of schema markup types on schema.org. Some popular types of schema markup include “Article”, “Product”, “Review”, “FAQ”, and “ContactPage”.
- Create a new HTML file for each page or post if you want to add schema markup to. You can do this using a plain text editor or an HTML editor like Dreamweaver.
- Add the appropriate schema markup code to each HTML file. The schema markup code should be placed in the head section of the HTML file, between the tags.
- Validate your schema markup using a validation tool like Google’s Structured Data Testing Tool or the Rich Results Test Tool. This will help you identify any errors or issues with your schema markup.
- Once you’ve validated your schema markup, upload the HTML files to your WordPress or WooCommerce website. You can do this using an FTP client like FileZilla or by using the file manager in your website’s control panel.
- Finally, test your schema markup to make sure it’s working correctly. You can do this by using a search engine like Google or Bing to search for your website and look for the schema markup in the search results.
How to Add Schema Markup in WordPress?
Using a schema plugin is one of the easiest ways to add schema markup to your WordPress website. There are many plugins available that can help you add schema markup, but one popular option is the “AIOSEO” tool. Here’s a step-by-step guide on how to use this tool to add schema markup to your WordPress site:
AIOSEO is another easy WordPress plugin to add schema markup. It is a powerful SEO optimization plugin that can add schema markup to your WordPress or WooCommerce site.
Go to Plugins > Add New to install and activate the AIOSEO plugin on your WordPress dashboard. After that, the plugin’s setup wizard will guide you through setting it up.
Once the plugin is set up, it will automatically add the accurate schema across your website. However, I’ll also show how to tweak all the markup settings manually on the AIOSEO.
Add Schema Markup Across The Website
First, let’s learn how to tell search engines some basic information about your website. Navigate to All in One SEO > Search Appearance page > Scroll down to the Knowledge Graph section.
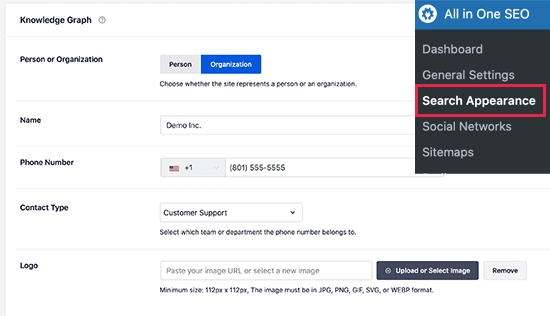
You need to now select whether your website is a person or an organization. For an organization, you can add information like name, contact number, logo, etc.
On the flip side, if your website is a person, select the user account from the dropdown list. If you select an existing WordPress user, edit the selected user’s profile from the Users > Profile page.
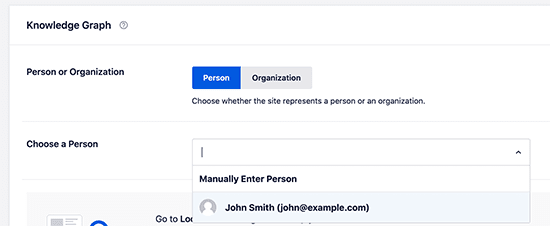
You can also add the user’s Twitter and Facebook profile links.
Finally, set up the user’s profile photo as a Gravatar. Hit the Update Profile button to save the changes.
Add Default Schema Markup
You can select default settings to generate schema markup for all your pages and posts. This will make sure schema markup is set up properly for all product pages, blog posts, or other content types.
Go to the All in One SEO > Search Appearance > Content Types tab. Here you can see all your post types listed.
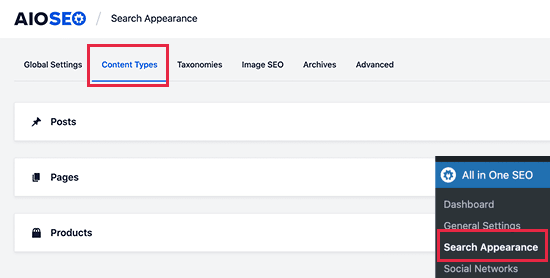
For every post type, a Schema Markup tab is available. Switching to it will help you select the default schema type for the particular post type.
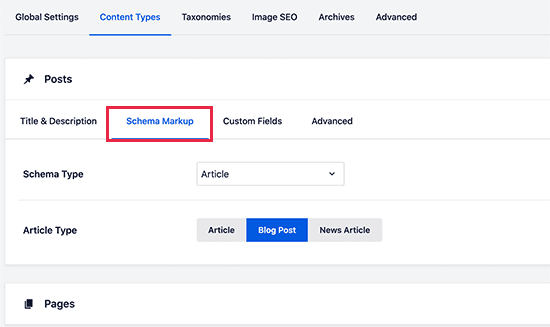
You can review the settings and change them if required. For example, if you have a news website, you can change the Article Type to News Article schema.
How to Change Schema Markup for Each Post & Page?
Once default schema settings are set up, there is no need to change your schema markup for your content. However, there are a few scenarios where you want to adjust it for an individual post or page.
For instance, if you are using custom WordPress landing pages, you should tell this to search engines. To do so, edit the post or page that you want to modify. Then, scroll down to the AIOSEO Settings box and switch to the Schema tab.
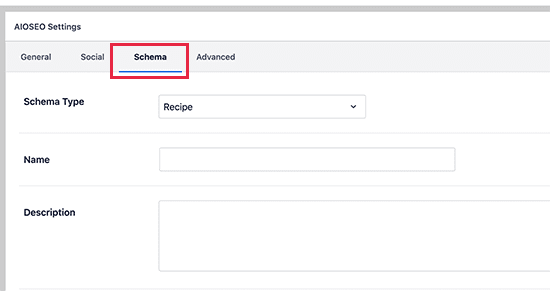
There are different types of schema markups available to select from. For example, if you select a Product schema type, you can add price, brand, etc.
Add Schema to Taxonomies
Using AIOSEO, you can also add schemas to your taxonomies. Go to AIOSEO > Search Appearance > Taxonomies tab. You will see schema type for each taxonomy for the content on your site, like tags, categories, etc. Click on the Schema Markup tab to configure the schema for a particular taxonomy.
Troubleshooting Common Issues
While the “All in One SEO” tool makes it easy to add schema markup to your WordPress site, there are some common issues that you may encounter when using this tool. One common issue is that the schema markup may not be applied correctly to certain types of content. In some cases, you may need to manually add schema markup to certain pages or posts using custom code.
Another issue you may encounter is that the schema markup may not be validated correctly by search engines. This can happen if the schema markup is missing key information or contains errors. To avoid this, make sure to test your schema markup using a validation tool before publishing it on your website.
How to Add Schema Markup for WooCommerce?
Adding schema markup to product pages in WooCommerce can help improve the visibility of your products in search engine results pages (SERPs) and increase click-through rates. There are different ways to add schema markup to your WooCommerce product pages. Here’s a step-by-step guide on how to add schema markup to your WooCommerce product pages using AIOSEO:
The AIOSEO plugin also works with WooCommerce websites. In addition, it can manage general SEO settings and select product schema markup for all your products.
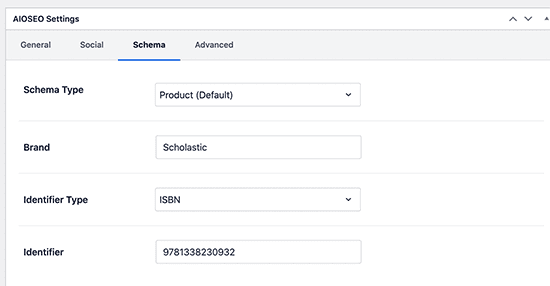
The plugin can fetch metadata from your WooCommerce product listing, including price, reviews, and more.
Troubleshooting Common Issues
While using a plugin like “All in One SEO” can make it easy to add schema markup to your WooCommerce product pages, there are some common issues that you may encounter. One common issue is that the schema markup may not be applied correctly to certain types of products. In some cases, you may need to manually add schema markup to certain products using custom code.
Adding schema markup to your WooCommerce product pages can be a powerful way to improve your search engine rankings and attract more visitors to your online store. By using a plugin like “All in One SEO” and following these step-by-step instructions, you can easily add schema markup to your WooCommerce product pages and reap the benefits of improved visibility and search engine optimization.
Test Your Schema Markup
Testing your schema markup is an important step in the process of adding schema markup to your WordPress or WooCommerce website. This helps you ensure that the schema markup is valid, correctly implemented, and working as intended. It helps you identify any errors or issues with your schema markup before it goes live on your website. This can help you avoid potential problems such as incorrect or incomplete schema markup, which can negatively affect your search engine rankings and user experience.
Testing your schema markup also helps you ensure that it is compatible with different search engines and devices. This is important because search engines like Google and Bing use schema markup to understand the content of your website, and if the schema markup is not valid or compatible, it can impact how your website appears in search results.
Free Tools Available to Test Schema Markup
- Schema Markup Testing Tool: This tool is designed to help you test the schema markup on your website and identify any errors or issues. You can enter the URL of your website or upload an HTML file to test your schema markup.
- Rich Results Test Tool: This tool, also provided by Google, allows you to test how your website’s structured data will appear in search results. It helps you identify any errors or issues that could prevent your website from displaying rich results.
- Schema Markup Validator: This is a free tool that helps you validate your schema markup for different types of schema, including Product, Review, and Recipe. You can simply copy and paste your schema markup into the tool to validate it.
How to Use The Tools to Test Schema Markup
- Copy the schema markup code from your website.
- Navigate to the testing tool you want to use.
- Paste the schema markup code into the testing tool.
- Click the “Test” or “Validate” button.
- Review the results to see if there are any errors or issues with your schema markup.
- Make any necessary changes to your schema markup and retest it until it is valid and error-free.
FAQs
What is the purpose of adding schema markup to my website?
Adding schema markup to your website helps search engines better understand the content on your website, which can improve your website’s visibility in search results and increase traffic to your website.
Do I need a plugin to add schema markup to my website?
No, you don’t necessarily need a plugin to add schema markup to your website. You can add schema markup manually by editing your website’s HTML code. However, using a plugin can make the process much easier and more efficient.
Can I add schema markup to specific pages or products on my website?
Yes, you can add schema markup to specific pages or products on your website. This can help you provide more detailed information about those pages or products, which can improve their visibility in search results.
What happens if I add incorrect or incomplete schema markup to my website?
Adding incorrect or incomplete schema markup to your website can negatively affect your search engine rankings and user experience. It’s important to test your schema markup to ensure it’s valid and working as intended.
Will adding schema markup improve my website’s ranking in search results?
Adding schema markup alone may not necessarily improve your website’s ranking in search results. However, it can help search engines better understand the content on your website, which can improve the chances of your website appearing in relevant search results.
Do I need to update my schema markup regularly?
It’s a good idea to regularly review and update your schema markup to ensure it’s up-to-date and accurate. This can help improve the visibility of your website in search results and provide a better user experience for your visitors.
What is schema markup for a WordPress website?
Schema markup is a structured data vocabulary that provides context to search engines about the content on a website. It helps search engines understand the meaning behind the content on a website, which can improve the website’s visibility in search results and provide a better user experience.
How do I add an event schema in WordPress?
To add an event schema in WordPress, you can use a plugin such as the All in One Schema Rich Snippets plugin. Once the plugin is installed and activated, navigate to the post or page where you want to add the event schema. Scroll down to the bottom of the post editor and locate the “Schema” section. From there, select “Event” from the dropdown menu and fill in the required information, such as the event name, date, and location. Once you have added the information, click the “Save Changes” button and test the schema markup using a free tool such as Google’s Structured Data Testing Tool.
What are some common issues that I may encounter when adding schema markup to my website?
Common issues when adding schema markup to your website include invalid schema markup, duplicate schema markup, and conflicts with other plugins or themes. You can troubleshoot these issues by using testing tools and consulting online resources.
Conclusion
Adding schema markup to your website can improve your search engine rankings, increase visibility in search results, and provide a better user experience for your visitors. Schema markup helps search engines understand the content of your website, which can result in increased visibility in search results and more organic traffic.
If you’re looking for the best WordPress schema markup plugins, there are several options available, including AIOSEO, Yoast SEO, and Schema Pro. These plugins offer a variety of features and benefits, so you should choose one based on your specific needs and preferences. In this guide, we’ve covered the basics of schema markup and how to add it to your website using a plugin: AIOSEO. We’ve also discussed how to add schema markup to your WooCommerce product pages and provided troubleshooting tips for common issues.
Whether you’re a blogger, business owner, or eCommerce store owner, implementing schema markup on your website can have a significant impact on your online presence. So don’t wait any longer – start adding schema markup to your WordPress or WooCommerce website today and take your SEO to the next level!

Leave a Reply