How to Build a Membership Website on WordPress? (Detailed Guide)
Since the dawn of the COVID era, people have been turning towards making money online. Setting up small-scale e-commerce websites, building membership websites on WordPress, and creating and selling online content are a few successful business models. Check out our detailed guide on how to build a membership website on WordPress.
Do you also want to start something of your own? Do you want to make $25K to $50K a month from your WordPress site?
Then, we bring you one of the most trending businesses online. Building membership websites and selling premium content. For this, you have to learn how to create a membership site on WordPress. That’s because when you sell premium content on your website, you have a better chance of monetizing your site with unique and valuable information.
So, let’s get started.
What Is a Membership Website?
A membership website allows users to pay for premium content such as courses, videos, reports, and newsletters.
Nowadays, three common and populars types of membership websites available online are:
- Learning Management Systems: Individuals and businesses build online educational sites with membership support. It is projected that the LMS market will grow to $28.1 billion by 2025. There are various plugins that will help you create LMS website. One of the many plugins that can be used to create LMS website is LearnDash. Some of the features that LearnDash offers are; sending email notifications to learners, helping you create interactive courses with advanced quizzes, custom messages, question banks, etc. Check out our detailed guide on how to set up LearDash membership on WordPress.
- Association Memberships: These are small organizations that serve the interest of a specific profession or trade. As per Marketing General, 57% of people are interested to learn from their peers.
- Subscription Memberships: It is the best way to make recurring income online when users subscribe to your products or services. Data showed that 53% of software revenue would be generated from subscription models by 2022.
Benefits of Creating WordPress Membership Site
- Better Income – Membership websites provide recurring income. You can generate a steady income every month by registering visitors daily.
- One Time Work – Once you have created a course, it can become your passive source of income. Without posting new content daily, you can constantly make money for a lifetime—unless you want to upgrade your content.
- Establish Authority – When users see that you have restricted content on your site, it will automatically send messages that your premium content provides a unique value, which can’t be found anywhere else.
- Build Email List – While users register with their email IDs, you can use the list for further marketing of your content and running campaigns. To make your email campaigns successful, it is important to use tools that can help you run successful campaigns. check out our guide on the best email marketing tools available in the market. This way, you can interact or share new premium content with people who are already familiar with your site. You can seamlessly boost your email marketing efforts with this practice.
How To Build a Membership Website on WordPress?
Today, the membership site model is gaining huge momentum due to its good success rate. There are a plethora of successful membership websites such as CopyBlogger, Blue Apron, Study Gateway, Lynda.com, and FabFitFun available online..
The process to build a membership website on wordpress is incredibly simple. Once you get a domain name, web hosting account and set up your WordPress dashboard, you need to follow through this path:
Select a WordPress Membership Plugin
WordPress has multiple free and paid membership plugins. You need to compare different plugins based on two things—
- Type of WordPress membership site, and
- Features you want to add
Some of the common WordPress membership plugins and their operations:
- WPForms for simple user login and registration form-based websites.
- To sell subscriptions, content, or downloads, MemberPress is the best plugin with multiple advanced features like accept payment, level-based access, etc.
- When you want to develop an LMS site, LearnDash fits in the scenario.
- MemberFul is an easy, fast, and modern membership plugin for bloggers and writers, already used by creative minds like Leo Babauta and Paul Jarvis.
- To sell research studies and academic content, SubHub got the right features.
Once you have picked your WordPress membership plugin, you have to download it on your WordPress dashboard (like any other WordPress plugin). For this tutorial, I am using MemberPress, so once I downloaded MemberPress, I opened MemberPress > Options and configured settings.
Set Up Payment Method
To accept payments, you have to first set up a payment gateway on your membership site. You can move to the ‘Payments’ tab and select your payment gateway. Choose from online payment gateways, such as PayPal, Stripe, Razorpay, Cashfree, CCAvenue, and more.
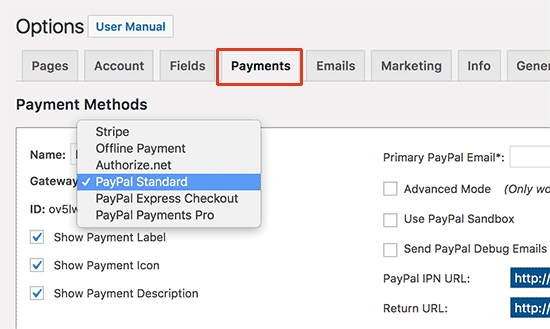
MemberPress supports PayPal (Standard, Express, and Pro), Stripe, and Authorize.net out of the box. According to your preference, you can add multiple payment methods and save your settings.
Define Your Membership Levels
Next, you can define different membership levels on your site. For example, Grammarly offers two membership levels—a free basic version and a full paid version.
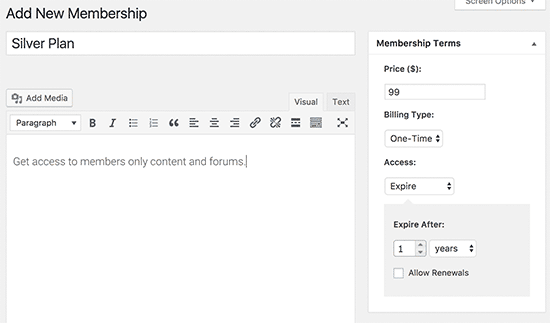
To create your membership level, you need to open the MemberPress plugin > Memberships page and click on the ‘Add New’ button.
On the next page, you have to provide the title and plan details in the post editor, such as expiration date, price, features, etc. You need to define a meta box like you do for blog posts and publish your membership plan.
However, if you have multiple membership plans, you need to restrict content for different membership plans on your site. On the MemberPress Rules page, click on the Add New Button to add multiple conditions and associate them to a membership plan.
For instance, if you have three membership plans—Bronze, Silver, and Gold, content that matches a particular category should be available to members with a particular membership—Bronze members will only get bronze content and silver and gold ones accordingly.
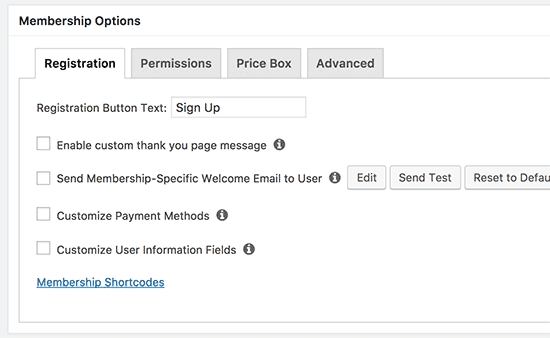
Using the drip and expiration options, you can release content to users based on their membership level instead of all at once.
Create Membership Content
Without premium content, you cannot make your membership website grow. MemberPress allows users to smoothly publish content using Rules.
Once you have restricted users as per content, you add the ‘MemberPress Unauthorized Access’ meta box to select what logged out users (non-members) will preview when they reach this content.
You can use the default settings or show a login form, experts, or a custom message. Once you have created your content, edit and publish it in your WordPress Content Builder. You can also learn about the MemberPress classroom mode to create lecture and lesson pages. Those are content as well.
Powerful Membership Content Ideas
To increase your membership site’s revenue, you have to create exclusive and engaging content like:
- Interviews with prominent personalities.
- Mega list of useful resources.
- Long blogs, tutorials, reviews, and reports.
- Daily news articles and tips.
- Downloadable infographics to encourage downloads.
- E-books are magnetic to market content and build an email list.
- Video content makes learning the process a lot more interesting and drives traffic to your membership project.
- Running an email newsletter is a great way to stay in touch with your members.
- Host random quizzes and surveys.
- Live webinars are a good method to receive instant feedback from your members.
Design a Price Page
When users want to sign up for your membership plan, this page will appear. On this page, the price and features available in each plan must be defined properly. If anyone clicks on a restricted area in your site, they’ll also be redirected to this page.
Go to MemberPress > Groups Page and Add New button and add the group plan title that the user will see. Next, scroll down to the ‘Group options’ meta box and add the membership plans that you want to show on the page.
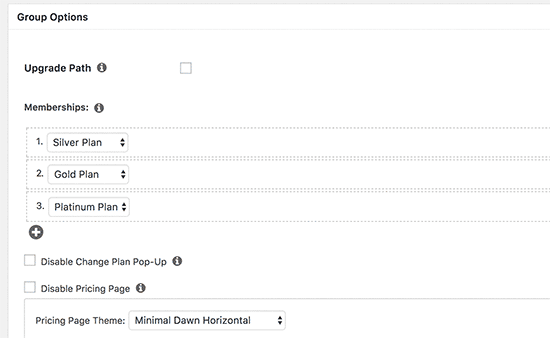
You can also pick a theme for the pricing table as MemberPress comes with numerous ready-made templates. Once you are satisfied, publish it.
How to Redirect Users to Pricing Page?
To redirect unauthorized users to your pricing page, you need to open MemberPress > Groups Page and copy the URL to the group (you have created previously).
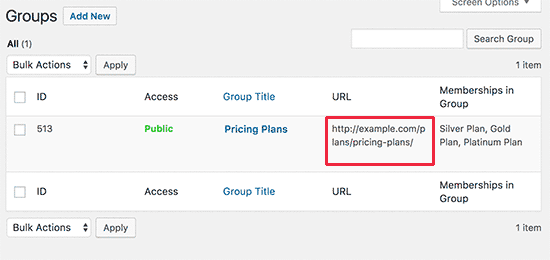
Then, go to MemberPress > Options page and move to the ‘Unauthorized Access’ section. Check the box next to the ‘Redirect unauthorized visitors to a specific URL’ option and paste a copied link. And, click on the ‘Update Option’ button to save your settings.
Add User Login & Sign Up Forms
The final step is to allow your users to easily find a membership page on your site. For that, you need to add a user login form so that registered users can sign up for their accounts.
Navigate to Appearance > Widgets > Insert MemberPress Login Widget in the sidebar.
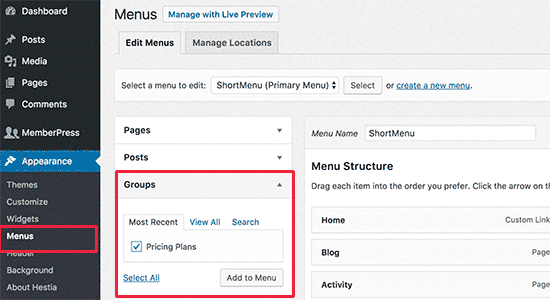
Now, add a pricing page link to the navigation menu so that new users can select a plan and register. To do that, go to Appearance > Menu page > Click on the Groups tab to expand it > Check the box next to the pricing page and click on the Add to Menu button. Now, your pricing page will be in the right column, which you can rearrange anywhere with an easy drag and drop menu.
Build Your Membership Website
Your membership site is now all set up, but you can further create email templates to send a welcome email to your new registers. Additionally, you have plenty of other options to improve your site’s functionality with powerful WordPress plugins.
I hope that you enjoyed my Membership Site Guide 101 and super ready to start your site. Once you created your website, don’t forget to share it with me. I’ll be waiting!

Leave a Reply