How to Build Online Store in Less Than 1 Hour? (Best Guide)
To build an online e-commerce store is not all about a great idea or product. Your e-commerce development platform and theme matter too. It can help you create an e-commerce website with a better UX to sell more products.
There are around 12-24 billion eCommerce websites available on the web. That means you can’t sell your unique products online without a stunning and high-performing online store.
Fortunately, it is not hard to create an e-commerce store today. Thanks to WordPress and WooCommerce and readymade themes like Astra Pro, setting up an e-commerce store within an hour is possible.
So, let’s see how to start an online store with WordPress within an hour.
Prerequisites to Build Online eCommerce Store
WooCommerce is a free platform for creating a website to sell products online. It is a WordPress extension that allows users to create an e-commerce website from scratch.
It is a self-sufficient extension. But, you need to get the following things before setting up your WooCommerce website:
Domain Name
It is your website’s name. It is the address that users will type in browsers to land on your website, like www.amazon.com. Ensure to select relevant, unique, and keyword-focused website domain names.
Web Hosting
Web hosting servers store your website data and make it accessible worldwide. Your website’s speed and security depend upon your web hosting service provider.
Thus, check all the available service providers and hosting types before selecting the best one. For example, Bluehost is an official WordPress hosting partner. But, you can also choose any other hosting partner like GoDaddy, Hostinger, etc.
WordPress Theme
A WordPress theme contains files that define the overall appearance of the online store. The theme files contain graphics, style sheets, and codes. Themes can control your website layout, user experience, and speed.
Thus, select the best e-commerce theme to display your products and services attractively.
How to Build Online Store in Less Than an Hour?
After getting the domain name and hosting, you can start an e-commerce website following these steps:
Install WordPress
Most web hosting services allow you to install WordPress with a click like Bluehost. But, if your hosting doesn’t offer WordPress Installation, you can install WordPress from cPanel.
cPanel is a software that provides a web-based interface to manage your hosting account. In addition, it contains several helpful utilities, including auto-installer scripts to install WordPress.
Hosting providers decide which auto-installer scripts they want to use. In general, Softaculous, QuickInstall, and Fantastico are the popular ones.
We will show you how to install WordPress using the Softaculous script. It is a popular auto-installer script. Companies like SiteGround and InMotion Hosting use Softaculous in the control panel.
Log in to your cPanel account and look for Softaculous under the Auto Installers section.
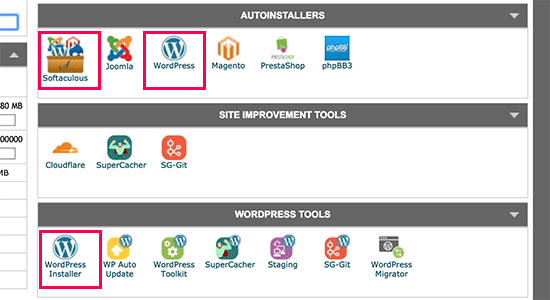
After that, click on the Softaculous auto-installer for WordPress > Install tab.
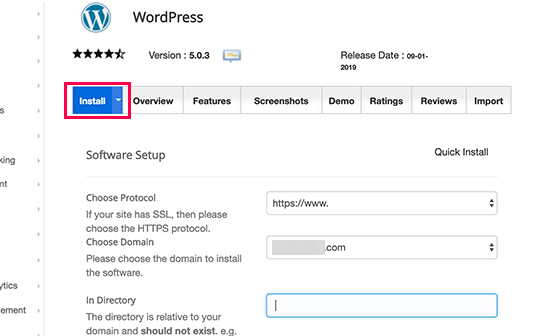
Softaculous will next ask you where you want to install WordPress. You need to select http:// or http://www. as protocol.
Now, select the domain name to install WordPress. Most users install WordPress in their domain’s root directory, like example.com. In that case, ensure that the ‘In Directory’ field is blank.
Under this section, add relevant information in the following fields:
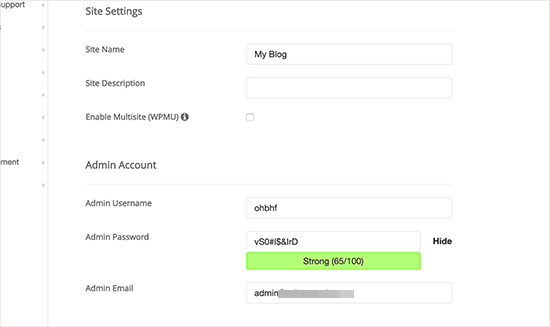
- WordPress title and description
- Email address
- User name
- Password
The rest of the fields are optional so you can avoid them now. Just click on the install now button and wait a few minutes to complete the process.
Install WordPress Theme
There are millions of online stores selling the same products out there. Your professional and stunning WordPress theme can set your e-commerce store apart. It can help to capture your brand message.
Today, there are several WordPress templates and themes available for e-commerce sites. You can always customize your website design. But, we will recommend you get ready to use WordPress themes. The reason?
- A pre-built WordPress theme is faster and cheaper.
- These themes are designed for specific e-commerce store needs.
- Users with no or minimal coding knowledge can work around pre-built WordPress themes.
- Most themes give you various customization options like colors, fonts, layouts, social icons, and other variables.
- Theme developers often update their themes.
There are several WordPress themes to start an online store available in the market. But, you must select a theme from reputable developers.
That is because some developers use poor codes and heavy graphics to make the website look stunning. But, it can increase website size and make it vulnerable on the web.
To build an e-commerce website, Astra is the best WordPress theme. It is a fast, lightweight, and stunning WordPress theme. Astra can integrate with popular eCommerce plugins and is easy to navigate.
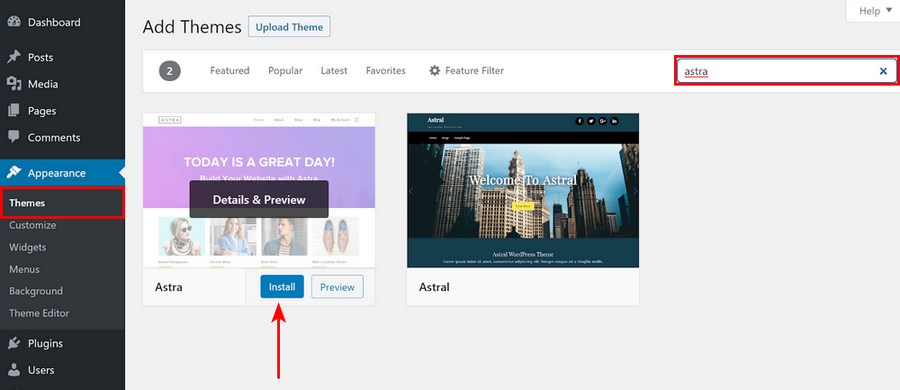
It is a simple and customizable e-commerce theme, making it perfect for new online store owners. The best part is that this theme is available for free.
Besides an awesome free version, you can move to the Pro plan for only $49.
There are several ready-to-start Astra templates available for e-commerce owners. But, the most popular ones are:
To activate your Astra theme, you must first deactivate the Storefront theme. Just go to Appearance > Themes to deactivate the Storefront theme.
Install WooCommerce
The next step to build an online store is to install the WooCommerce plugin on your WordPress site. If you have just installed WordPress, configure basic settings before installing WooCommerce. Here is an extensive guide from Asta theme to build your online store.
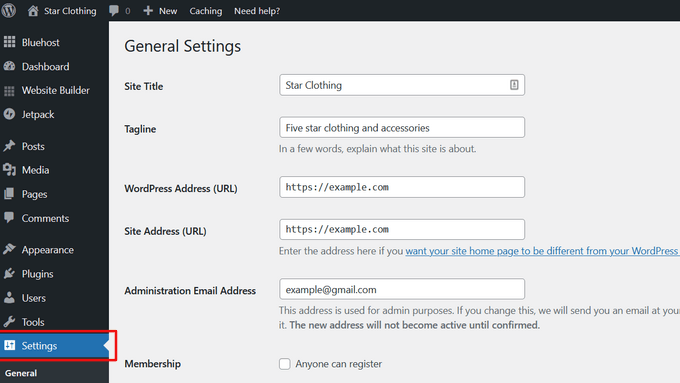
Log into your WordPress dashboard and go to Settings. From there, change your WordPress title and tagline. Also, review your admin email, as you will receive WooCommerce notifications and password setup details on that email address.
Go through the time zone settings and save the changes.
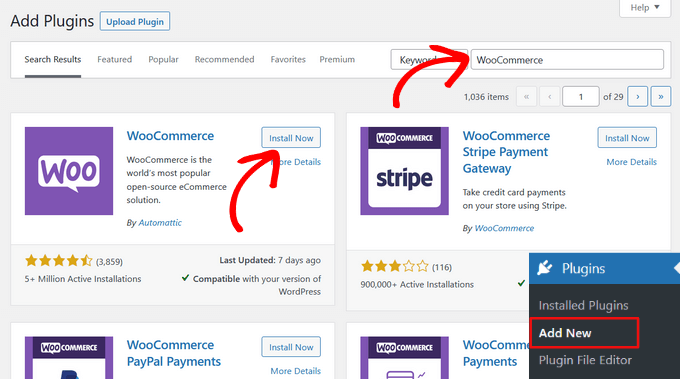
As we mentioned, WooCommerce is a WordPress plugin, so that you can download it as a regular plugin.
To do so, go to Plugins > Add New > WooCommerce > Install > Activate.
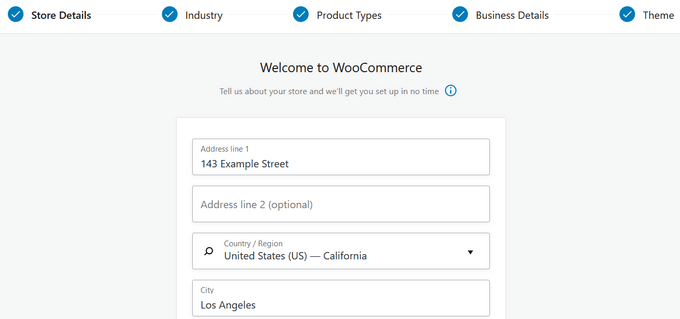
Enter your location, industry, product type, and other business details upon activation.
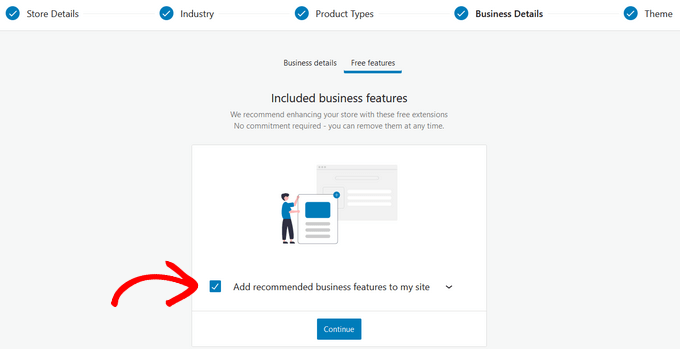
The setup wizard will ask you to add recommended business features to your store. All these free features, so you can select the option and continue.
In the last step, the wizard will ask you to select your WordPress theme. Select the Continue with my active theme button, as you have already chosen the perfect Astra theme for your store.
Setup Payments
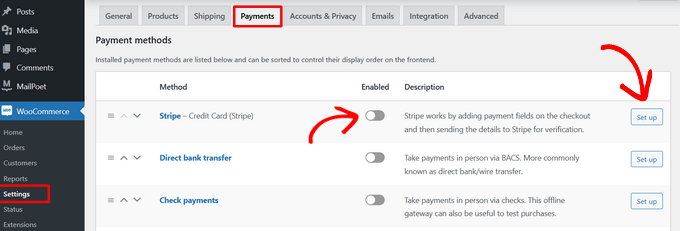
You need to set up payment methods to accept payments on your online store. WooCommerce supports several payment gateways — PayPal, Checks, Bank Transfers, etc.
Go to WooCommerce > Settings > click on the Payments tab. Scroll down to select your desired payment modes by clicking on the Set Up button next to each option.
Add Your Products
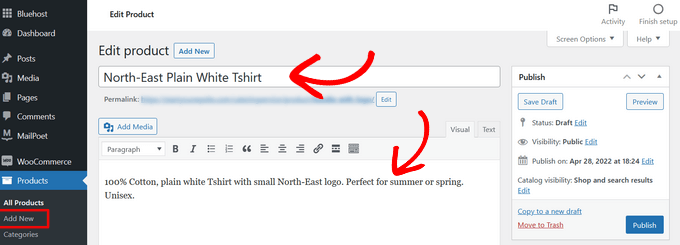
You can now start uploading your products. Go to Products > Add New to open an editor.
First, add a product title and a detailed description.
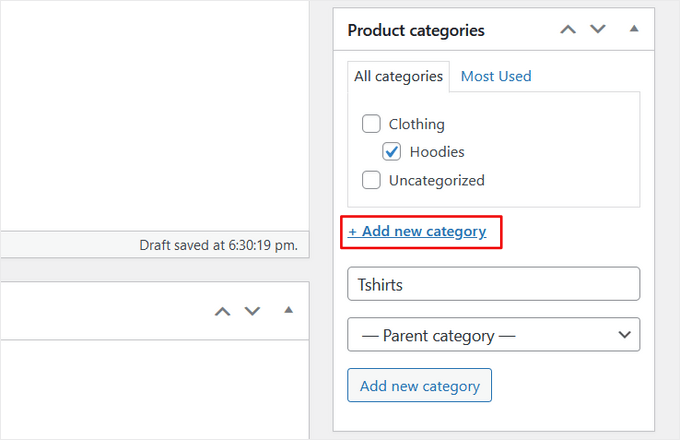
Expand the Product Categories box from the right pane. Click on the +Add New Product Category to create a category for your product.
Scroll down to the Product Data box. Add all the product-related information here, like inventory, pricing, etc.
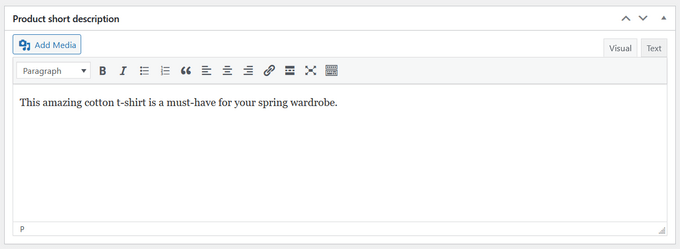
Below this box, you can find another box to add a short description of the product. This description helps to view multiple products on a page.
At last, add the main product image and a product gallery. After that, hit the Publish button to upload your product.
Setup Tax
The following step is to configure taxes in WooCommerce. First, return to the homepage and select the tax option.
Taxes can be configured using WooCommerce Tax, Avalara, or manually. If you don’t want to add taxes, you can select the I don’t charge sales tax option.
Let’s look at how to configure taxes in WooCommerce manually.
Choose the manual option. Alternatively, navigate to WooCommerce > Settings > Tax.
Enter your tax information, such as country, city, zip code, GST number, etc. When you’re finished, save the settings.
Configure Shipping
Finally, configure shipping information on your WooCommerce site. Set up shipping charges for orders within the country, or provide free local shipping.
You can also create shipping classes to provide different rates for various types of products.
Enable the Rest of the World option and define shipping costs for different pricing zones if you intend to ship across borders.
You can now install and enable WooCommerce Shipping to print shipping labels from the comfort of your own home. You can also select No Thanks if you don’t require that feature.
WooCommerce installation is now complete.
Make Your Online Store More Functional Using Plugins
You have learned how to start an online store with basic features. Now, let’s see some robust plugins that can make your website more functional:
- WPForms assists in creating contact forms, customer surveys, login forms, and other forms.
- MonsterInsights works with Google Analytics to track the most popular products, web pages, and categories. It assists you in comprehending your customers’ online behavior.
- SeedProd is the most effective drag-and-drop page builder for creating a WooCommerce store. It allows you to create visually appealing landing pages to promote products, sales events, etc. SeedProd does not require any coding knowledge.
- WooFunnels can help you create a sales funnel and customize WooCommerce checkout pages. It also includes a marketing automation toolkit for configuring email automation for WooCommerce.
- AffiliateWP assists you in setting up an affiliate referral program on your eCommerce site.
- Advanced Coupons for WooCommerce allows you to create custom coupons for your website. You can make coupons for BOGO deals, gift cards, free shipping, etc. Check out our exclusive guide on how to create buy one get one free coupon in WooCommerce.
Conclusion
As you can see, creating an e-commerce website in less than an hour is possible. WordPress and WooCommerce are easy to set up. On the top, readymade themes like Astra have made it super quick to build a stunning online store.
Plus, many WordPress plugins are available to add more features to your online shop. So, if you have a great idea, make it live today!
We hope you find this post helpful. Do share your thoughts in the comments.

Leave a Reply