Guide on How to Create a Multi-Part Form Using Formidable Forms
Are you facing problems of low form conversion rates from having long forms on your website? Breaking a form into multiple pages makes the user interested and engaged on your website. It not only increases the rate of user experience but also increases the rate of form conversions. This guide includes the detailed steps on how to create a multi-part form on WordPress using Formidable Forms Plugin.
What is a Multi-Part Form?
WordPress is a vast ocean. There are thousands of paid and free WordPress plugins that solve problems of website owners. Similarly there are hundreds of WordPresss plugins to create forms, which aid in getting contact information of users.
Here’s a simple guide to create contact forms on WordPress.
A multi-part form is a more user-friendly form that is split in multiple parts step by step to collect information from your customers. It improves the engagement time and experience of your users and prevents them from abandoning their forms halfway. You can add fields to collect your customer’s information accordingly.
About Formidable Forms Plugin
Formidable forms plugin is one of the best WordPress forms plugins which helps you to create many types of forms on WordPress for your website. Following are some of the Formidable Forms Multi-Page Forms that you can make:
- Quizzes or Exams
- Registration forms
- eCommerce forms
- Job application forms
- Website signup forms
- Medical intake forms
- School enrollment forms
- Surveys (especially longer ones)
The Need of a Multi-Part Form
Usually, a single long-form at times is abandoned by the visitors and therefore drives the customer to leave it halfway. Splitting the form into multiple pages increases the sense of curiosity and makes it easier for you to review the form entries. That’s why you need to create a multi-part form on WordPress
Reasons to Create a Multi-Part Form
The following are some of the major reasons to consider creating a multi-part form on your website.
Diminishes the Abandonment of Forms
If the form is broken into multiple pages then it would tend to maintain the curiosity and the interest of the user and would not drive them to abandon the forms.
Accumulates the Required Information
You should only collect the information which is required and is important to you. It will save your customer’s time and avoid making the form too long by adding unnecessary fields.
WordPress gives you an option named as conditional logic where only specific conditional fields are taken into consideration. Therefore, you will only be able to see those pages where the answers are given by your users.
Simple Implementation
By using the multi-part form it makes your form easy to understand and therefore visitors can quickly fill in the details. It will increase the number of your customers who usually abandon the long forms without completing them.
Now, the following are the detailed guide steps on how to create a multiple-part form in WordPress using the Formidable form plugin.
How to Create a Multi-Part Form using Formidable Forms?
Formidable forms plugin is widely used by hundreds of users to create a multi-part form on WordPress. Follow this step-by-step guide and in the end you’ll have successfully added a form to woo your engagement and conversion.
Step 1: Create a Form in WordPress
- First, install and activate the Formidable forms plugin.
- Now, click on Formidable under the dashboard and click on the add new button.
- Select the type of form and create a multi-step contact form.

Step 2: Split Your Form With Page Breaks
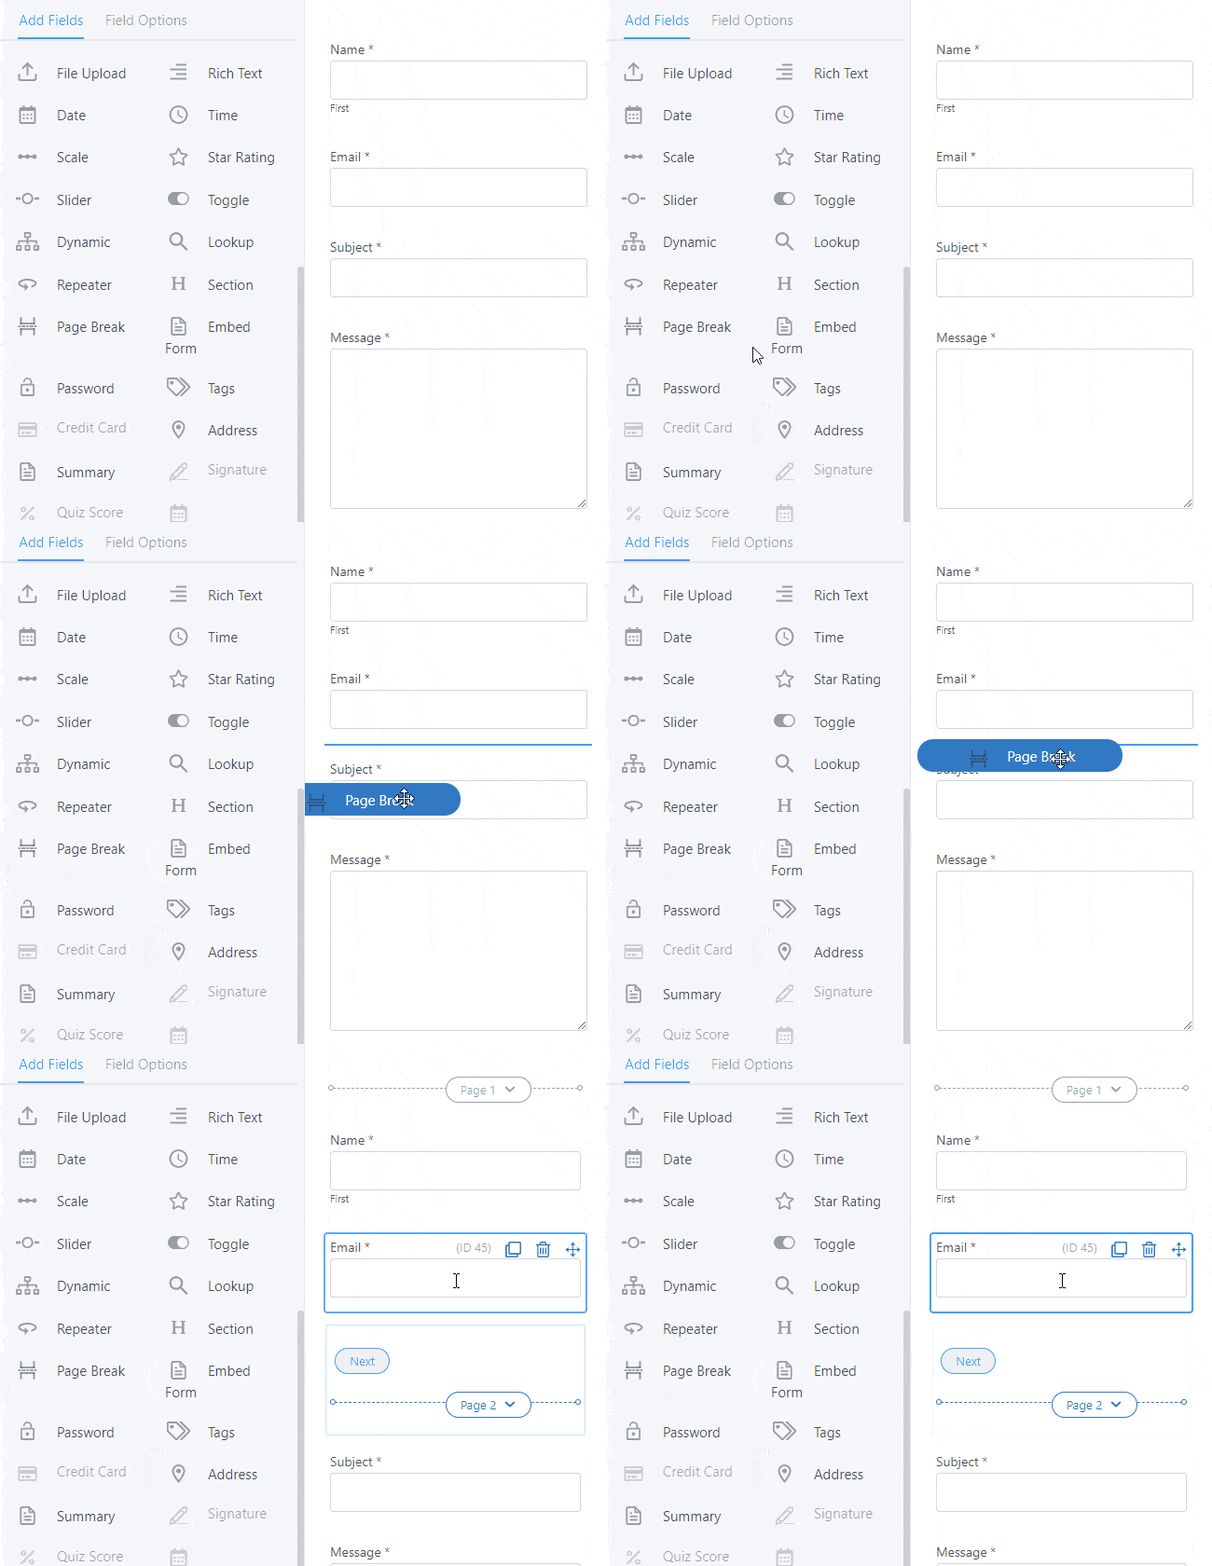
- Adding page breaks enables you to create a multi-step form.
- Use the Formidable drag and drop builder option where under the advanced fields option, you will drag the page break button into your form.
- Now split your form into multiple pages as required and add the fields accordingly.

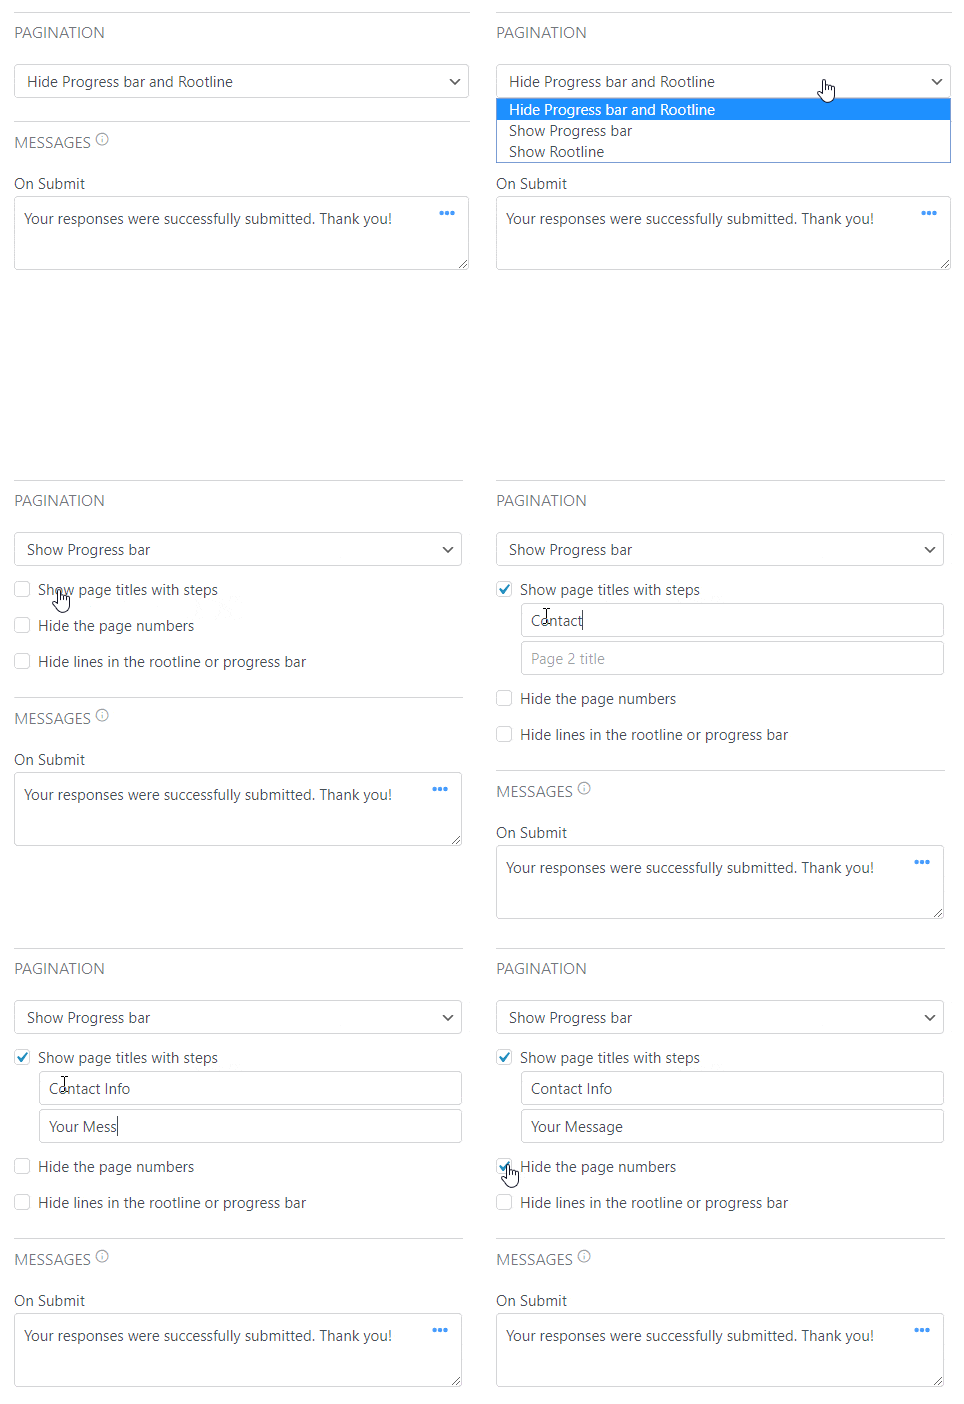
- You will first go to the form setting option and will click on the pagination setting to show the progress bar.

- You can also adjust the page title, hide the pagination lines, hide the page numbers, naming the pages etc.
Step 3: Design Your Progress Bar
- You will first choose the type of pagination you want from the form settings tab.
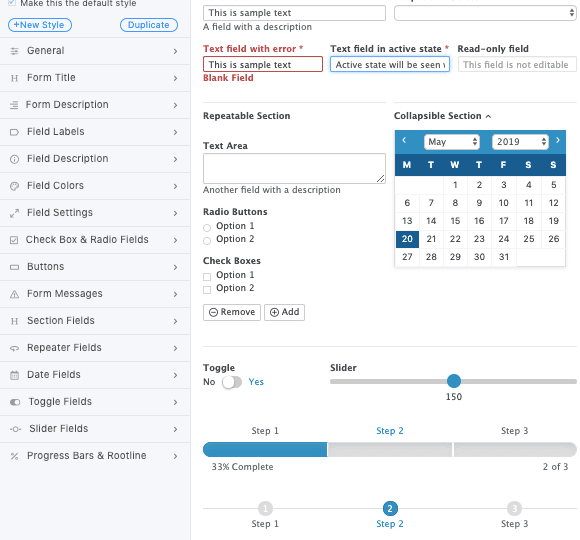
- Now, tweak the designs and go to the formidable bar. Click on formidable styles, click on progress bars and add the color scheme accordingly.
- You can also preview your changes with the help of the visual styler button and click on the submit button to update the changes.

Step 4: Add the Multi-Step Form to Your Website
There are multiple ways in which you can add your form to your website in a Formidable form plugin.
Using the Shortcode Builder
- First, go to your WordPress page or post and click on the Formidable button present above the content box.

- Now, select your form you want to insert and choose it from the options below.

- Select your file and click on the ‘Insert into post’ button.
Inserting the Shortcode Manually
- You can insert your shortcode on your page, post or text widget to display your form.
[formidable id=x]- Replace the X with the ID key of your form.
- You can find your ID key in your form available in the upper right corner and then click on the show.

Using a Formidable Form Widget
- Go to your WordPress dashboard and click on the appearances button and go to widgets.
- Now drag the widget called formidable form into your sidebar and enter a suitable title for your widget.
- Select the form of your choice to display and you can also select the show description if you would like the form description to be shown.
- Now, save your widget.

Using the WordPress Block Editor
- First, go to your WordPress page or post, you will find a block editor option where you will click on the + button.
- Now, scroll the widget category and then search for Formidable forms block.

- Now, choose the dropdown option and select the form you want to insert. Also, you can configure the form block settings from the right sidebar.

Step 5: Configuring Optional Form Settings
- Click on the Form Settings and go to the general form settings option.
- Under the setting category, you can edit and add the form title, form key, form description and the embedded shortcode.

- Other than the basic settings, you can also edit the show message column, redirecting form settings, form scheduling, pagination, styling and buttons, form confirmation page, form permissions etc.
Step 6: Configuring Notification Settings
- Go to form settings and click on actions and notifications.
- Here you will be able to edit and add notifications regarding receiving or sending messages or email notifications, replying to the visitor, managing your attached files etc.

Bottomline
With formidable forms plugin, creating multi-part forms is now very easy and it’s also interesting for your customers and improves the quality and traffic of your website.
You can also categorize the results in a very organized manner accordingly and get the correct information at its best. By using the Formidable forms plugin you can easily make and edit your form thus giving your customers an interesting experience.

Leave a Reply