How to Enable Wishlist in WooCommerce Stores? (Step-by-Step Guide)
Online retail customers are seeking a satisfactory experience today. They wish for a personalized experience, thanks to the high benchmark set by brands like Amazon and eBay. Similarly, enabling wishlist is a great way to offer the best experience to your customers. It is very important to learn how to enable wishlist in WooCommerce stores.
A wishlist allows customers to save their favorite products to order later. In addition, your customers can share their wish lists with their friends and family on social media. For example, people can create their wedding or baby shower gift wish lists and share them with their guests.
If you’re a part of the eCommerce teams, you can leverage wishlist data to create personalized marketing campaigns for buyers. Online stores are building multiple strategies such as BOGO coupons Learn how to create buy one get one free coupon in WooCommerce. For instance, if a user has added shoes to their wishlist, you can offer them a discount on the item to motivate them to purchase faster.
Overall, the wishlist is an excellent WooCommerce feature to retain customers.
How to Enable Wishlist in WooCommerce Store?
First of all, if you don’t have a WooCommerce store yet, we’ve got you covered. Here’s an exclusive and simple guide on how to set up WooCommerce store.
The best way to enable wishlist in WooCommerce is by using a WordPress plugin like YITH WooCommerce Wishlist.
It is a free WooCommerce plugin that allows customers to create their favorite product list and share it with friends personally or on social media. Besides this, the plugin offers exclusive features like:
- Set a page for the wishlist
- Display the shortcode “Add to wishlist” anywhere on your website
- Add the “Remove from wishlist” button
- Show the “Add to wishlist” button also on the Shop page
- Customize the wish list table columns
- Product variation support
The free version of the plugin is capable of enabling wishlists in WooCommerce stores. However, you can get the premium version to explore advanced features, like:
- View popular product wishlists
- Send promotional emails to customers who have created wishlists
- Show the “Ask for an estimate” button
- Allow users to create, manage, edit or rename wishlist
- Allow users to search and see registered wishlists
- Customers can set visibility options for each wishlist
- Select an elegant and stylish wishlist page layout
- Show product price variations, etc.
Setting Up YITH WooCommerce Wishlist Plugin
- First, install and activate the YITH WooCommerce Wishlist plugin on your site. To do so, go to your WordPress admin panel > Plugins > Add New > YITH WooCommerce Wishlist > Install > Activate.
- After activating the plugin, head to YITH > Wishlist and select the “Add to wishlist options” tab to configure the plugin.
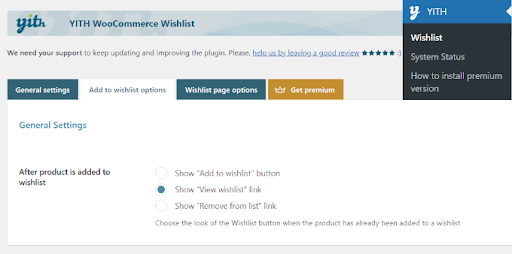
- The plugin will add a “Add to wishlist” button to each product page.
- In the settings, you can define the link that appears on the customer screen after they add a product to the wishlist. You can keep the standard “Add to wishlist” button or change the link to “View wishlist” or “Remove from list” options.
- After that, access the Loop settings and Product page settings. Here you can decide on the “Add to wishlist” button position on the product page.
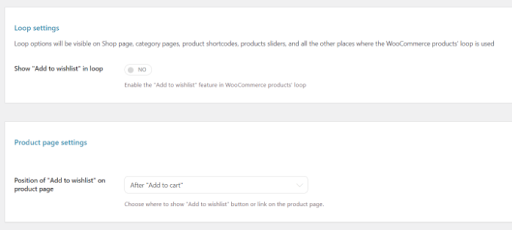
- The button appears after the “Add to cart” button by default. However, you can select a different position for the wishlist button using the drop-down menu in front of the “Add to wishlist” position on the product page option.
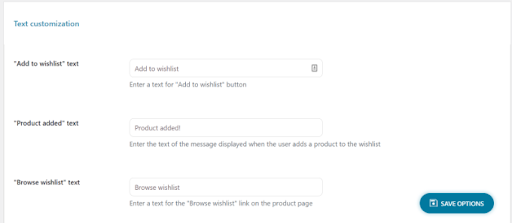
- After that, scroll down and add text for your wishlist button. You can also edit the color and font style of the button to make it attractive. Click on the Save option to save all the changes.
- Next, go to the “Wishlist page options” tab. The plugin will set up a new page for wishlist option in WooCommerce. However, you can select different pages from the Wishlist menu to select another page for a wishłist.
- Alternatively, you can use the [yith_wcwl_wishlist] shortcode to enable wishlist in WooCommerce store.
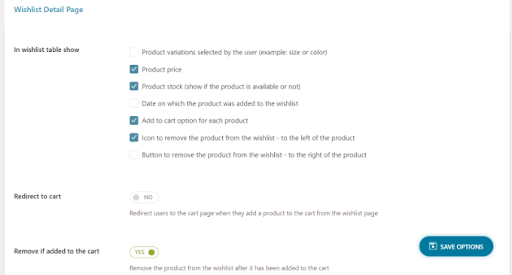
- After that, you can scroll down to decide what details you want to display in the wishlist table. For instance, you can display product variations like the date the product was added to the wishlist, price, etc.
- You can also define which social media channels customers can share their wishlists with. Also, define whether customers can share custom captions with their wishlists.
- The plugin allows you to share your wishlists on Facebook, Twitter, Pinterest, or via email. In addition, you can customize the text, edit color, and style options for the social share button based on your website layout.
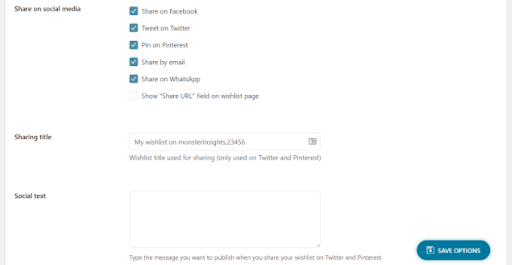
- Finally, you can click the Save change option to implement the function. Now, you can visit your website and check whether the “Add to wishlist” button is working fine or not.
Empower Wishlist Feature to Grow Your Business
Now that you have added a wishlist button to your WooCommerce website, don’t stop there. You can use many other options to provide a personalized shopping experience to your customers.
WooCommerce has a great plugin gallery that you can explore to add more features to your website, such as:
- Advanced Coupons for WooCommerce to add smart coupons for discount deals, BOGO offers, etc.
- PushEngage to stay connected with visitors after they leave your website.
- Uncanny Automator allows you to automate your WooCommerce workflow to save you time.
- WP Mail SMTP helps you check whether your emails are actually delivered to your user’s inbox.
- WooFunnels plugin to optimize your WooCommerce checkout, add one-click upsell, and other marketing automation features.
Enable Wishlist in WooCommerce Stores Now!
Enabling wishlist in your WooCommerce store is a good marketing move. It allows you to improve customer experience and retention
In addition, the YITH WooCommerce Wishlist plugin has made it super simple to enable wishlist in WooCommerce store. The plugin even lets you add a feature to share wishlists on social media and promote your business.
Also, I will suggest our readers use other plugins discussed in this post to grow their online sales. Making your online store accessible and functional is important to retain customers today.
Now, I will leave you to optimize your WooCommerce store for a better user experience.

Leave a Reply