How to Setup WooCommerce Store? (Detailed Beginner Guide)
WooCommerce is the best option for creating a digital store. Over 5 million eCommerce portals are built on WooCommerce, including Barefoot Buttons, The Good Batch, etc., only if it wasn’t so easy to set up a WooCommerce store. WooCommerce is an open-source and customizable platform that lets you build attractive websites using several themes and plugins. Plus, it is built on WordPress, so minimal coding skills are required to set up WooCommerce. Here you will learn how to setup WooCommerce store quickly.
However, codeless plugins like Elementor might help you if you want your shop pages to look distinctive and appealing. You can easily customize an eCommerce website by combining Elementor and WooCommerce. To know more about this, check out our guide on how to Create WooCommerce Shop Page With Elementor.
And there are many other ways that WordPress can be used to generate income for yourself. To know more, check out our guide on how to make money online using WordPress website.
However, if you are new to WordPress or WooCommerce, you have landed on the right post.
Why is WooCommerce The Best eCommerce Platform?
Flexible
The best thing about WooCommerce is you can sell anything on it. Be it physical, downloadable, or virtual products, you can sell all kinds of products on WooCommerce. You can even sell affiliate products on WooCommerce.
It is also highly scalable and lets businesses grow and sell products worldwide. Flexibility is the factor that’s allowing online business owners to shift from Shopify to WooCommerce. If you’re one of them, planning a shift, check out our exclusive step-by-step guide on how to move from Shopify to WooCommerce.
Customizable
WooCommerce allows you to be creative in building a digital store. With a wide range of themes and plugins, you can shape your website for a better UX. Even if you don’t find a desirable theme, you can setup WooCommerce from scratch.
No technical expertise is required to customize your WooCommerce store. WooCommerce wizard allows you to modify your site with minimal CSS or HTML knowledge.
Intensive Security
For eCommerce platforms, it is essential to have secure payment gateways to protect customers’ financial details. Therefore, WooCommerce is integrated with secure payment lines like PayPal and Stripe.
However, WooCommerce is always on the radar of hackers, being a popular portal. Recently, a massive attack on WordPress has been reported. Almost 1.6 million websites went under with this attack.
Therefore, WooCommerce developers continue to work on improving security. Plus, several back-ups, encryption, and other security tools are available on WooCommerce.
Interactive Community
WooCommerce is a popular and powerful eCommerce platform. There are several forums and WooCommerce social communities available out there. In addition, WooCommerce has also created helpful content to help new users.
So, you can find infinite resources on WooCommerce, and its plugins for guidance whenever you are stuck somewhere.
What Makes WooCommerce Better Than Its Competitors?
Some benefits of WooCommerce that make it better than Shopify or BigCommerce are:
- Shopify is easy to use, but it charges you more every time your sales increase.
- BigCommerce is adequate to sell products at a small scale or if you already have a following on other platforms like Instagram or eBay.
- MemberPress is only useful to sell memberships. It is not feasible to sell digital resources or physical products.
- On the other hand, WPForms is a full-fledged eCommerce portal with simple payment forms. But unfortunately, it can’t handle complex procedures like taxes.
Setup WooCommerce Store?
Prerequisites to Setup WooCommerce
A web hosting. Get a fast and secure host to launch your store, including an SSL certificate, dedicated IP, etc. WooCommerce and WordPress are officially partnered with Bluehost. But you can also use other web hosts like SiteGround, Hostinger, etc. A domain name. It is the virtual address of your shop, like amazon.com or ebay.com. Check out our latest guide on what is domain name and how to create your website with it.
Now, let’s set up your WooCommerce store.
Get Your Web Hosting
Assuming that you have selected Bluehost, click on the Get Started Now button after choosing your plan. The basic Bluehost plan starts from $2.95 per month.
After that, select your new domain or use an existing one. Here are a few quick tips for choosing the perfect domain name:
- Use keywords in the domain name. For instance, if you sell clothes, use the words related to clothes in your domain name like garments, clothes for men, etc.
- Set your brand name as your domain name.
- Use the .com extension as it is globally acceptable.
- Don’t use numbers or hyphens in your domain. This will make it harder to pronounce and spell your domain name.
After that, provide your accounts and finalize payment details to ready your Bluehost account.
If you don’t want Bluehost services, you can follow the same steps on your selected web host website.
Setup WordPress
Most web hosting service providers let you download WordPress with a click. You can simply log in to your hosting dashboard and install WordPress.
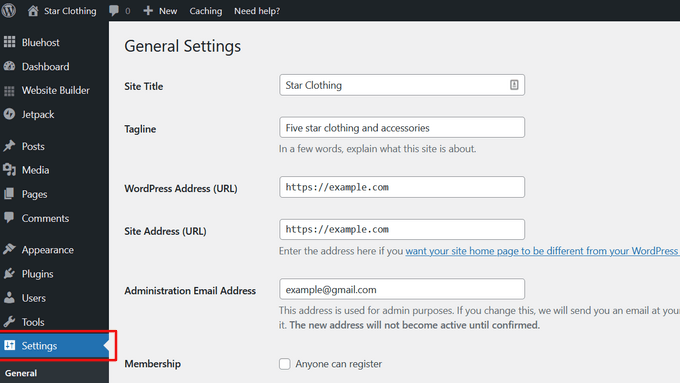
This will take you to a WordPress dashboard where you configure basic WordPress settings. Go to the Settings, and change your website title and tagline.
Also, ensure your website URL shows HTTPS, not HTTP. With Bluehost, you will get free SSL certificates. If your host plan doesn’t include SSL, you can get it from Cloudflare for free.
Now, review the website admin email address. You will receive WooCommerce notifications and password reset requests at this email address. So, make sure it is correct.
Scroll down and select the website’s timezone settings. Give a final look at settings and click on the Save button to apply changes.
Installing WooCommerce
WooCommerce is a WordPress plugin. So, its installation process is similar to any other WordPress plugin.
Simply go to Plugins > Add New > Search for WordPress. Now, install and activate the plugin on your website.
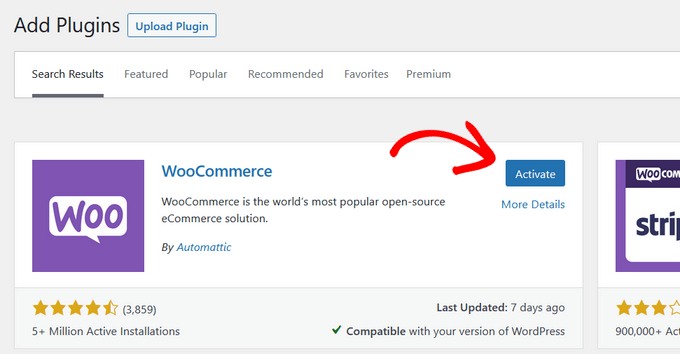
After activation, WooCommerce will launch the WooCommerce setup wizard.
You have to enter your store location. On the next page, select your industry and product type and add other business details. You can also add recommended features to your store. All the features are free to install as per your business needs.
Finally, choose a new WordPress theme or continue with your active theme. You can check out our guide to learn how to choose right WooCommerce theme.
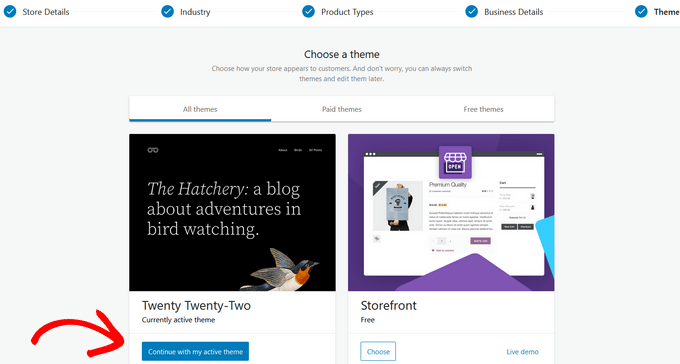
Here are a few tips for selecting WooCommerce themes:
- Never choose a bloated theme; it will hurt your website speed in the long run.
- Select responsive themes that are accessible across devices.
- Keep your brand’s color theme in your mind.
- Get a premium theme as they offer more features.
- Test them thoroughly before installing.
- Check fonts available with the theme.
After selecting your WooCommerce, you will be taken to the screen where you can customize your store.
Setup WooCommerce Store
On your WooCommerce dashboard, you will find a checklist to setup your store. So, follow all the steps one by one:
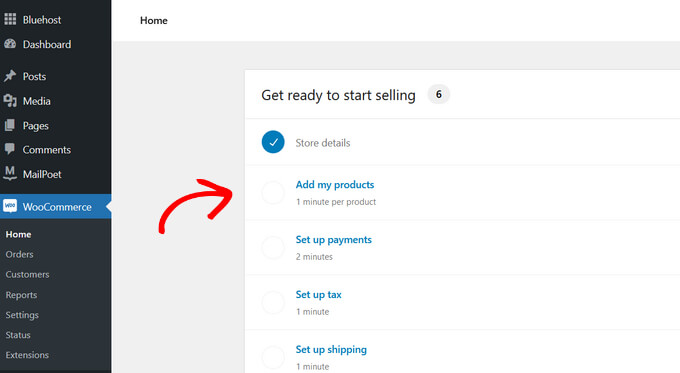
Add Products
WooCommerce has made it easy to upload products. You can use the product templates and import them via CSV or other formats. Speaking of templates, there are various software and tools out in the market that will provide you with numerous templates to design your website. One such is Joomla Monster.
Joomla Monster is a professional website template and extension provider. Hundreds of template designs have been created by the company, including medical templates, fashion and beauty templates, school templates, e-commerce templates, and others. The templates are user-friendly, SEO-optimized, and adaptable to the needs of various clients.
Check out our Joomla Monster coupon codes and get 25% discount on your purchase.
This guide will show you how to add products using templates. So, select your template based on your product types like a physical product, digital product, or variable product.
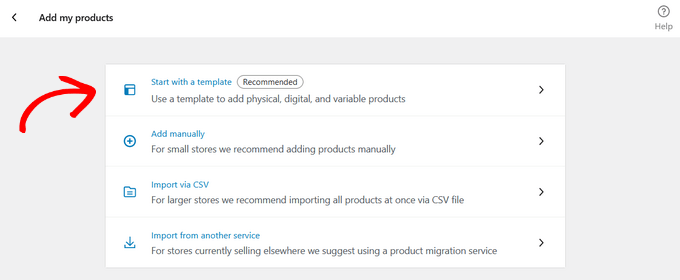
Click on the Go button, which will take you to a product editor. Alternatively, go to your WordPress admin panel > Products > Add New.
Now, provide your product title and description. From the right side, click on the Add new category link and setup a new product category. It will help you efficiently manage your products.
One thing to keep in mind while creating and publishing products is to make your website look semantic and avoid duplication of products. This can be achieved by adding categories and sub-categories. Check out our guide on how to add categories and sub-categories to your website.
Scroll down to the Product Data box. There you have to define product type, add product pricing, shipping costs, grouped products, etc.
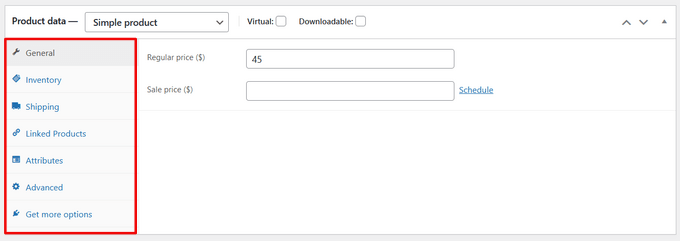
Now, add a short and catchy product description in the product brief description box. This description will be displayed on the page before the long description. So, make it punchy and sales oriented.
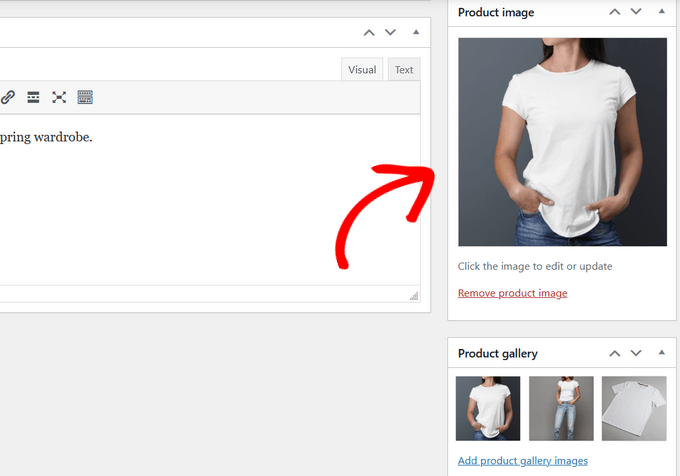
Next, add your product images. WooCommerce allows you to add multiple product images. However, you have to set one main image.
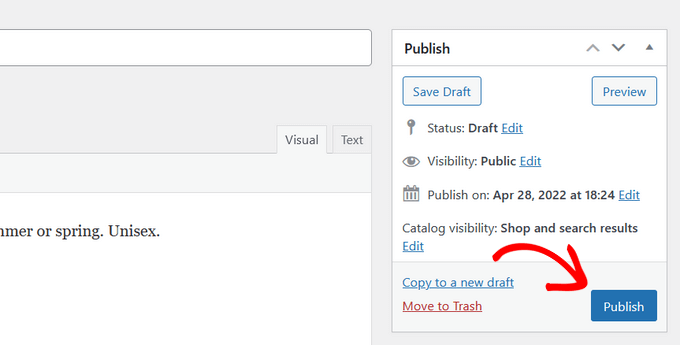
Review your product information and hit the Publish button.
To know more, check out our detailed guide on how to upload products in WooCommerce website.
Once your products are published, earning revenue from them is a bit difficult part. There are many ways to generate sales. For example, you can do paid advertisements, you can organically build your customer base on social media platforms, and many more. One of the many and most effective ways to attract customers is by adding a Buy one Get one free (BOGO) lead magnet. To learn more check out our guide on how to create buy one get one free coupon in WooCommerce.
Setup Payment Gateways
Now, you must add payment gateways so people can purchase your products. Go back to WooCommerce > Home > Setup Payments.
This will take you to a page to select your payment options. You can select from Stripe, PayPal, Klarna, and direct bank transfer or cash on delivery.
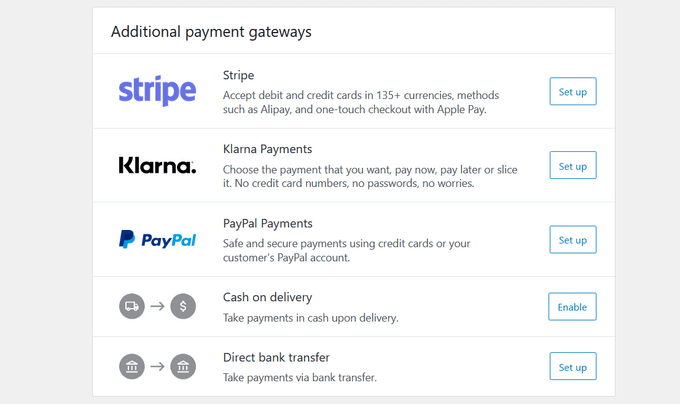
Select the preferred option and follow on-screen instructions to set it up.
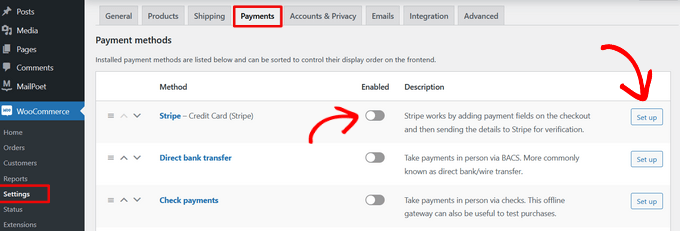
To add more payment gateways in the future, simply go to WooCommerce > Settings > Payment tab.
Setup Tax
The next step is to setup taxes in WooCommerce. Similarly, go back to the homepage and select the tax option.
You can set p taxes with WooCommerce Tax, Avalara, or manually. Also, you can select the I don’t charge sales tax option if you don’t want to add taxes.
Let’s see how to set p taxes manually in WooCommerce.
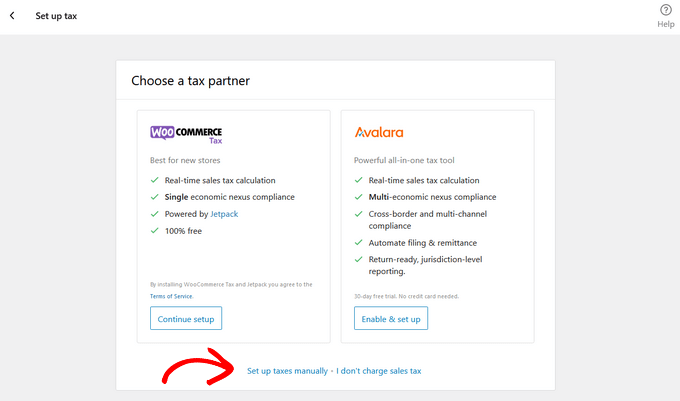
Select the manual option. Alternatively, go to WooCommerce > Settings > Tax tab.
Simply enter your tax details like country, city, zip code, GST number, etc. Save the settings when you are done.
Setup Shipping
Finally, setup shipping details on your WooCommerce site. Setup shipping costs for orders within the country, or you can offer free local shipping.
You can also create shipping classes to offer different rates for different types of products.
If you plan to ship across the borders, enable the Rest of the world option and define shipping costs for different pricing zones.
Once you are done setting up your store, its vital to have a proper structure in place that will help you manage your orders. Learn how to manage orders in WooCommerce by going through your detailed guide to avoiding any mishaps.
You can now install and enable WooCommerce Shipping to print shipping labels at home. You can also select the No thanks option if you don’t need that feature.
WooCommerce setup is now done.
Bonus: Tips to Promote Your WooCommerce Store
After setting up your WooCommerce store, promoting is essential to generate more sales. Here are some quick tips to promote your WooCommerce marketplace:
Build Your Email List
Having a dedicated email list is essential to promote your new offers or deals. Email marketing can directly land in your potential customers’ inboxes and motivate them to purchase.
- WPForms helps to create contact forms, customer surveys, login forms, etc.
- MonsterInsights integrates with Google Analytics to track your top products, web pages, or categories. It helps you understand your customers’ online behavior. Check out our guide on how to add Google Analytics in WooCommerce with MonsterInsights.
- SeedProd is the best drag-n-drop page builder to setup WooCommerce store. It lets you create stunning landing pages to promote products, sale events, etc. No coding skills are required to use SeedProd.
- WooFunnels can create your sales funnel and personalize WooCommerce checkout pages. It also comes with a marketing automation toolkit to setup email automation for WooCommerce.
- AffiliateWP helps to create an affiliate referral program on your eCommerce site.
- Advanced Coupons for WooCommerce add custom coupons to your site. You can create coupons for BOGO offers, gift cards, free shipping, etc.
- TrustPulse allows you to social proof your site and triggers FOMO to generate more leads.
In addition, emails help to cross-sell or upsell to your existing customers. You can build a relationship with your customers by starting an email conversation.
The good thing is that WooCommerce integrates with all leading email marketing services like SendinBlue, Drip, etc.
Generate Leads
This is the part where you nurture your website visitors or email subscribers to become your customers.
You can use OptinMonster to generate leads. The software allows you to convert abandoned website visitors to email subscribers and customers. It has features like exit-intent popups, A/B testing, content locking, etc.
Work on WooCommerce SEO
Search engine optimization helps to rank your website on search engines. WooCommerce is an SEO-friendly portal. So, it is easy to optimize your WooCommerce store for SEO.
However, you can use the AIOSEO plugin to optimize your digital store to rank on search engines.
Create Your Own WooCommerce Store!
There you go, peeps! You are now ready to setup WooCommerce store. You have learned basic WooCommerce installation setups, extensions, and tips to promote your store.
I have also mentioned all the essential tools that you would ever require to setup a custom WooCommerce store and promote it. So, I’ll suggest you get the basic SEO, landing page builder, and monitoring tools to start your eCommerce business. Rest, you can keep adding plugins based on your store’s growth.
Now, let’s bid farewell and setup WooCommerce store of your own!

Leave a Reply