How to Add New Users & Authors to Your WordPress Website?
As your blog grows, you probably also want to add new users or authors to it. Whether you’re collaborating with other bloggers or defining roles for your team members, adding new users and authors to WordPress is pretty simple. Learn how to add new users in simple steps.
Using the WordPress user management system, you can add new users to your blog in different roles and permission levels. There you have three ways to add new users to your WordPress blog.
- Add users manually
- Allow users to register themselves
- Launch a paid membership program
Few users who have access to your WordPress dashboard can find the options that are located on the sidebar overwhelming or distracting while writing or creating content. what if I tell you that there is a way to avoid this distraction? Check out our guide on how to rearrange post edit screen for a smoother and more effective workflow.
This post will walk you through each step to add new users to WordPress. So, let’s get started!
Different User Roles in WordPress
Before adding new users or authors to your blog, let’s first understand different user roles in WordPress. By default, WordPress lets you add six different user roles.
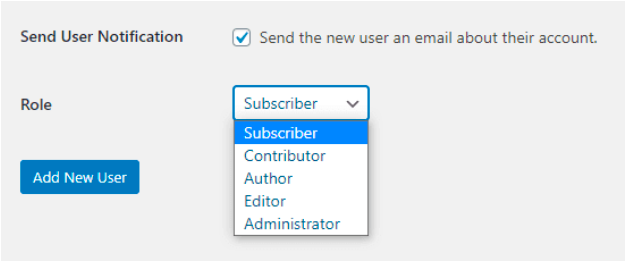
- Administrator: An admin can perform all operations on the website. This role lets users install plugins, themes, delete content or even remove other users. Assign this role to trusted users only, or the best keep it yourself.
- Super Admin: If you have multiple WordPress blog sites, you can also add a super admin user role. This user can manage all your sites like a regular admin.
- Editor: Editors can add, edit, publish or delete their own posts. They can also perform all these actions on other users’ posts. Though, they can’t access plugins, themes, or other website settings.
- Author: Authors have only the capacity to add, edit and publish their own posts. They can also upload relevant media files. But they can’t edit other users’ posts or access website settings and tools. You can use plugins to further restrict authors. For this, you can use plugins like MemberPress, WP Private Content Plus, etc.
- Contributor: A contributor can only add or edit their own posts. They cannot publish their posts or access other users’ posts. Also, contributors don’t have the right to upload media or edit website settings. This user role is useful when you allow anyone to register and post on your site. That way, you can edit posts before publishing them on your site.
- Subscriber: The subscribers can’t add or edit posts on your site. These users can create profiles with their details and leave comments on your posts. If you publish premium content for only members, this role is useful for you. You can also use the membership or LMS plugins to create members-only content.
How to Add New Users & Authors?
Now that you know the different user roles that WordPress lets you add to your site, let’s move to the next step. Let’s find out how to add different users and authors to your WordPress blog.
Add New User or Author Manually
If you want to add selected users to your site, using WordPress built-in user management system is the best plan.
This way, you can manually add users or authors to your blog and define their roles. This method is perfect when:
- You have a small online business that’s managed by multiple employees.
- You run a non-profit website and encourage volunteers to contribute with content.
- Multiple blog categories that required various authors to run them.
- Online stores that have several people handling different operations like inventory, shipping, etc.
To add new users or authors manually to your WordPress blog, follow these steps:
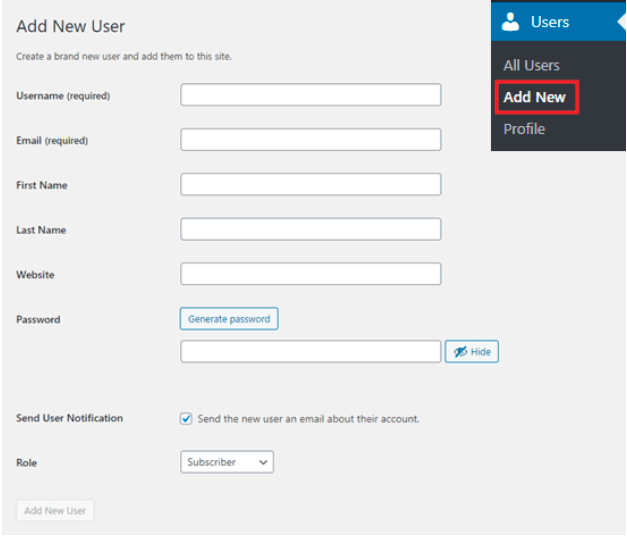
Step 1: Go to the Users > Add New page in your admin area.

Step 2: Fill out the form to add a new user. Remember WordPress username on the form is hard to change, so add it very carefully.
Step 3: Enter the user’s email address. Users will use this to reset passwords or receive email notifications.
Step 4: Next, enter the user’s first name, last name, and website URL.
Step 5: Now, choose a password that the user can change later on. While setting the password, check the box to send the user an email. This way, the user will receive an email to know how to log in and a link to change the password.
Step 6: Finally, select the WordPress user role from the dropdown list. As you already know, different user roles have capacities, so simply select the role and click on the Add New User button. And, your new user is added!

Open Your Website for Registration
If you want to create a website like Medium where users can register themselves, the manual method won’t work.
You can allow users to create an account and profile on their own. For this, follow these steps:
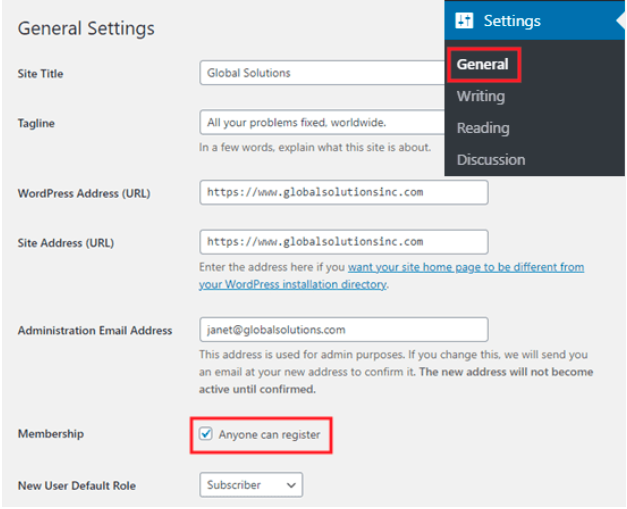
Step 1: Go to Settings > General in your WordPress admin area and check the Anyone can register box.

Step 2: By default, WordPress will give the subscriber role to the new user. You can change this from the dropdown if you want.
Step 3: Press the Save Changes button once you are satisfied with the changes.
Launch a Paid Membership Program
Another way to add new users and authors to your WordPress blog is via a paid membership program. You can sell premium content on your site with this method.
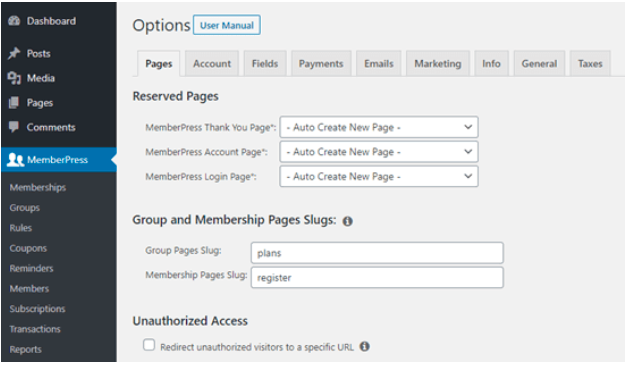
To create a membership site, WordPress has an amazing plugin like MemberPress. It is the perfect plugin to create membership and courses with custom features.
MemberPress allows you to restrict certain pages and posts on your blog to only paid members. Also, you can create different membership levels with MemberPress like Bronze, Silver, or Gold.

MemberPress allows you to customize your membership program in many ways like:
- Allow you to add drip content to create an evergreen program.
- Easy integration with various third-party services like forums, social communities, etc.
- Help you manage and track membership programs and so much more.
To create a membership site with MemberPress, you have to make a small investment. MemberPress Basic plan starts from just $279 per year. There you can also upgrade to the Pro plan for $449 and Plus for $599 per year.
Also, refer to our guide to know how to build a membership site using MemberPress.
How to Manage Your WordPress Users?
Like adding new users to your site, managing them is also very easy. Admin users can click on the User tab to open the user page and edit or delete any user.
Admins can change a user’s profile, passwords, roles, and more. They can even edit their own profile from the Users > Profile page. However, the admin can change all the profile details but can’t change their role.
Let’s Add New User or Author on Your WordPress Website Now!
You are now all set to add new users and authors to your WordPress blog. If you have a small team to run your blog, define each member’s role with a built-in WordPress editor.
Contrary, if you want to offer free registration or a paid membership, you can now do that as well. All in all, no matter what your goal is, you can add a new member to your site quickly. The manual method to add new users to WordPress is pretty easy. But the plugins like MemberPress have taken it to a new level of ease.

Leave a Reply