How To Customize WordPress Login Page? (No HTML/CSS Required)
Ever wondered if you could customize the WordPress login page for your website? Creating a custom login page helps you display a consistent brand to your users, which gives your site a more professional appearance. In this blog, we’ll show you how to customize WordPress login page through multiple methods.
Reasons to Customize WordPress Login Page?
The issue is three-fold:
- Traffic: The more traffic you get, the more “bad” traffic you get as a direct result. By bad traffic I mean malicious scripts and bots, spammers, and all sorts of users coming to your site with bad intentions. Customizing your WordPress login page can make your site more secure.
- Branding: The default login page is all good, but there’s the big WordPress logo right in the middle. Switching this and making the login page look more like your own can be a nice branding touch. This is especially valid if you’re building a website for a client. Providing your client with a consistent experience is surely something they will appreciate.
- Multi-user site: If your site is managed by multiple people – be it administrators or authors/bloggers – multiple occurrences of logging in will take place. Providing a custom login form will make the process more pleasant overall.
- Better UX: In the modern competitive era, attractive and appealing designs can help you establish an exceptional user experience. To stand out amongst the heavy competition out there, try putting yourself in the consumer’s place. What kind of user experience would you love to interact with on a website? Find answers to this, and reflect the required changes on your online place i.e. your website.
If any of the above sounds compelling to you, you should consider customizing your login page. Let’s move forward with the three methods that we can use to create our custom WordPress login page.
Customize WordPress Login Page with SeedProd
First, let’s look at how to create a custom login page with SeedProd, step-by-step.
Install SeedProd on Your Site
- To begin, you need to download the SeedProd plugin. Then, upload and activate the plugin on your WordPress site. For detailed instructions, follow this tutorial on how to install WordPress plugins.
- After activating the plugin, you’ll see a welcome screen where you’ll need to enter your license key. You can find your license key from your account on the SeedProd website.
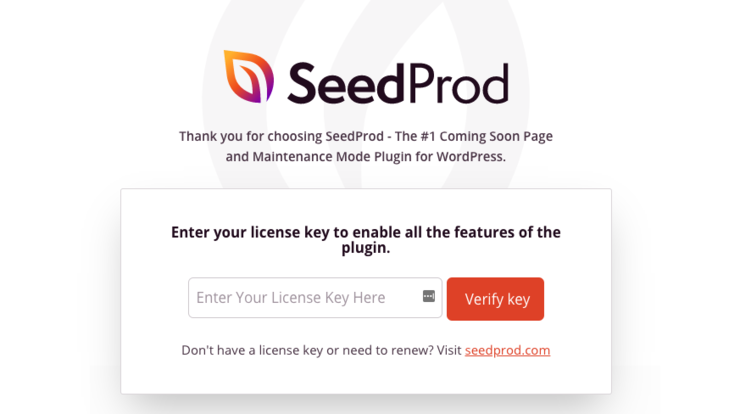
- Once you verify the license key, scroll down the page further and click on the Create Your First Page button.

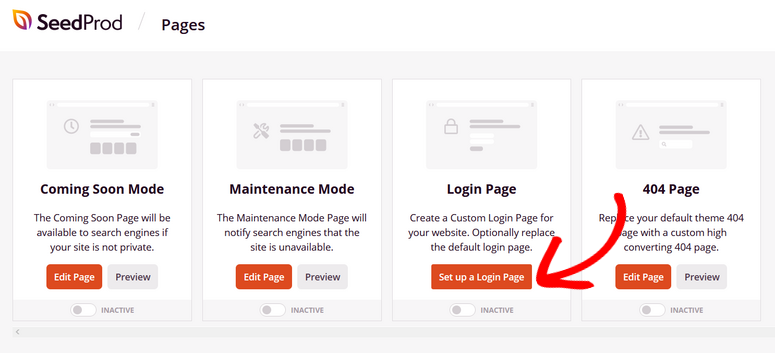
- Next, you’ll be taken to the SeedProd dashboard. Here you can see the different types of landing pages you can create. Click on the Setup a Login Page to get started.
Select Login Page Template
- In this step, you’ll be prompted to choose a login page template. SeedProd offers a ton of professionally-designed templates you can choose from.
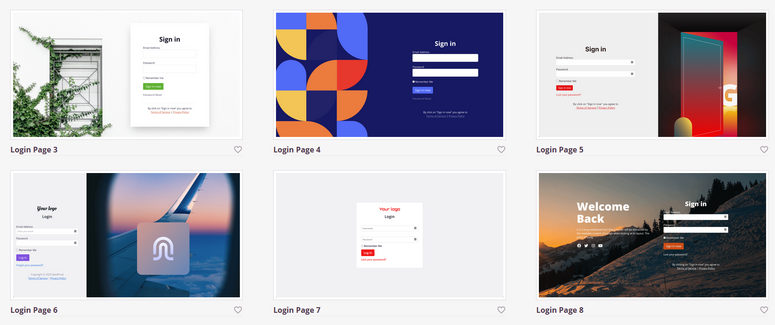
- There’s also a Blank template you can use if you want to start your design from scratch.
- To choose a login page template, simply hover over it and click on the checkmark icon.
- Next, it’s time to customize the template.
Customize Your Login Page
The best part about SeedProd is that you can easily customize your login page using the drag and drop visual builder.
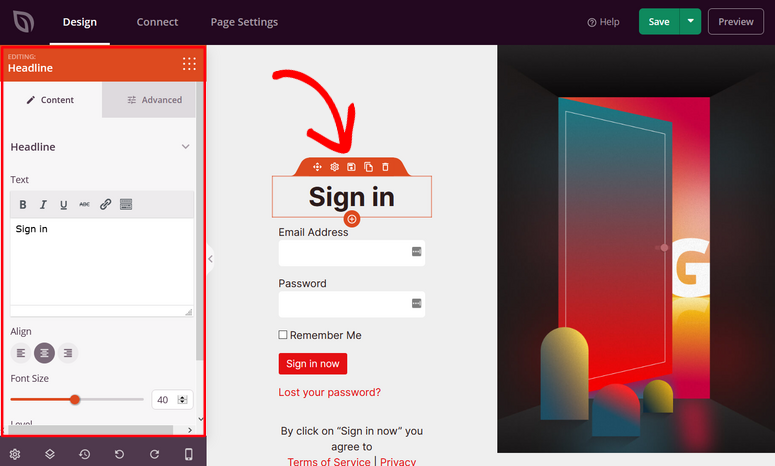
- First, you can customize any existing element on the template by clicking on it.
- For example, you can click on the Sign In headline to change the text, size, alignment, typography, and more.
- To add new content to your login page, you can use SeedProd’s ready-made landing page blocks.
- On the left side of the visual builder, there are landing page blocks like image, video, button, social profiles, countdown timer, progress bar, and more.
- Simply drag the block you want and drop it onto your login page. Again, you can click on the block to customize the style, size, alignment, etc.
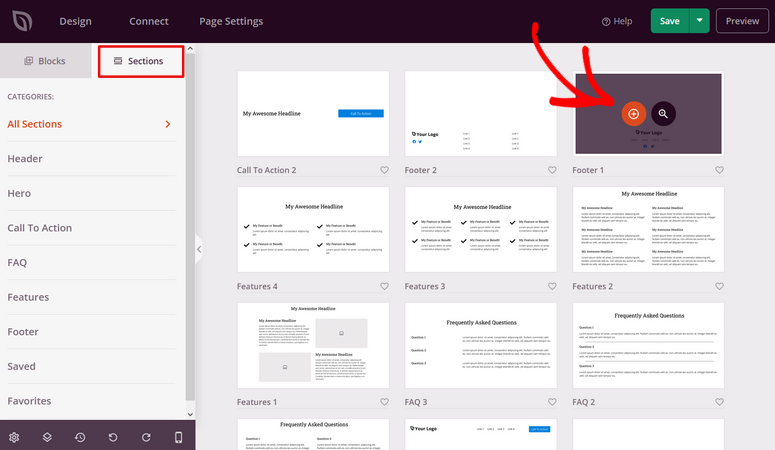
- SeedProd also offers pre-built sections like Features, FAQ, Footer, and others, that you can add to your login page.
- Simply click on a section and SeedProd will automatically add it to your page.
- You can also head to SeedProd’s Global Settings in the bottom corner to change the background image, font, and colors of your entire login page, instead of changing each element individually.
- For example, if you want to change the color scheme of your login page, SeedProd offers over 20+ color palettes you can use to create a cohesive look.
- Once you’re happy with how your login page looks, click Save in the top right corner.
Configure Your Login Page Settings
If you add an email option form to your login page, you can connect it with your email marketing service on the Connect tab.
- Simply click on your preferred email marketing provider and follow the prompts to connect your account. Now, any time someone provides their email address through the optin form, they’ll be added to your email list automatically.
- You can also go to the Page Settings tab to configure other settings.
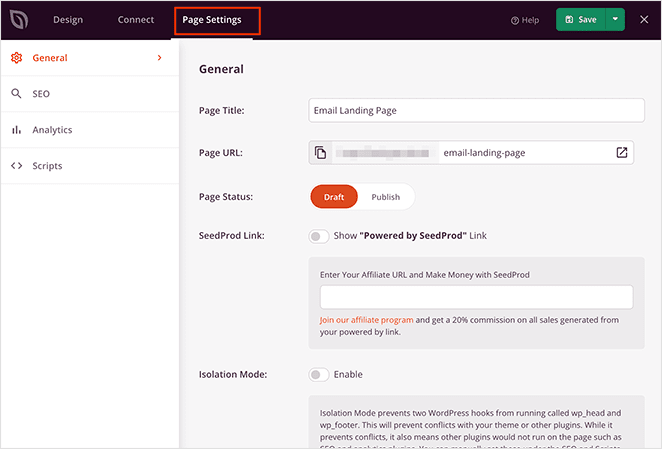
The settings on this page include:
- General – Change your login page name and URL, display a SeedProd affiliate link, and more.
- SEO – Set your page SEO title, meta description, etc. If you’re using an SEO plugin like All in One SEO, you can use this as a shortcut to its settings.
- Analytics – Track the performance of your login page using an analytics plugin like MonsterInsights.
- Scripts – Use tracking and retargeting scripts like cookies or Facebook tracking pixels.
Don’t forget to click the Save button to save your settings.
Publish Your Login Page
Now it’s time to publish your custom login page on your site.
- To do that, click on the dropdown arrow beside the green Save button and hit the Publish button.
- You’ll then see a success message letting you know that the login page is now live.
- Click on See Live Page to view your new custom login page.
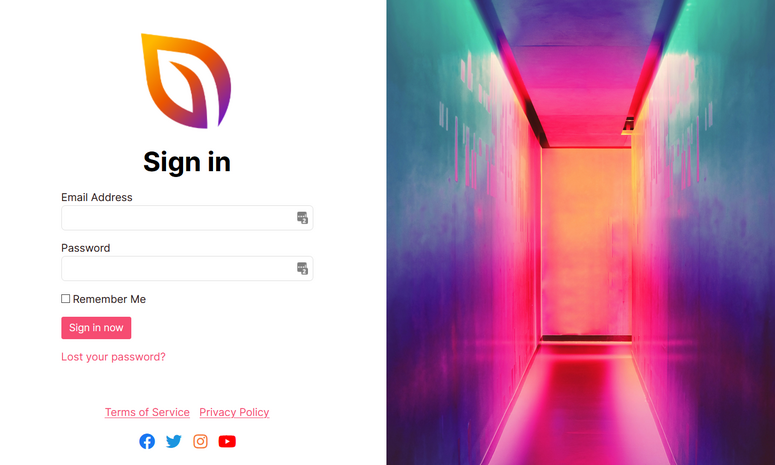
- The final step is to enable login page mode in your WordPress admin area. This might sound difficult, but SeedProd makes it super easy.
- Simply exit the visual landing page builder and head back to the main SeedProd dashboard. Under the Login Page section, toggle the button from Inactive to Active.
That’s it! Now your WordPress login page has a custom design.
Customize WordPress Login Page With WPForms
WPForms is a polls and survey plugin that can enable any type of form on WordPress websites. Let’s take a look at how to create a login page with WPForms.
Install WPForms on Your Site
- The first thing you need to do is install and activate the WPForms plugin. Make sure to verify your license key by navigating to WPForms » Settings. You can obtain the license key from your account on the WPForms website.
- To be able to create a custom login page with WPForms, you’ll have to install the User Registration addon by going to WPForms » Addons. Click Install Addon next to User Registration Addon and then click Activate.
Once the addon is activated, you can go ahead and create a user login form with WPForms.
Create Custom Login Form
With WPForms’ powerful drag and drop builder, you can build a login form in just a few minutes, not hours, without writing a single line of code.
- To create a login form, visit WPForms » Add New. In the form setup page, you’ll need to choose the User Login Form template to create a login form.
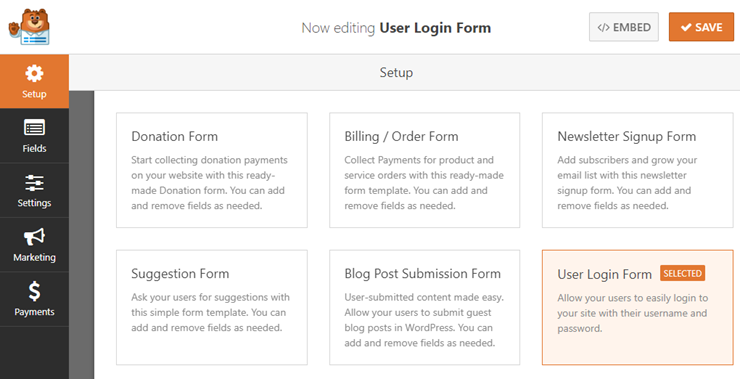
- You’ll now see the form builder where you can add, customize, and remove login form fields. By default, the login form template adds the following form fields: Username and Password.
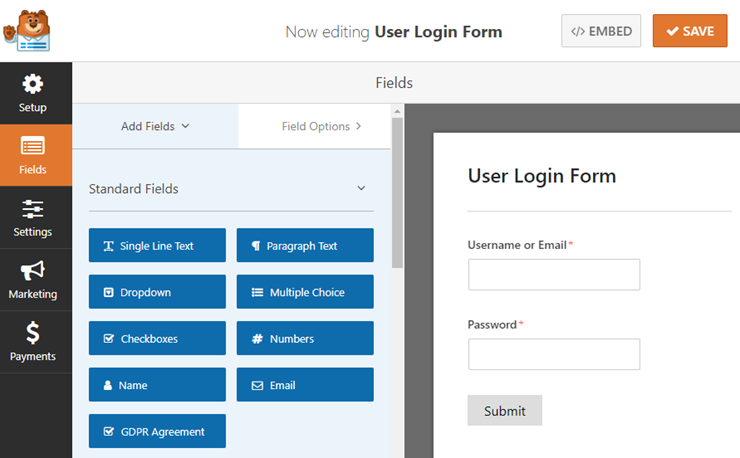
- You can customize any field by clicking on it in the page builder. Then, you can make the desired customizations in the left-hand panel.
Configuration Your Form
- To configure general settings, you can go to Settings » General. On this page, you can customize the form name, description, submit button text, etc.
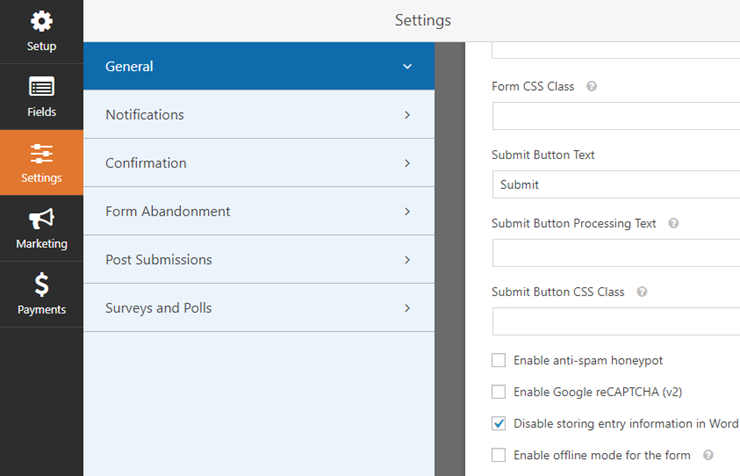
- You don’t have to do anything in the Notifications tab for your custom login form. By default, notifications are turned off, so you won’t receive an email whenever someone logs into your site.
- When a user logs in through your custom login form, they’ll land on your website’s homepage. You can change the redirect URL, if you want, in the Confirmation Redirect URL field.
Publish Your WordPress Form
One of the main benefits of using WPForms for creating a login form is that it lets you embed your form anywhere on your site, including posts, pages, sidebar widgets, or widgetized footer areas.
Let’s take a look at how to publish your form in posts or pages.
- Create a new post or page in WordPress and then click on the + icon in the Gutenberg block editor. You can search for the WPForms block and click on it.
- Next, select your login form in the WPForms block and it’ll automatically load in your post / page.
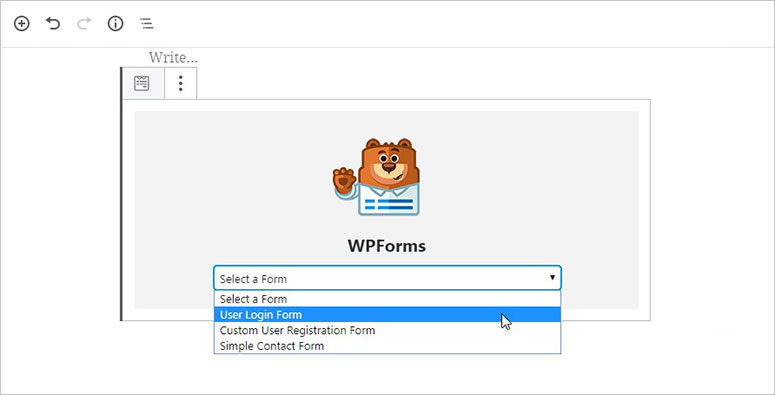
- After adding the form, you can publish your post / page.
- You can also add the login form to your sidebar widget as follows. Head over to Appearance » Widgets and add the WPForms widget to your sidebar.
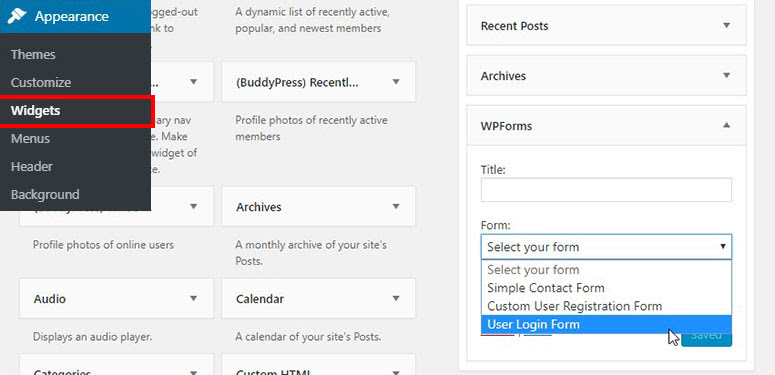
- Select your custom login form in the widget’s settings and click on the Save button to save changes.
Customize WordPress Login Page With Theme My Login
The Theme My Login plugin makes it super easy to publish a custom login form on your WordPress site. To create a simple login page, all you have to do is install and activate the Theme My Login plugin.
The plugin works out of the box without any further configuration.
However, if you need to customize the plugin settings, you can click the Theme My Login menu in your WordPress dashboard.
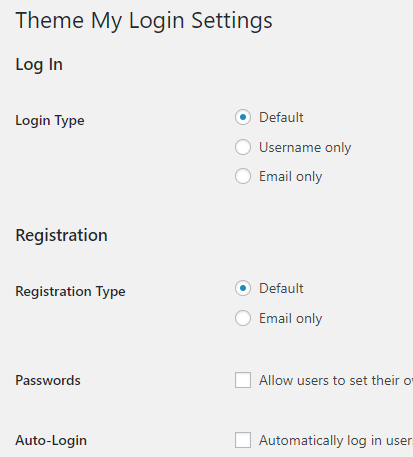
You can then change the login and registration types. You can also adjust the URL slugs for the login, logout, registration, lost password, and reset password pages.
Conclusion
In this guide, we’ve seen different ways to customize the WordPress login page. If you want something quick and easy, the plugin’s method is the way to go. With a page builder/landing page builder, you can customize the login page without writing any code. One of the main advantages of page builder plugins is that you can see the changes in real-time and that they come with several pre-made templates. We hope you liked this blog on how to customize WordPress login page, for more informative and comprehensive content, keep watching this space.

Leave a Reply