How to Manage Orders in WooCommerce? (Beginners’ Guide)
Amazon ships over 66,000 orders per hour in the US, making it 1.6 million packages per day. Now, even for small eCommerce businesses, managing several orders every day is not easy. It requires proper updates on inventories, shipping protocols, delivery tracking, and more. Thus, learning how to manage orders in WooCommerce and deliver them on time is essential. Read our latest detailed guide on how to setup WooCommerce to setup your online store.
When a customer places an order on your website, a unique order ID is generated to track and manage the order. Managing hundreds of orders every day can create chaos and mishaps. With a proper structure, you can manage multiple orders in WooCommerce.
Define Your Order Status
Mark several points in a purchase journey such as ordered, in-packaging, in-transit, and delivered. This would allow you effective tracking of the orders. For instance, is the payment still pending, or has the order been completed successfully?
Here are the common order statuses:
- Pending Payment: An order is received, but no payment is initiated. These are post-paid or cash-on-delivery orders.
- Payment Failed: Payment is failed or declined due to some problem with authentication.
- Processing: Payment is received, and the stock has been reduced, but the order is awaiting fulfillment. All orders require processing, except virtual and downloadable product orders.
- On Hold: When the payment status is not confirmed, but stock is reduced.
- Refunded: Admin initiated refund for cancellation of prepaid order.
- Canceled: Admin or customer has canceled order due to several circumstantial reasons.
- Authentication Required: Awaiting to authenticate the customer or transaction.
Manage Orders in WooCommerce (Multiple)
Assuming that you have already set up a WooCommerce and receiving significant orders, I suggest you follow these steps to manage orders in WooCommerce:
Overview Orders
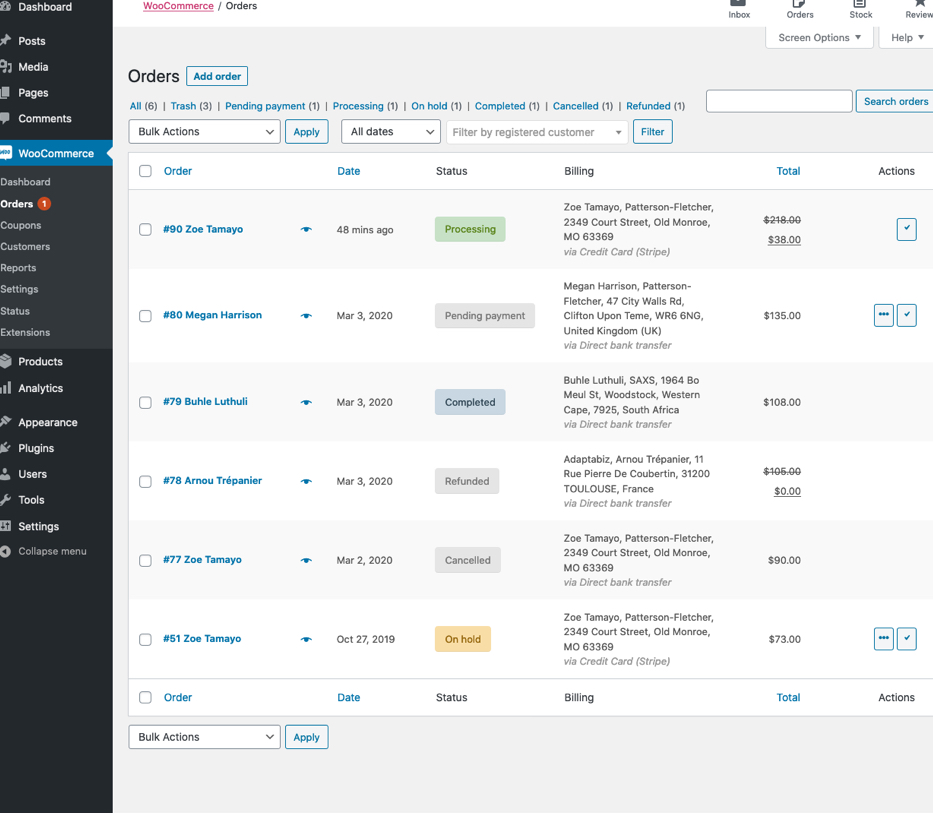
You can view all your orders on the Orders management page. Go to your WordPress admin panel > WooCommerce > Orders.
Every row contains a specific detail about your orders, like:
- Order number
- Customer name
- Date of purchase
- Billing address
- Shipping address
- Order status
- Purchase total
- Actions
WooCommerce lets you change these rows at your convenience. Go to WooCommerce > Orders > Select Screen Options from the top of your screen.

After that, choose which Columns to show. You can also select how many items you want to display on each page. And click on the Apply button.
Filter & Sort Orders
Further, you can filter your orders based on Date (month/year) or registered customer.
You can also arrange orders in descending or ascending order bifurcated to the Order number, Date, or Total. Click on the order number or customer name to see the Single Order page. You can also Edit single order details like Update Status and Add Notes.
Navigate Your Orders
You can search the box at the top right corner of the order list to find and manage orders in WooCommerce. Either type an order number, customer name, or other order details to find a certain order in the list.
Preview Tab
You can click on the Preview to open a Modal. It contains all details about your orders, including shipping details, billing details, order number, etc.
In addition, order statuses are color-themed, allowing you to quickly check your different order details. For instance:
- Canceled – Gray
- Completed – Blue
- Failed – Red
- On Hold – Orange
- Pending Payment – Gray
- Processing – Green
- Refunded – Gray
Also, at the end of a row, you can find shortcut buttons to quickly mark orders as Complete or Processing.
Manage Single Order in WooCommerce
If you wish to view, edit and manage a single order in WooCommerce, that is possible too. Here are detailed processes to manage the order in WooCommerce:
View Order Details
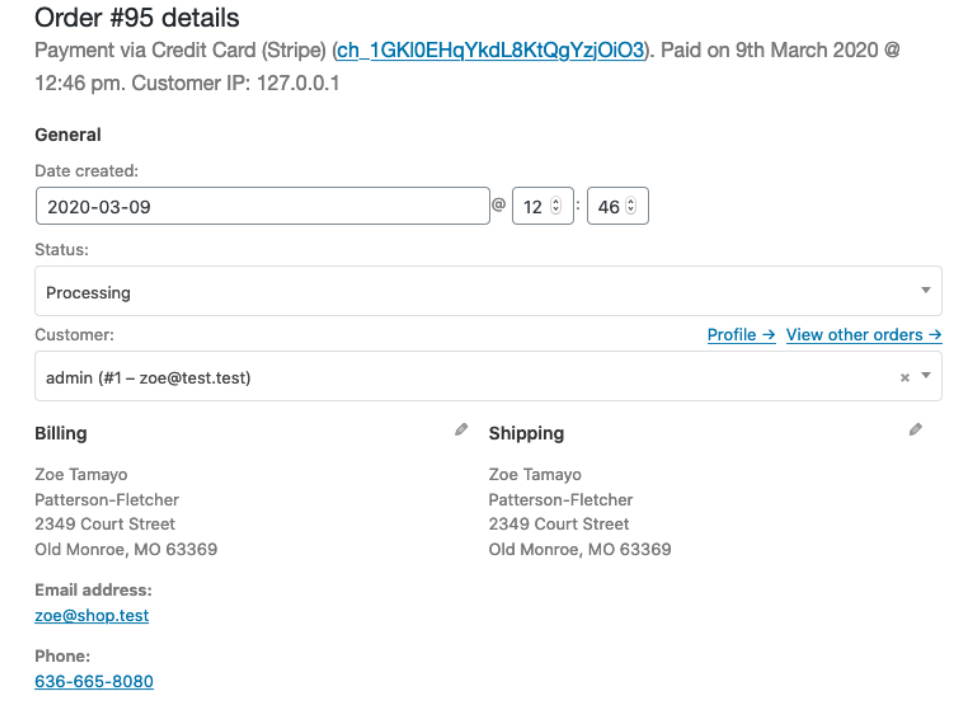
Go to WooCommerce > Orders and click on any order. After that, under the Order Details panel, you can view the following details:
- Payment details
- Order number
- Order date and time
- Customer details, including username, email address, billing details, and shipping details

Edit Order Details
Fortunately, WooCommerce allows you to edit all or some order details. For example:
You can change the order date and time using the dropdown date and quality selectors. From the right dropdown, you can change the order status. Select the current customer or search using the search bar to change the customer status.
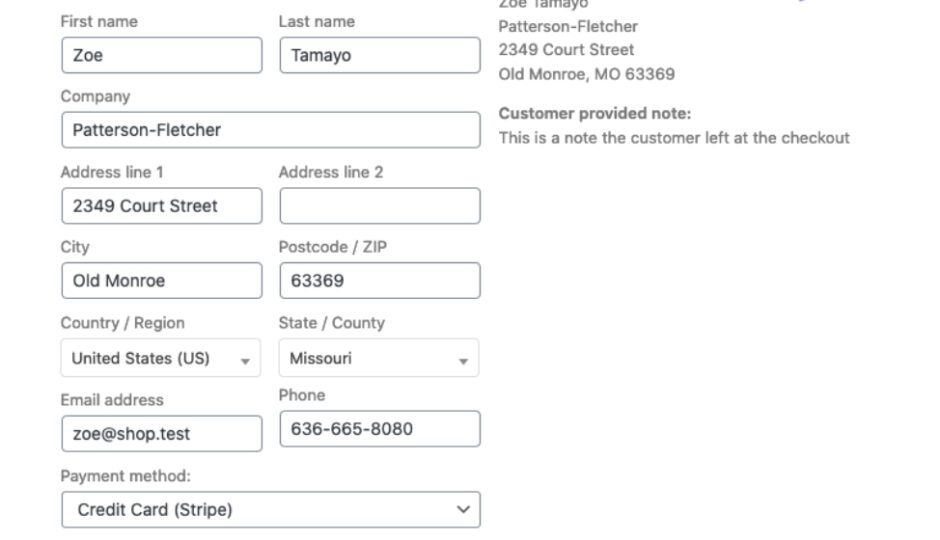
Besides this, you can change several settings under the Billing and Shipping tab. To do so, click on the pencil icon next to each option.

Under the Billing section, you can change the following options:
- Billing address
- Phone number
- Payment method
The Shipping section lets you change:
- Shipping address
- Customer provided note
After making the necessary changes, click on the Update button.
Manage Order Items & Totals
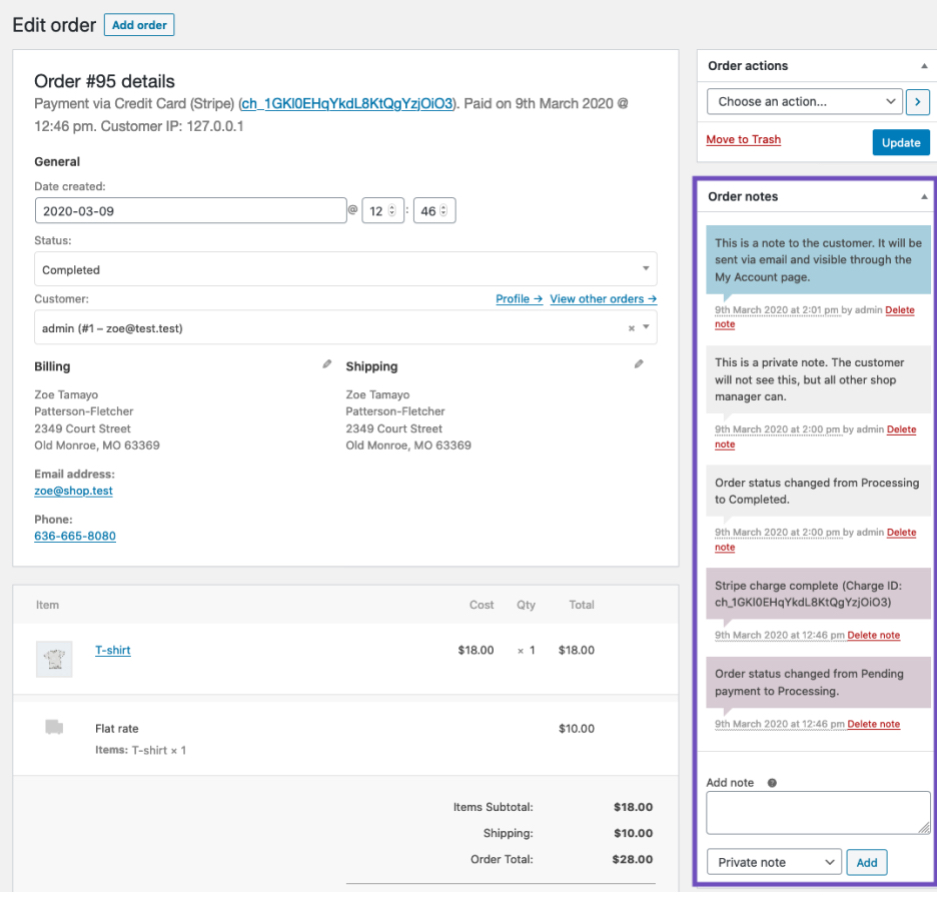
On the next panel, you can view the Order Details. It contains the product items, shipping details, and order summary. Every product item row contains product images, name, single product cost, quality, etc. Below that, all the shipping details are displayed boxed items, total cost, taxes, and shipping method. The last section contains an order costs overview. In case of refund, this section changes.
Editing Order Items
You can only edit the refund, pending payment, or on-hold order items. In order to edit an item, select the pencil icon next to it. After that, you can edit Add Meta, Quantity, Total, and Tax. You can also add a new item to this window. There is also an option to recalculate based on the new settings.
Manage Order Notes
The Order Notes panel shows notes attached to the order, like reducing stock levels or payment results. You can also add notes for customers to view.

WooCommerce allows you to add the following notes:
- Purple Notes: System status notices like payment gateway details.
- Gray Notes: General status notes like private notes or status changes.
- Blue Notes: These are notes to customers that they can receive via email.
How to Manually Add Order?
- Go to WooCommerce > Orders.
- Click on the Add New button to add a single order.
- Add information to all fields like customer details, add line items, etc.
- Set a Status for the new order and Save it.
From the Order Actions dropdown, you can email order details to the customers with payment instructions.
How to Remove Customers’ Personal Data?
With the WooCommerce 3.4+ version, you can easily delete the customer data.
To do so, navigate to WooCommerce > Settings > Accounts & Privacy. Enable the option that says Allow personal data to be removed in bulk from orders. You can also remove customer data from the order list. Just go to WooCommerce > Orders > Select the order for which you want to remove data. After that, select Bulk Actions > Remove personal data > Apply.
Besides this, you can automate personal data removal. In addition, WordPress lets you remove user details via Tools > Erase Personal Data.
You can also automate personal data retention on your WooCommerce site. For this, head over to WooCommerce > Settings > Accounts & Privacy. Under Personal data retention, mark thresholds for inactive accounts and orders with different statuses. And save the changes.
Manage Orders in WooCommerce for Your Online Store
I can bet you are now all set to manage multiple or single orders on your WooCommerce site. I have tried to share every small detail to manage orders in WooCommerce.
This post has covered everything to managing WooCommerce orders, whether adding, editing, or removing order data. To be honest, it is not hard to do. Just navigate to WooCommerce > Orders, and you can easily manage order statuses, customer details, etc.
However, I recommend getting WooCommerce 3.4+ as it lets you remove or retain customer data.

Leave a Reply