How to Move From Shopify to WooCommerce Store Properly?
WooCommerce and Shopify are the two popular platforms to set up an online store. Both platforms have a huge market following and offer amazing features to develop a unique digital shop. However, users often prefer to move from Shopify to WooCommerce once they start getting good traffic. I have come up with the latest guide on how to move from Shopify to WooCommerce. You can check out our detailed guide on how to setup an online store with WordPress.
WooCommerce being an open-source platform provides more flexibility to customize websites. But unfortunately, it is not easy to migrate your old Shopify store to WooCommerce. Some Shopify to WooCommerce migration services are available to help you out, but they can charge a fortune.
So, this step-by-step guide will help to move Shopify to WooCommerce.
Why Move from Shopify to WooCommerce?
Gain Better Control
WooCommerce is an open-source platform that allows you to customize your eCommerce store to attract more users. Its seamless integration with WordPress lets you publish SEO content on your site.
Additionally, WooCommerce has a more diverse payment gateway option than Shopify. WooCommerce also has a feature to directly deposit money into your bank account.
Easy to Customize
WooCommerce is 100% integrated with WordPress that helps users to customize their websites. Using WordPress block editor, you can design landing pages, categories, blog posts, and more.
Price Control
Shopify charges a fixed sum for monthly plans, transactions, and add-ons. Using an external payment gateway on Shopify will take 0.5% to 2% per transaction.
Luckily, WooCommerce provides full price control. Initially, WooCommerce and WordPress were 100% free. So, based on your budget, you can select hosting providers, themes, and other plugins. WooCommerce allows you to build your online shop – on your budget.
Vast Community
WooCommerce has large community support. More than 68,000 of the top million websites are running on WooCommerce. In comparison, Shopify runs merely 1,000,000 businesses in 175 different countries. So, WooCommerce users get more community support than Shopify users.
How to Move From Shopify to WooCommerce?
For growing businesses, WooCommerce has a better customizable and flexible environment. Therefore, if you are ready to expand your online business from Shopify to WooCommerce, follow these steps:
Configure WooCommerce
Before moving your Shopify store to WooCommerce, let’s first install and set up WooCommerce.
WooCommerce is a self-hosted platform. Thus, you have to get web hosting and domain name to set up a WooCommerce site. There are many great web hosting providers available for WooCommerce. But I’ll recommend using Bluehost. It is an officially recommended web hosting by WooCommerce and WordPress.
Also, Bluehost offers a free domain name and SSL certificate at $2.65/month.
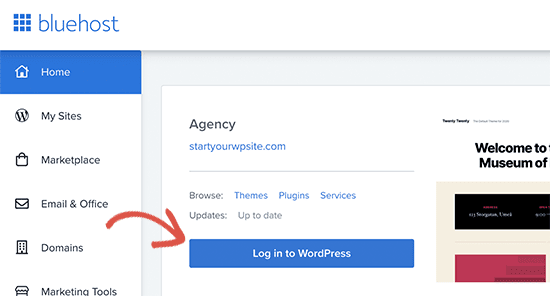
Once you are signed up for Bluehost hosting, it will automatically install WordPress for you. Click on the ‘Log in to WordPress’ from your hosting account.
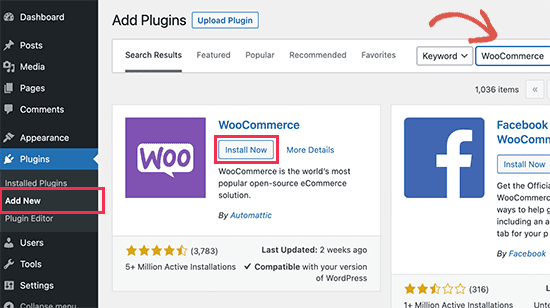
Go to Plugins > Add New > Install and Activate WooCommerce from the WordPress admin panel.
Follow the on-screen instructions to set up WooCommerce, such as payment gateway, store details, etc.
Download Shopify Data
Earlier, there was no reliable option available to move Shopify to WooCommerce. There wasn’t any plugin or built-in Shopify data migration service available to help WordPress users.
But thanks to WP Shopify to WooCommerce exporter, it is now super easy to export Shopify data and then import it to WooCommerce.
Let’s see how to migrate data from Shopify using this free tool.
- First, visit the Shopify to WP website.
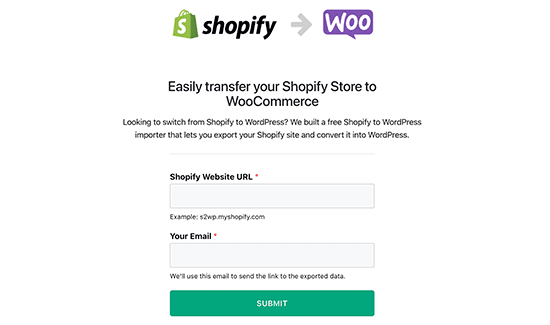
- Enter your Shopify website URL and a valid email address.
- Click on the Submit button.
- This will take you to your Shopify store’s admin section. There you need to install the app to automatically generate a Shopify API key for data migration.
- On the next screen, you can export all your store data using the Shopify API, including product categories, customer data, and more.
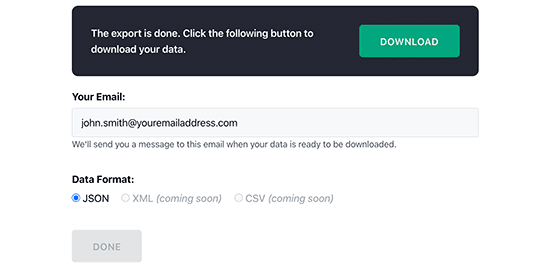
- Provide an email address to receive a link to download the export file.
- Click on the Start Export button.
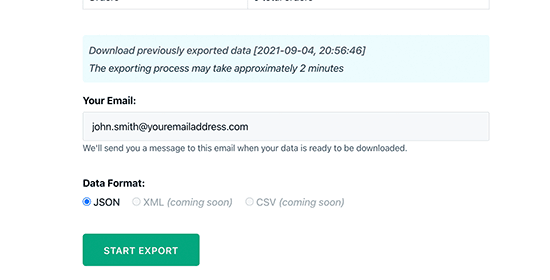
Once the process is complete, you will get an email with a link to download the file.
Import Shopify Data in WooCommerce
Now move the Shopify exported data to your WooCommerce store by uploading it directly. To do so, go to the WordPress admin panel and install/activate the Import Shopify to WP plugin.
After that, go to Tools > Shopify Importer. From here, select the Choose File button to select the Shopify export file. Click on the Upload button.
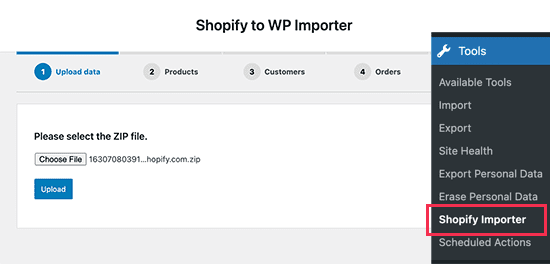
Now, click on the Start Import button to import data to your WooCommerce store. Once the process is complete, you can review all your Shopify data on the WooCommerce site.
Setup Your WooCommerce Store
Now that you have migrated your products, orders, and other Shopify shop data to WooCommerce, let’s customize your store.
Here’s how to customize your WooCommerce store:
Select A Theme
There are a plethora of WordPress eCommerce themes available, but I suggest using Astra. WP Astra Pro has several templates and options to customize your store. While moving from Shopify to WooCommerce, the Astra theme can add better customizations such as beautiful navbars, conversion-friendly product page elements, and more.
There are more ways too to make your WooCommerce store better. Follow our guide on how to add custom product builders in WooCommerce.
Design Landing Pages
Landing pages are the face of your digital shop that motivates users to buy from your store. Thus, it is important to design landing pages after understanding the targeted audience.
However, eCommerce store owners don’t have time to design each landing page while running a business. Therefore, I suggest you use the SeedProd plugin to get dozens of customizable templates to design your product pages.
Work on eCommerce SEO
Search engine optimization is the best way to drive organic traffic to your site. For eCommerce SEO purposes, All in One SEO is a perfect WordPress SEO plugin. AIOSEO comes with numerous SEO optimization features like local SEO, sitemaps, rich snippets, etc.
Monitor Your eCommerce Website
To personalize your eCommerce store, first, understand where your customers are and what they are looking at.
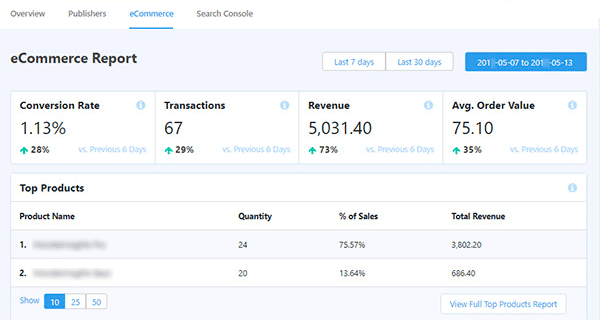
For this job, MonsterInsights is the right analytics plugin. Learn how to add Google Analytics in WooCommerce with MonsterInsights with our exclusive guide. This tool provides complete eCommerce statistics, including top products, average order value, etc.
Improve Conversions & Sales
Do you know 69.75% of desktop and 85.65% of mobile shoppers hit the exit button on a checkout page?
So, if you don’t want to lose your potential buyers just before checking out, get the OptinMonster plugin. This plugin helps to retain customers using targeted popups, exit-intent popups, and more.
Setup Redirects
Now the final step is to set up the redirect from your Shopify store to WooCommerce. Redirects will help move search engines and visitors from your old Shopify website to the new WooCommerce shop.
Remember, if your Shopify domain name is yourstore.myshopify.com, you cannot set up individual redirects. You have to add a link to your store by editing your Shopify store.
If you use a custom domain name for Shopify, point it to WooCommerce and set up redirects.
For this, you have to change your domain’s DNS settings. Your new web hosting provider will access DNS server addresses that you have to enter in your domain settings.
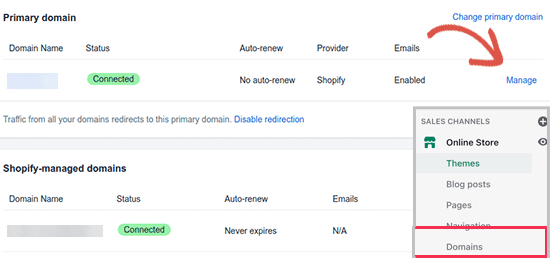
If your domain is registered via Shopify, log in to your account > Online Store > Domains.
After this, still some URLs in product descriptions might point to your old Shopify site. Here using the Velvet Blues Update URLs plugin, you can bulk update all those URLs.
Once the plugin is installed and activated, go to Tools > Update URLs. There enter your Shopify store URL as the old URL and WooCommerce URL as the new URL. Simply click on the Update URLs Now button to fix all your links.
However, if you have any blog posts or pages on your old Shopify website, the Redirection plugin will be more useful here.
Similarly, upon activation, go to Tools > Redirections > Add New. Provide the old post or page URL in the Source URL field and the new URL in the Target URL field. Just click on the Add Redirect button once you are done.
Successfully Move From Shopify to WooCommerce!!!
That’s it! You have successfully moved the Shopify store to a WooCommerce shop.
Throughout the post, I have mentioned different tools and services to migrate Shopify to WooCommerce. For some of the paid tools, you can find coupon codes on our website. So, do check the coupon section on this site before getting the tool.
I hope this article contains everything that can help you easily migrate Shopify to WooCommerce. But if you have any suggestions, do jot down below.

Leave a Reply