How to Transfer Web Hosting of Your WordPress Website? (Best Guide)
Do you want to shift your WordPress website to a new host or server without downtime and data loss? If so, you are in luck, as there are over 330,000 web hosts available worldwide. All you now need to learn is how to transfer the web hosting of your WordPress website. If you want more bandwidth and speed or simply are not happy with your current web host’s services, you can easily shift your site to another host. In fact, most website hosting providers offer site mitigation services. However, if you don’t want to pay for a web hosting transfer, you can also manually do it. So, let’s see how to transfer web hosting of your WordPress website without losing your sales and search engine ranking.
Transfer Web Hosting of Your WordPress Website in 7 Steps
Before we discuss how to transfer web hosting of your WordPress website, remember WordPress offers a free migration service. Usually, the service is free, but you might have to pay a small fee depending on your website data size. Besides this, most web hosting providers also offer migration services. You can check with your new web host company to know more about it.
Let’s get back to the topic and explore step by step process to transfer your website’s hosting:
Find Good Web Hosting Provider
First, you need to find a good web hosting service provider supporting your requirements. The web hosting transfer process is not that simple. Thus, ensure to select your web host carefully after checking the price, speed, and other factors.
Here are some of the best web host providers:
- Bluehost is a popular web hosting service that offers an in-house migration team.
- DreamHost is a multipurpose web hosting with vast storage, high speed, and free migration.
- A2 Hosting is a small web hosting company with dedicated customer and migration support.
Get Duplicator Plugin
Next, you need to install a Duplicator plugin on your website to transfer your website data without losing its SEO work. It is a free plugin that you can download from the WordPress store. This plugin can move, migrate or clone a WordPress site between domains or hosts with zero downtime.
Just go to Plugins > Add New on your WordPress admin panel to install and activate the Duplicator plugin.
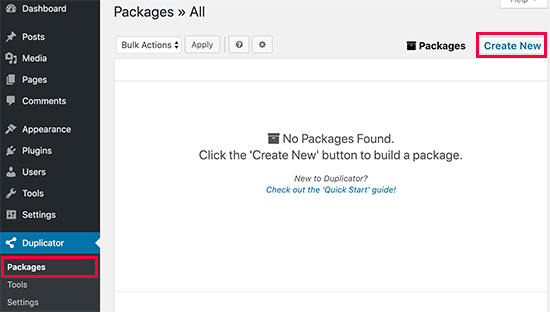
After that, go to the Duplicator > Packages page > Click on the Create New button. Click on the Next button and follow the instructions to create a package.

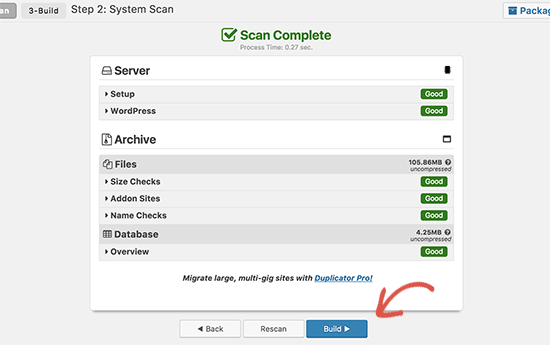
Ensure that scan results are all good, and then click on the Build button.

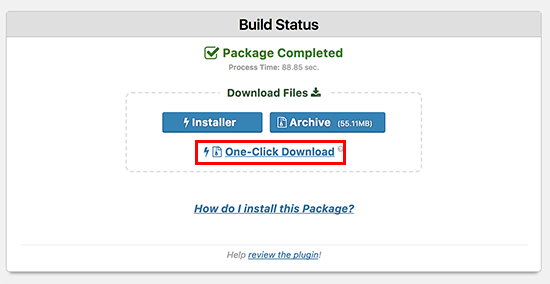
It will take a few minutes to complete the process, so keep your tab open. Once it’s done, you will see two options to download – Installer and the Archive package.
You need to click on the third one showing the ‘One-click download’ link to download both files.

The Archive file contains a backup for your site, and the Installer file will ignite the installation process for you.
Move Files & Database
Now, you have to transfer both Archive and Installer files to your new web host. For this, you will need access to your new hosting account’s FTP client. FileZilla is the most commonly used FTP. Check our latest guide on how to use FTP to upload files using FileZilla.
To upload your website file:
- Connect FileZilla to your new hosting account, and under the Remote Site column, check for the public_html folder. FileZilla is a utility for transferring files to or from a remote computer by a standard method known as FTP (File Transfer Protocol).
- Look for the folder with the site files you want to upload under the Local Site column.
- Right-click the folder and select Upload.
Usually, you would use your domain name when connecting to an FTP client that’s still pointing to your old host. Therefore, you have to use the server’s IP address or server hostname to connect with your FTP client.
You can find this information under your new web host’s cPanel dashboard. If you are unable to find the information, you can contact your new web hosting provider for help. Ensure your root directory is empty. Some web host providers automatically download WordPress when you sign up. If WordPress is installed in your root directory, delete it before uploading the Archive and Installer zip files.
Change Host File
Next, you need to change the host’s file to prevent downtime. You need to open the installer.php file in your browser. Usually, you can access the file using this URL:
http://www.example.com/installer.php
This URL will redirect you to your old hosting and show a 404 error. That is because your domain name is still pointing to your old host.
Some might suggest you change your domain nameserver and point it to your new host. But never do that. This will show a broken link to your visitors. That will impact your traffic and sales.
Fortunately, there is a way to access your new WordPress site temporarily without affecting the old one. This is possible with the host file on your computer. The host’s file can map a domain name to the specific IP addresses. It simply tricks your computer into thinking that the website has been moved, even though it is not.
Making changes to the host file allows you to access your website on the new web host. At the same time, the rest of the world will access your website on the old host. This will maintain 100% uptime.
Foremost, you need to retrieve your IP address from the cPanel.
After that, go to Programs > All Programs > Accessories > Right-click on Notepad > Run as Administrator.
When the Windows UAC prompt appears, click on the Yes to open Notepad with the administrator.
Once on the Notepad window, go to File > Open and follow this location
C:\Windows\System32\drivers\etc.
Now, select and open the host file.
On Mac devices, you need to open the Terminal app and follow this command:
sudo nano /private/etc/hosts
Both Windows and Mac users have to add their IP address and domain name at the bottom of the host file, like this–
192.168.1.22 www.example.com
Save the changes. And you can access files on the new host using the same domain without any problem.
Setup MySQL Database on New Host
Before running the installer on your new web host, you need to create a MySQL database on it. You can skip this step if you have already created a MySQL database. Otherwise, follow the lead.
Log into your new web hosting account. Open the cPanel dashboard, navigate to the Database section and click on the MySQL database. You will find a field to create a database. Give a name to your database and click on the Create Database button.
Next, scroll down to the MySQL user section. Provide a username and password to create a new user account. Then click on the Create a user button. Now, add this user to your database. It will provide the database with all the permissions to work on the new user account.
For this, scroll down to Add User to a Database section. Simply select the database user you created from the dropdown menu, select database, and click on the add button.
Your database is now ready to use on your WordPress site. You should note down your database name, username, and password. This information will be required in further steps to transfer the web hosting of your WordPress website.
Start Duplicator Migration Process
You are now ready to run the installer. Just open this URL on your web browser, and replace the example with your domain name:
http://www.example.com/installer.php
- The installer will run a few tests and show Pass before the Archive and Validation tests.
- Check the terms and conditions checkbox and click on the Next button.
- You have to add your MySQL host, database name, username, and password on the next screen.
- Your host will probably be localhost. After that, enter the database you have created in the previous step.
- Click on the Test Database button to ensure you have entered the correct database information.
- If Duplicator is connected, you will see a string starting with Pass. Otherwise, you might encounter a database connection error.
- Click on the Next button to continue. Duplicator will import your WordPress database from the Archive zip file to the new database.
- Next, you will be prompted to update the site URL or path. As you are not changing the domain name, there is no need to change it.
- Click on the Next button for Duplicator to take you to the final login page. From there, you can log in to your WordPress and check if everything is running fine.
Update Your DNS
The final step in transferring your WordPress site host is to update your domain name server. To do so, you have to switch your DNS nameservers.
This will make sure that your users are taken to the new website location. You need the DNS nameserver information from your new web host. That looks like this:
ns1.hostname.com
ns2.hostname.com
The steps to change DNS varies from host service to service. This guide will show you how to change DNS nameservers with GoDaddy.
Log in to your GoDaddy account and then click on Domains. After that, click on the Manage button next to the domain name you want to change.
Under the ‘Additional Settings’ section, click on ‘Manage DNS’ to continue.
Now, head over to the Nameserver section and click on the Change button.
From there, you need to switch the nameserver type from the dropdown menu to Custom. Next, enter your new hosting provider’s information under Nameservers.
Click on the Save button and wait for around 4-48 hours to complete the process.
Transfer Web Hosting of Your WordPress Website
You are all set to transfer web hosting of your WordPress website. As you can see, it is possible to switch your web hosting without downtime or spending a penny.
Though if the above-discussed steps are hard for you, the free WordPress migration facility is always available. In addition, you can consult your new web host provider for migration assistance.
On parting notes, I would suggest you keep your old website for at least a week. This way, you will have a backup in case something goes wrong with your new host.

Leave a Reply