How to Add Contact Form Pop-Ups on WordPress? (Best Guide)
Do you want to increase your email subscribers by increasing your customer engagement? WordPress pop-ups are the exact solution to your problem. With contact form pop-ups, your visitor can find your page and accelerate action in just a few clicks. This article will focus on how to add contact form pop-ups in WordPress.
What is Contact Form Pop-ups?
Contact form pop-ups are a common trend that we come across on many websites, nowadays.
Contact form pop-ups are sudden pop-ups on your screen, which are subjected to an action users do on the website. For example, some pop-ups appear when you scroll down to 50% of the page. Whereas, some pop ups appear when you are trying to close the tab and exit the website.
There are WordPress plugins that can help you create pop-ups. For example, OptinMonk is an exit pop up builder tool. If you are planning to try it out, you can get some great discounts using our OptinMonk coupon code while making the purchase.
It is a form With minimal fields such as name and email ID and the intent is only to get subscriptions. The user simply clicks on the contact button or link, rather than going on a new page.
You can create contact forms on WordPress easily by using WPForms plugin.
But before asking for user’s contact information its important to get consent from the user. Cookie consent is required under the EU’s strict GDPR cookie consent requirements before collecting personal data from a visitor. Failure to do this will result in not complying with international privacy laws. To avoid this, check out our guide on how to create cookie consent popup on your WordPress.
Why Do You Need Contact Form Pop-Ups?
A contact form pop-up can be handy to both the users as well as for the owners.
User-Friendly
Contact forms are user friendly. It enables the user to connect directly with the website without causing any inconvenience. Therefore, retaining the user from navigating away from your site.
Organized Source of Information
The contact form provides the organized data of the users landing on the website. This data can further be used for lead generation and marketing campaigns—for example, email campaigns, newsletter campaigns, and many more.
How to Add Contact Form Pop-Ups in WordPress?
There are hundreds of paid and free WordPress plugins that can help you add contact forms or any kind of form on your WordPress website. However, WPForms is the most popular and recommended by many experts. Now, using the OptinMonster and WPForms plugin, let’s start the detailed guide on how to add contact form pop-ups in WordPress.
Step 1: Install OptinMonster & WPForms
First, install OptinMonster plugin and then install WPForms in WordPress to get started. Here, you can opt for the OptinMonster plugin with the canvas form type and WPForms.
Step 2: Create a Contact Form Using WPForms
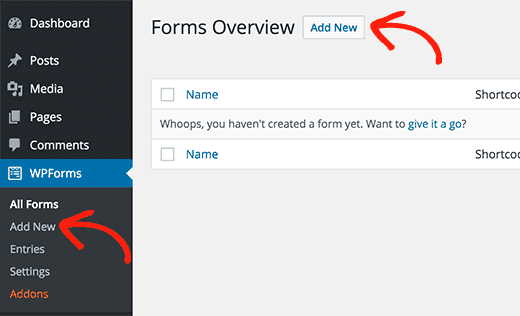
- First, click on the WPForms menu present in your WordPress admin sidebar.
- Now, click on the add new button.
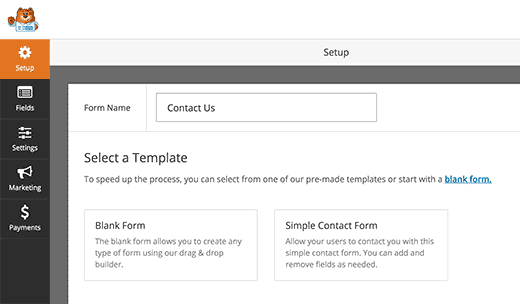
- You will now see a form builder where simply you will enter the name of your form. Then click on the simple contact form template.
- Now, you will be redirected to the field editor section automatically, where you can edit or remove any field accordingly. You just need to drag and drop to rearrange your fields.
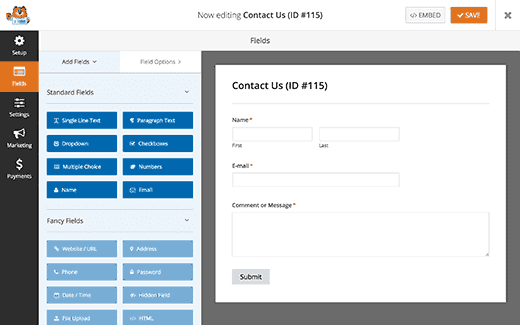
- Now, to save the changes, click on the Save button.
- Go to the WPForms page and then to all forms page.
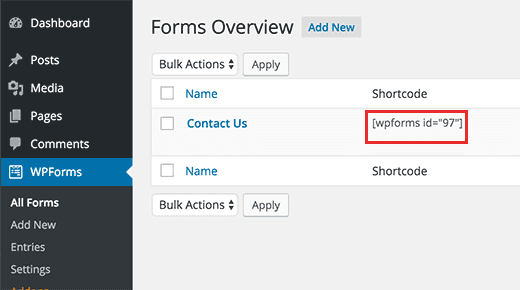
- The Contact Form will be listed there. Copy the shortcode written right next to the contact form.
(If you already have a contact form created with the WPForms plugin, kindly ignore this step.)
Step 3: Add Pop-Up Form Using OptinMonster Plugin
- First, create a new optin by clicking on the OptinMonster option present in the WordPress admin sidebar.
- Then, click on the create a new optin button.
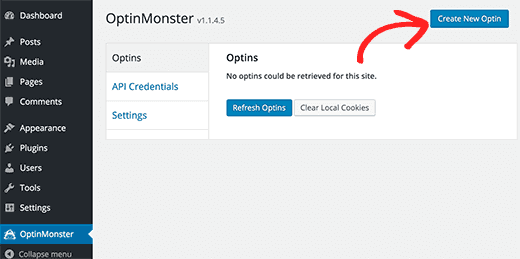
- You will be redirected to the OptinMonster website, where you can create your popup.
- Provide a unique title to your campaign.
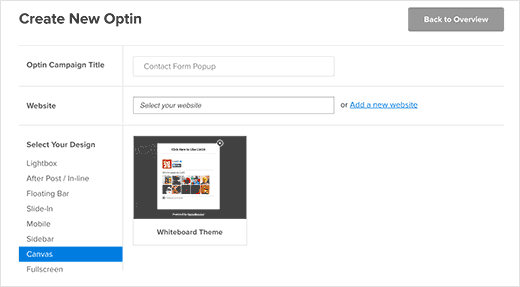
- Now, select your website from the dropdown menu and click on the canvas to choose your design option.
- You will find a number of templates. But initially, you will see a whiteboard canvas available. Select the whiteboard canvas.
- You will be redirected to the Optin customizer screen with a blank canvas.
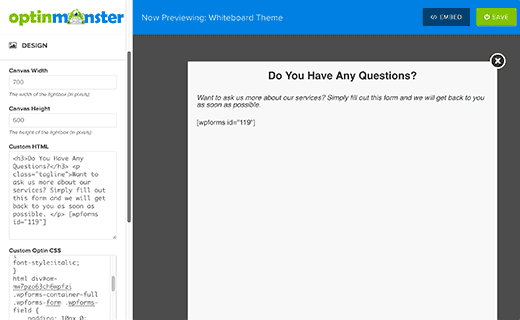
- Sign up for the contact form in the blank space.
- Put the exact width and height of your canvas accordingly. Under the custom HTML box, add the contact form shortcode. You can also customize your form using HTML code.
- Enter the custom CSS. Below the custom CSS box, you will notice a random text which may look like this: HTML div#om-mw7pzo63ch6wpfzi. This is known as the CSS prefix, which you have to enter in the custom CSS box.
- Switch to the configuration tab present in the customizer.
- Now, change both the optin cookie duration and the optin success cookie duration to 0.
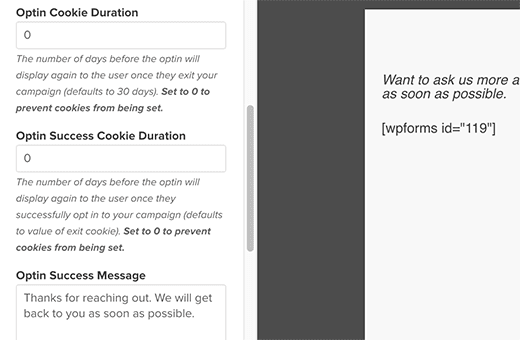
- It will stop OptinMonster from setting the duration of cookies.
- Now, change the optin success message.
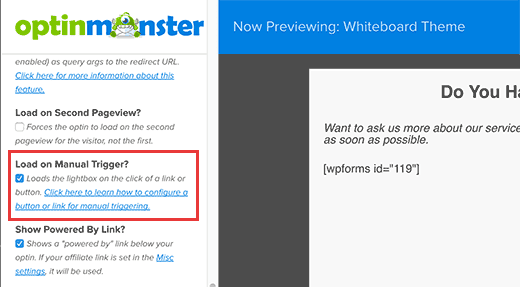
- Finally, your popup will only be visible to the visitors who click on the link or a button. For this, you have to enable the manual trigger button.
- Check the box under the ‘load on manual trigger’ option.
- Lastly, save the changes. Then click on the close button to exit the customizer.
Step 4: Add Pop-Up on Your WordPress Website
- Go back to your WordPress admin dashboard and click on the OptinMonster button.
- If you are not able to see your optin, simply click on the refresh button.
- Now, click on the edit output settings link available below your optin.
- You will automatically land on the output settings page for the popups.
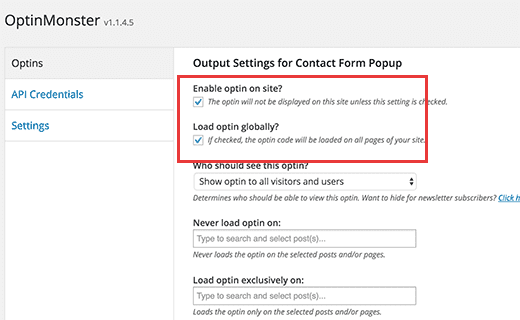
- Check the box next to the enable optin on-site and load optin globally options. You need to check both these options, as, without both of them, the popup will not appear on your website.
- Now, you will see the option of parse content for short codes. Make sure it is checked as then OptinMonster will not parse the short codes inside your popup.
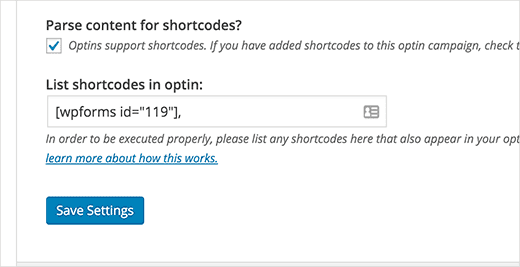
- Enter the short code, which you have included in your popup, as it will be your contact form’s short code.
- Click Save to store the changes.
Step 5: Add a Link or Button to Trigger Contact Form Pop-Up
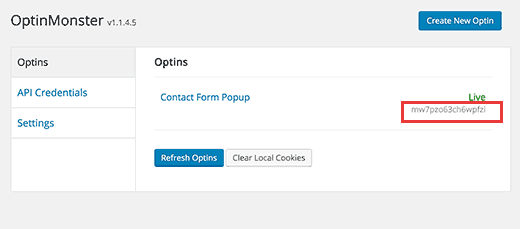
- Firstly, you need your OptinMonster optins’ slug. A slug is the part in the URL that describes the page’s intent.
- For this, click on the OptinMonster icon present in your WordPress sidebar.
- You will see the optin slug present next to your optin title.
- Create a new page in WordPress or edit a post or page where you want to add the contact form popup link or button.
- Now, in the post editor, you can switch on to the text editor and then add your popup link.
- Replace the data optin slug with your optin slug, respectively.
- Finally, save your changes and visit your post or page to see the contact form popup in action.
Bottomline
Contact form pop-ups are important for your WordPress website as it helps you to gain more traffic along with increased conversion and sales rates. Moreover, they help in increasing the user engagement process and also create awareness regarding the products and services.
That’s all, we hope this article on how to add contact form pop-ups in WordPress Website provides you the required information. Finally, if you liked it, do share it on social media and tag us @reviewsnguides.

Leave a Reply