How to Connect WPForms And Salesforce to Save More Time?
One satisfied customer is the biggest asset of a company that can boost its sales constantly. Unfortunately, 72% of customers are suffering from the problem of poor customer service. Now, that’s a huge challenge for businesses to provide optimum quality customer services on time. However, WPForms’s new Salesforce CRM add-on is a dynamic solution that can help businesses overcome this challenge. Let’s have a good look at why WPForms’s Salesforce addon is a revolutionary step and how to connect WPforms and Salesforce effortlessly.
Salesforce is a leading Customer Relationship Management (CRM) solution. It provides assistance to sales, marketing, IT, and customer service teams by integrating them. CRM is an innovative technology for managing your past, present, and even potential customers. It works on a simple ideology – improve your business relationship for better growth.
What is Salesforce CRM?
Currently, CRM is one of the swiftly growing industries with a $120 billion market share. By 2050, it is expected to touch the mark of $82 billion – straight 12% of growth per year According to Buyer Zone, 91% of companies with more than 11 employees are using CRM software nowadays. In a nutshell, CRM tools can be used by anyone who wants to connect – customer lifecycle, digital commerce, sales, and marketing channels.
What is WPForms?
WPForms is a popular WordPress plugin for creating contact forms in WordPress for multiple purposes.
Some of the common forms are – Newsletter form, User Registration form, Contact form, etc. Usually, website owners and bloggers use this plugin to provide a personalized user experience, initiate conversation, make payment and so much more.
With the help of forms, websites can collect user’s information and create custom marketing strategies such as sending custom newsletters, building personalized campaigns, etc.
It is a challenge for 63% of online businesses to generate significant leads and traffic. Thus, using WPForms, they can target customers in multiple attractive ways like newsletters, personalized offers or deals, they can better know their customers and prepare effective marketing plans.
For a non-tech person, it is impossible to manage multiple user forms manually. Therefore, the plugin is the best option for businesses to provide the best quality of customer services.
Integrate WPForms & Salesforce
WPFroms is known for its successful collaboration with many third-party business applications. Their latest collaboration to connect Stripe with WPForms services has made the collection of business payments easy.
Recently, WPForms has introduced a Salesforce addon to automatically send entries to the Salesforce app. It has reduced the manual admin workload to a greater extent.
If you have been spending hours copying data from your forms to Salesforce, this addon will be a blessing in disguise for you. However, it is a new addon, so some users are reluctant to use it.
So, let’s clear the reluctance of users by knowing how WPForms and Salesforce CRM amalgamation can be helpful –
- Cost-Effective – Once you have installed this plugin, you don’t have to purchase third-party tools like Zapier to connect with Salesforce.
- Time-Saving – Indeed, when the manual data copying process is out of the business, you will save lots of time.
- Swift – With one tap, your customers’ information will be transferred to Salesforce. It will bring swiftness to your Customer Management System.
- Effective – Conditional logic is an amazing feature that lets you control form entries. You can define the logic to send entries to the Salesforce tool so that you can make better decisions.
- Dynamic Connectivity – You can connect any kind of WPForms with Salesforce CRM – no restrictions. If you are an elite license holder, you can easily connect any form with Salesforce.
- Multiple Accounts – If you have more than one Salesforce account, you can connect them all through a new addon. It will give you more flexibility to manage your customers and teams.
Overall, the marriage of Salesforce and WPForms is highly beneficial for businesses that have been struggling to manage their customers. Therefore, to save time and effort, you should learn how to connect WPForms and Salesforce systems.
How to Connect WPForms and Salesforce?
If you have been using Salesforce to coordinate your business operations, you can bring more ease with WPForms’s Salesforce addon. You don’t need to possess intensive coding skills to learn how to connect WPForms and Salesforce. With these simple seven steps, you can connect numerous forms with Salesforce CRM.
Step 1. Go Through Your Salesforce Version
Before moving ahead, check your Salesforce version and ensure that your account has API access. The API access is available on the following Salesforce versions – Enterprise Edition, Developer Edition, Unlimited Edition, and Performance Edition.
You can check the Salesforce edition by logging into Salesforce now. The edition details will be mentioned in the browser’s title tab.

If you can’t see the edition, you can click on the profile tab and next on Switch to Salesforce Classic. Up next, click on the Setup present at the top. Expand Company Profile and click on Company Information. At the bottom of the page, your Salesforce edition will be listed. S
Note – If you don’t have Salesforce edition with API access, upgrade now to move ahead to the next step.
Step 2. Get Ready to Install WPForms
This is one of the crucial steps where you are going to install the WPForms plugin to connect with Salesforce. If you have ever installed a WordPress plugin before, you are familiar with the plugin installation process. So, let’s not repeat that and focus on how to connect WPForms and Salesforce.

Once you have installed the WPForms plugin on your WordPress website, click on WPForms and then on Addons in the sidebar. Next, install the Salesforce addon and let the integration process begin.

Note – Keep the WordPress tab open so that you can easily switch back to WPForms.
Step 3. Work on Salesforce WordPress Integration
Now, you have to work on the Salesforce app. You require an app to connect WPForms to your website. First, sign in to your Salesforce account and switch to the Salesforce Classic layout.

On the Classic layout, go to the top navigation bar and click on Setup. Now, scroll down and search for the Build menu item. Tap over the Create option to expand the item list and click on the App link below it. Again, scroll down and stop at the Connected Apps section and click on the New button.

To make your app in the New Connected App screen, you have to fill two fields –
- Connected App Name – Here, you have to enter the name of your app. You can type anything as per your convenience. Salesforce will automatically copy your given name to the API Name field.
- Contact Email – You have to enter your email address in the Contact Email field.

Step 4. Create Authentication for the App
This is an important security step that’s valued the highest in the list of connecting WPForms and Salesforce. In this step, you have to set up your Salesforce app permissions.
You have to navigate the API section and tick on the Enable OAuth Settings box. Now, copy the WPForms callback URL and paste it into Salesforce. Move back to your WordPress dashboard and go to WPForms and Settings. On the top, you will see the integration tap, click on it.

Now, scroll down to the Salesforce icon and click on the small arrow located on the left side of the logo and expand the box. Click on the Add New Account button and copy the callback URL.
Go back to Salesforce and paste the callback URL into the OAuth settings box. Now, scroll down to Selected OAuth Scopes and look for – Access and manage your data (api) and Perform requests on your behalf at any time (refresh_token, offline_access). Give permission by sliding arrows to the right.

Click on the Save button at the bottom. Now, Salesforce will show a message to confirm the settings.

Note – Try to wait for 10 minutes before moving to step 5; otherwise, you might face an error.
Step 5. Let’s Connect WordPress to Salesforce
Now, you have to copy the API keys to WordPress to connect with Salesforce. Similar to step 4, open Salesforce and WPForms in two different tabs. In the Salesforce tab, press the Copy button next to the Consumed key and paste in the WPForms tab. Again open the Salesforce tab, and click next to the Secret Key, and copy it. And, paste on the WPForms tab.
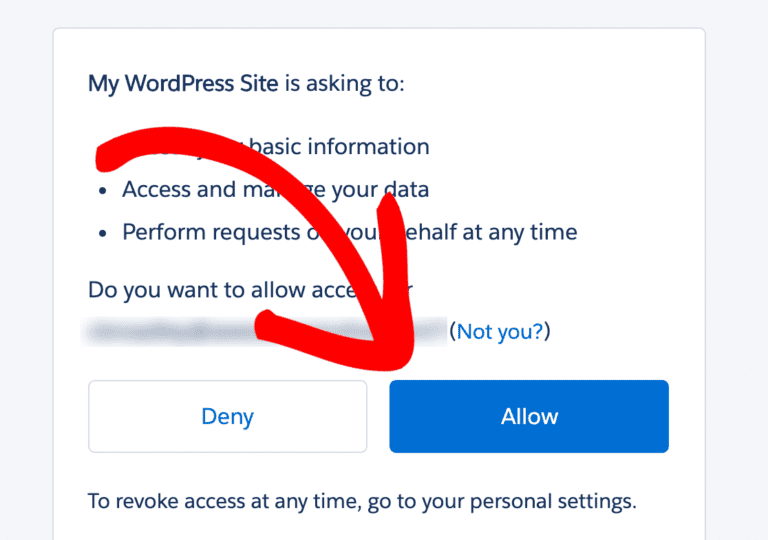
Once everything is done, click on the Connect to Salesforce button. You need to log in again to Salesforce and click on the Allow button. Now, the hard part is over!

Step 6. Create a Salesforce WordPress Form
Now that you know how to connect WPForms and Salesforce, you can send data from a form to Salesforce. With WPForms, you can integrate any form to Salesforce as per your requirements. You have to go to the form builder and click on your form. Next, click on Salesforce and then on Add New Connection.
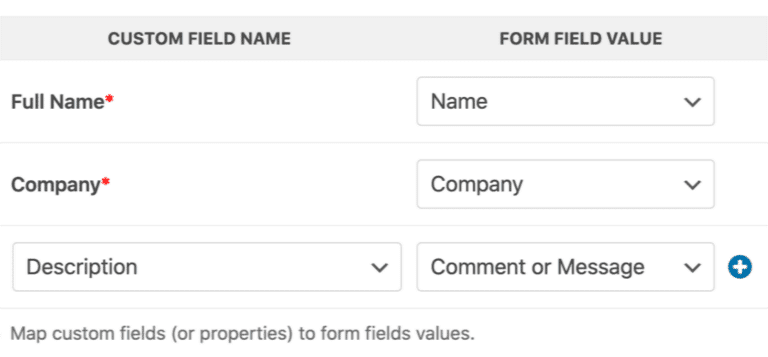
You have to give your connection a name and select your Salesforce account from the drop-down menu. Click on the Lead and define all the fields. You can now save your form or can use smart conditional logic to automatically filter leads.

Step 7. Just Publish It
You can publish your form without any code by clicking on Embed at the top of the form builder.
Then, you have to click on Create New Page and type your form name. Now, click on Let’s Go, and WPForms will automatically create a WordPress page containing your embedded form. Here, you have to just click on the Publish button, and your form will go live.

Get Your Salesforce Integration Now
WPForms offer a wide variety of contact forms like signature forms and multi-page forms in WordPress. You can build a wide range of forms for business use. Moreover, with the Salesforce WordPress integration, the power of CRM technology can be intensified easily.
From making personalized marketing strategies to providing timely customer services, so many operations can be performed efficiently. So, go and connect WPForms and Salesforce app today!

Leave a Reply