How to Create WooCommerce Shop Page With Elementor? (Detailed Guide)
Do you want to improve your online sales? In that case, you have to personalize your shop page because 93% of companies have seen a rise in conversion rate after personalization. Learn how to create WooCommerce shop pages & customize them using the Elementor website builder in no time.
WooCommerce is an awesome WordPress plugin to create online stores. It is bundled up with several payment gateways, order management systems, and more. Once the orders come in, it’s vital to have a proper structure in place that will help you manage orders. To learn, check out our guide on how to manage orders in WooCommerce.
You will also get basic shop pages ready with WooCommerce like check out, cart pages, etc.
But if you want your shop pages to look unique and attractive, codeless plugins like Elementor can help you. By pairing Elementor and WooCommerce, you can customize an eCommerce website with a minimal workload.
Excited? So, let’s see how to create WooCommerce shop page with Elementor.
What is Elementor?
Elementor is a drag-and-drop WordPress page builder. Using a visual editor, this plugin allows you to build stunning pages. It’s made to let you easily create dynamic websites. This WordPress plugin is an all-in-one solution that allows you to manage all aspects of your website’s design from a single location.
We’ve talked about this amazing tool in our exclusive Elementor Pro review. The review shares data about the features in detail, pricing (along with a 50% OFF elementor pro discount code), and benefits and limitations.
To enhance the custom web page building experience, Elementor tries to keep pages lightweight for swift loading. Overlapping multiple elements on a webpage is a technique that limits the number of elements on the page. We’ve explained, in 3 easy steps, how to overlap elements in Elementor.
How to Create WooCommerce Shop Page With Elementor?
Before starting this guide, install and activate WooCommerce and Elementor plugins on your website. To do so, go to Plugins > Add New on your WordPress dashboard.
You can use both plugins for free with some basic features. But I will advise our readers to invest in Elementor Pro. The reason?
Elementor Pro will unlock several great features to customize your shop page, like:
- WooCommerce widget
- Slides
- Media Carousel
- Custom fonts
- Animated Headlines
- Post widget and many more
For all these advanced features, you only have to pay around $49/year per website. There are also other price variations available that you can explore to save money.
So, once you activate WooCommerce and Elementor on your website, follow these steps:
Create Product Archive Template
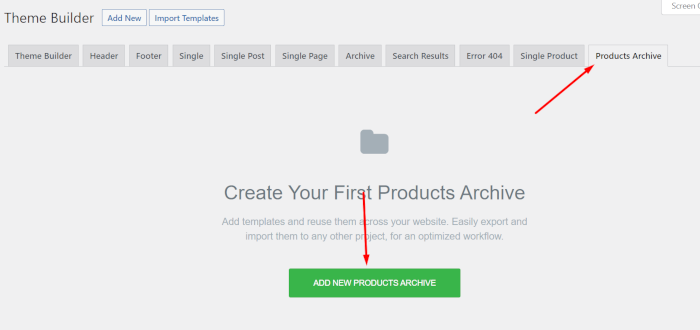
First, create a product archive template to design different pages for your website with different products. Check out our guide to learn how to upload products in WooCommerce website. Once your pages are ready you can then go on your WordPress dashboard, and go to Templates > Theme Builder.
Then, click on the Product Archive tab and then on the ADD NEW PRODUCTS ARCHIVE button.

Give a name to your template and click on the CREATE TEMPLATE button.
Select WooCommerce Shop Page
By default, you can select your WooCommerce shop from three pre-made templates. However, if you want to customize a shop page, close the templates library and use the Product widgets in Elementor.
Before using the Product widget, you have to define your page layout. For this, click on the gear icon from the bottom left corner of your screen. Define the page layout on the Page Layout option under the General Settings block.
You can select the WooCommerce shop page layout as per the design structure in your mind. For example, if you want to create a full-width WooCommerce shop page with Elementor, select the Elementor Full-Width option.
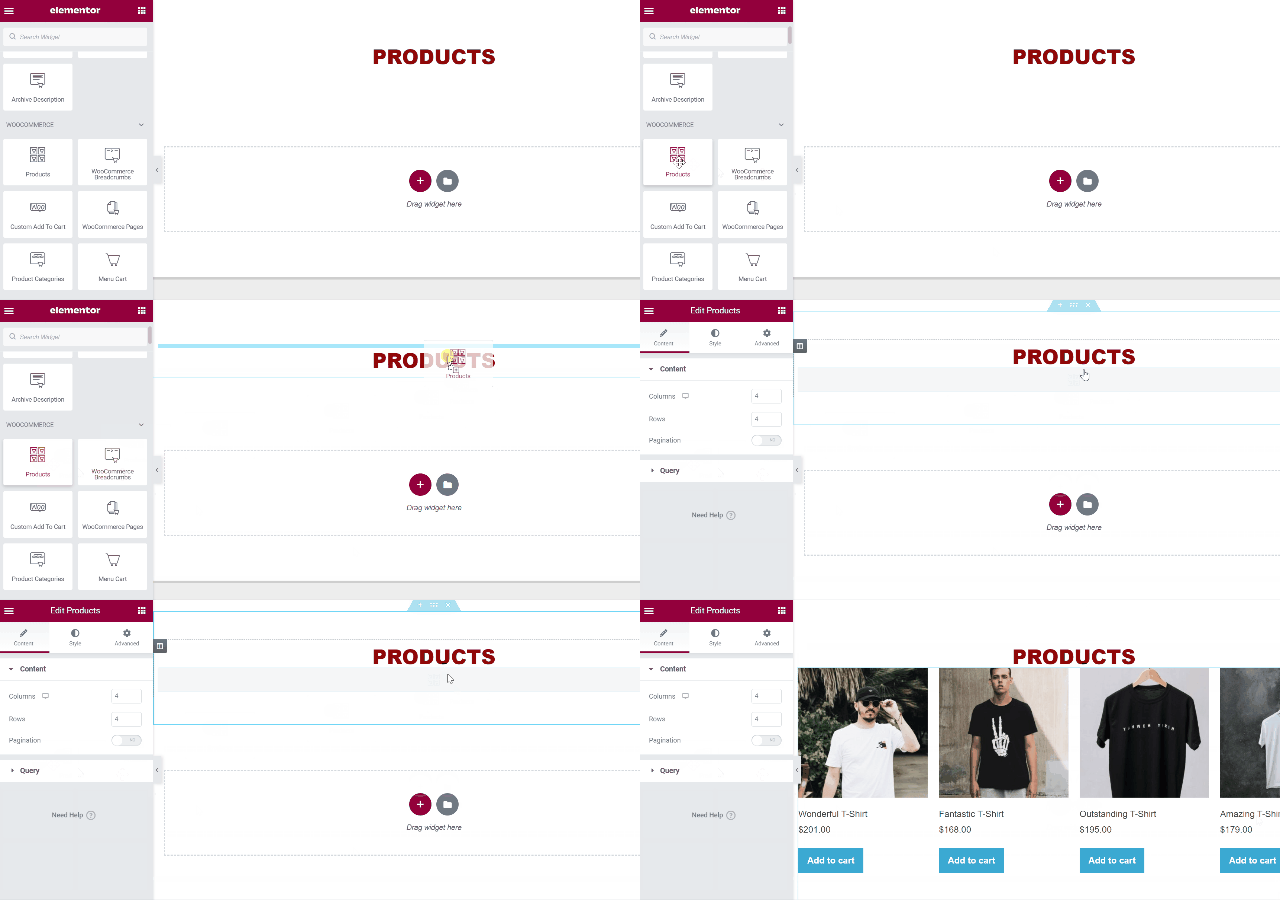
After that, click on the plus icon on a canvas area and select column structure suiting your web page layout.
Edit Shop Page Using Product Widget
The Product widget will now appear on your screen, displaying all your WooCommerce products. Now, you can tweak with queries under the Content tab on the settings panel.
Under Query block, you can define five different queries—
- Current query
- Latest products
- Sale
- Featured
- Manual selection

Users can also set product orders and exclude certain products. You can open the Content block under the Content tab to set the number of columns and rows. Under this block, you can enable pagination.
You can here tweak around with the settings tab to customize the Product widget as per your requirements. Once you are satisfied with the settings, you can embed the Product widget to your web page.
Style Up Your Product Widget
Elementor further allows WooCommerce users to style the Product widget to create interactive shop pages. Click on your Product widget on your canvas area and click on the Style tab from the Elementor edit pane. There you will get four options to style up your Product widget:
- Products: You can use this styling option to set the gap between columns and rows. Under this section, you can modify typography settings like font size, family, and so on. You can also change the text color elements of the product title, product price, and product quality. In addition, you can add product images too.
- Box: Box means the container of each product. You can use the Box block to adjust the width of the border, border-radius, background color, border color, and so on.
- Pagination: If you can’t access the Pagination option under the Content tab, you can enable it through the Style section. You can set things like spacing, background color, border color, etc.
- Sale Flash: You can use this option to highlight the discount given on a product to your buyers. Under the Sale Flash tab, you can customize the sale badge and set text color, background color, border radius, size, distance, etc.
Publish Your WooCommerce Shop Page
Once you are satisfied with your WooCommerce shop page layout, just hit the Publish button to launch your website.
Since you want to create a shop page, click on the arrow next to the Publish button and add conditions. Select the Shop Page condition before saving and publishing your web page.
Bottomline
WooCommerce and Elementor are a match made in heaven for WordPress. Elementor supports a complete WooCommerce builder that allows web designers to create WooCommerce shop pages from scratch.
Not only the shop page, but you can fully customize your WooCommerce website with Elementor. And if you are an Elementor Pro user, WooCommerce, Post, and Product widgets will make your website designing experience much better.

Leave a Reply