How to Upload Products in WooCommerce Website? (Best Guides)
Today, more than 263 million people in the USA shop online, which is projected to surpass 291.2 million by 2025. Digital stores that are optimized for users’ queries are easy to find and attract more buyers. WooCommerce provides an optimized platform to set up online businesses. It is packaged with several order management systems, payment gateways, and other tools. WooCommerce also provides basic shop pages like the checkout and cart pages. However, codeless plugins like Elementor might help you if you want your shop pages to look distinctive and appealing. You can easily customize an eCommerce website by combining Elementor and WooCommerce. To know more, check out our guide on how to create WooCommerce Shop Page With Elementor.
In this guide, we’ll talk about how to upload products in WooCommerce and optimize them for easy access.
It is essential to upload products in the right manner on your site to:
- Attract more customers
- Display all your product details
- Enable better search engine optimization
- Enhance your website aesthetics, etc
So, if you already have set up a WooCommerce site, let’s see how to upload your products.
Upload Products in WooCommerce
With WooCommerce, you can not only build online businesses but also shift your physical offline business to a digital platform. Check out our guide on how to manage brick-and-mortar stock with WooCommerce.
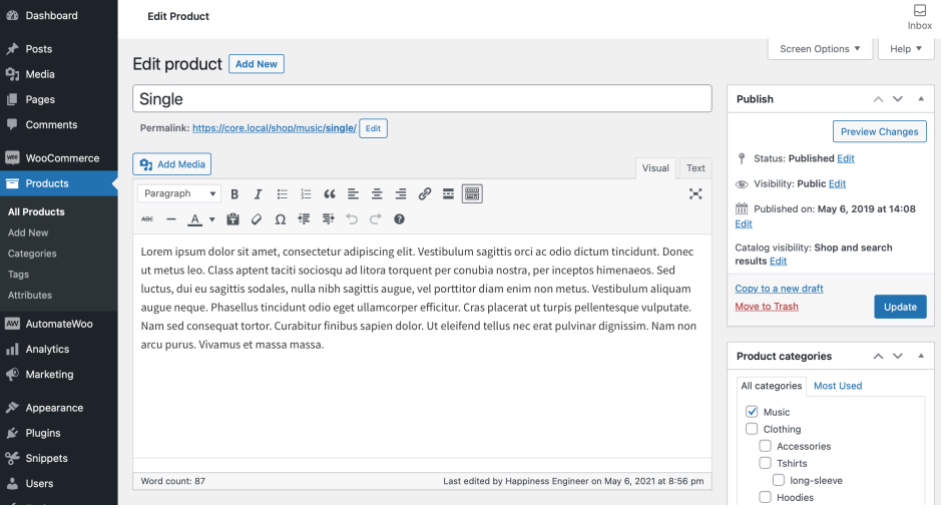
After setting up WooCommerce, open your WordPress dashboard and go to WooCommerce > Products. Click on the Create Product button to upload products in WooCommerce.
This will take you to WordPress editor, where you can start adding your products. You need to make sure that while adding products you need to have proper categories and sub-categories added to avoid duplication and give a semantic look to your store. To know more, check out our guide on how to add categories and sub-categories to your website.
Now let’s jump right into uploading products in WooCommerce:
Insert Product Description & Title
Give a proper title and description of your products. Best of you keep these attributes exactly matching with user queries. This helps search engines index your product page and rank them in search results.
Use relevant keywords and internal links to make an SEO-friendly product page. Here are some tips for writing product titles and descriptions:

- Define your targeted audience, and based on that, select your product description tone
- Highlight product benefits using bullet points
- Narrate a story to capture the buyer’s emotions
- Use power words that help to create urgency, like “exclusive sunglasses” or “limited edition watches.”
- Make your content easy to read with short paragraphs, highlight important facts, bullet or numeric points, etc.
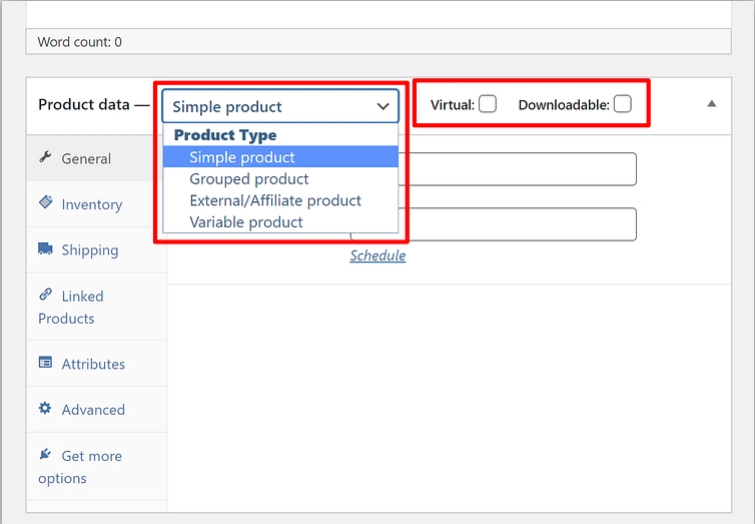
Select Your Product Type
WooCommerce allows you to sell several types of products on your site. Your product should fit into a suitable WooCommerce theme. Find out how to
- Simple Products. It is a default product type under which you can upload all sorts of products in WooCommerce.
- Grouped Products. A grouped product combines simple products like 5 packs of socks.
- Affiliate Products. If you have a drop shipping business, you can use the affiliate products option to link the “Add to Cart” button to an external page.
- Variable Products. These products come in various variations. For example, a t-shirt can come in different sizes, colors or styles.
- Virtual Products. You can select this option if you sell digital products like online courses or software.
- Downloadable Products. If buyers can download your products after purchasing, you can upload products as downloadable. For example, ebooks and audio or video files are downloadable products.

Under the Product data tab, you can select the appropriate product type. The process to upload different products is the same in WooCommerce, with a bit of variation that I’ll explain ahead.
Add Details to Product Meta Data Box
After selecting your product type, you must add product details to the respective fields. You can use the left pane to navigate between different tabs and add relevant data as follows:

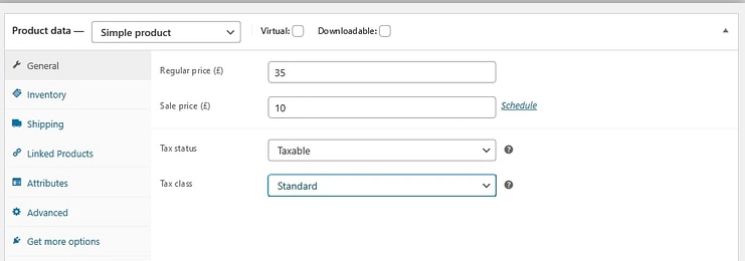
General Tab
Under this tab, you will define the product’s regular price and discounted price. Discounted prices will appear when you run offers on your products. Otherwise, buyers will see the regular price on their screen.
Below that, you can add the tax status if your product is taxable under state law.
Inventory Tab
With the inventory tab, you can manage your entire stock effectively. With default settings, SKU, stock status, and other options are available under the tab.
But if you can’t find stock management options, go to WooCommerce > Settings > Products > Inventory.
The SKU or Stock Keeping Unit number is a unique product identification number that helps you organize your different products. You can assign SKU manually or use WordPress plugins like Easy Auto SKU Generator for WooCommerce.
The SKU field can accept up to 255 characters, including alphanumeric values and some special characters.
If you haven’t checked the option “stock management on product level”, you have to update your products manually. However, if you check this option, the WooCommerce stock management system will automatically update the product status.
Here you have to enter the following product details:
- Add the number of pieces available in the stock quantity
- Allow back orders if the product is being manufactured
- The low stock threshold to notify you when the product’s stock goes below the threshold
Shipping Tab
Under the Shipping tab, you can control your product’s shipping features. For example, you can define product sizes and dimensions.
A shipping class feature also allows you to group products based on their sizes and dimensions. You can further assign shipping rates, service type, and other reasons.
For example, you can put products under 20 kgs under one shipping class and set an express delivery method for those products. On the contrary, you can put products over 20 kgs under one class and set regular delivery as a service type.
Linked Products Tab
Linked product is the best method to increase your sales. In this section, you can show other similar products or products your user might like to buy based on their preferences. This way, users might click on other products and buy them.
Here you can add link products in three ways:
- You can recommend the same product that the user is currently exploring
- For up-selling, you can recommend products that are more expensive than the current product page
- Or, you can cross-sell products from other related categories
In addition, you can also upsell products on the checkout page.
Attributes Tab
This tab helps you add different style attributes to your product like size, options, and so on. This feature is useful when you want to upload variable products in WooCommerce.
Advanced Tab
The Advanced tab will allow you to add a custom message that the buyer will see after placing the order. You can also enable customer reviews under this section. In addition, select the custom ordering position for the item purchased.
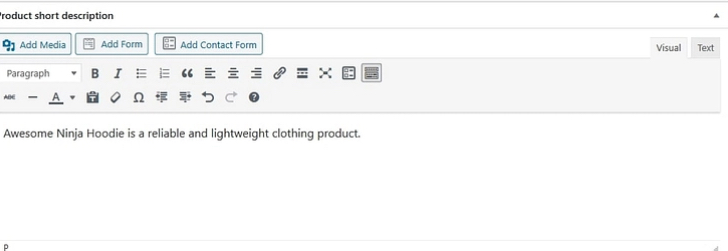
Add Short Product Description
Apart from your detailed product description, you must add a short product description after adding product data. This small description appears on the top of the single product page.

It is like a small snippet of your product that the user can read quickly. Users who like your short description can scroll down to read the long description.
The most important thing to keep in mind while writing a product description apart from integrating keywords is to make sure that your description is grammatically correct. There are many tools that will assist you while writing and one such most used tool is Grammarly.
With the help of the online writing tool Grammarly, you can check your content for spelling, punctuation, grammar, and writing errors. In order to determine whether or not the information is plagiarised, it also compares the content with a database of billions of online pages. It uses artificial intelligence to look for an appropriate alternative for the error. It makes writing simpler so you can write with confidence, clarity, and without errors. If you are inclined towards buying Grammarly, check out our Grammarly coupons and get 20% discount on your purchase.
Therefore, you should write a small description of not more than 2-3 lines. Also, include your targeted keywords and power words to make your description compelling. You can also hire a professional writer to make your product description engaging.
Final Touch Ups
The process of uploading products to the WooCommerce store is almost over. You just have to do some final touch-ups now, like:
Add Product Categories & Tags
Categories and tags will help you organize your online store. It also helps buyers to navigate through your website and find desirable products. Therefore, you should choose product categories and tags relevant to the products that you are setting. For example, for selling women’s fashion items, you can set categories like tops, bottoms, accessories, etc.
Add Product Images
Images are an essential aspect of online shopping. You can not convince shoppers to purchase your products without proper product images. The quality of a product picture plays a very important role in generating sales. The image needs to be edited properly and thoroughly for it to look attractive to users.
There are many photo editing software out there, however, one particular and easy-to-use software is PicMonkey. PicMonkey is a photo editing app that can help you create eye-catching images. You can make stunning photographs that make a statement and leave people in awe. The tool is simple to use, and even those with no technical knowledge can use it to create appealing visuals. Check out our PicMonkey coupon codes and get 55% discount on your purchase.
However, here are a few tips to add well-optimized product photos on your WooCommerce site:
- Only upload high-quality images
- Allow users to zoom in
- Add multiple photos from different angles
- Capture product color and size properly
- Try to capture the contextual and material feel in the images
- Compress product images to load faster
- Hire a professional photographer to click the realistic photos
Publish Your Product
Finally, you can press the Publish button to make your products live on your site. However, I recommend readers crosscheck all the product data, descriptions, titles, and images before publishing products.
Poor grammar, photo quality, or product data can ruin the user experience. Plus, search engine optimization will also suffer. So, only upload products in WooCommerce site when you are fully satisfied with the quality.
Once you publish your products half of the work is done and the main struggle is to generate sales. There are many ways to generate sales such as advertising, influencer marketing and many more. One of the many and most effective ways to increase your revenue is by adding Buy one Get one (BOGO) free coupon. To learn more, check out our guide on how to create buy one get one free coupon in WooCommerce.
Bonus: How to Delete or Feature Products in WooCommerce?
If you want to delete or feature a product on your website, WooCommerce has made it simple.
To delete a product:
- Go to WooCommerce > Products.
- Navigate to the product you want to delete.
- Hover over the product name and click on the Trash.
To set a product as featured, go to Products > All Products > Select the Star in the featured column. Alternatively, select Quick Edit and then the Featured option.
So, Let’s Upload Products in WooCommerce!
As you can see, it is simple to upload products in WooCommerce website. You don’t need any extra plugins or tools to add new products to your online store.
Simply go to WooCommerce > Products, and you can easily add different types of products to your website. However, fill Product data with precision as wrong details can damage your website layout, CX, and SEO.

Leave a Reply