How to Install And Setup Jetpack Plugin? (Best 8-Step Guide)
What if you can enhance performance, customize themes, and improve your WordPress site’s security with one plugin? It isn’t wishful thinking – with the Jetpack plugin, all this and so much more can be achieved easily. So, it is very important for a WordPress user to know how to install and setup Jetpack plugin.
With over 5 million active installations, Jetpack is an all-rounder plugin developed for WordPress users. Jetpack can be used by professional as well as amateur website owners and marketers. You can create surveys, social sharing buttons, and fix lazy loading easily through Jetpack.
Without further ado let’s dive into learning how to install and setup Jetpack in a few simple steps. But first, let’s go through the basics.
What is Jetpack?
Jetpack is developed by Auttomatic, the company behind the development of WordPress. It is one of the best premium WordPress plugins for your personal blog or business website. Once you install Jetpack plugin you get the following features, even with a free version:
- XML sitemaps
- Social sharing buttons
- Elevated security protocols
- Site statistics
- Image CDN
However, the above features are limited and the free version doesn’t give access to website backup too. There’s a great benefit in subscribing to the Jetpack Pro version. In short, Jetpack prevents your website from bloating with numerous different plugins and tools.
Why Use Jetpack?
There are more than 55,000 WordPress plugins available, but why Jetpack is the most popular one? Here are some reasons why you should install and set up Jetpack.
- Free CDN – The most useful feature of Jetpack is the free Content Delivery Network (CDN). Jetpack Photon CDN doesn’t require any signup and offers unlimited CDN bandwidth. With CDN, you can dramatically improve your site’s loading time, which is very beneficial to get in Google’s good grace.
- Quick Image Loading – This feature is mentioned under every optimized WordPress post. A lazy loading feature means loading the image when the visitor scrolls on it. With this feature, you can improve your website’s speed and SEO score.
- Email Subscription – You can enhance the engagement level on your site by Jetpack’s email subscription feature. The Follow Blog button asks people to enter their email address to subscribe to your blog. It also helps in creating an email subscribers list for further marketing campaigns such as newsletters and product information.
- Uptime and Downtime Monitoring – Jetpack set up periodically monitors your website and sends email notifications whenever the website is down. once it’s back up, Jetpack sends a confirmation email.
- Infinite Scroll – This feature will automatically load new posts when your visitors keep on scrolling down on a page or post. Infinite Scroll feature helps in increasing engagement rate and visitors time on your site.
That’s not it. There are plenty of other Jetpack features that can improve the functionality of your site, including – publish posts via email, automate social sharing, secure authentication, and much more. Once you know how to install and setup Jetpack, you won’t have to use any other plugin ever.
Apart from that, we’ve compiled 10 major reasons why to use Jetpack for your WordPress website. Do check it out.
Install and Setup Jetpack on WordPress
Before you install and set up Jetpack on your site, you have to log in to your WordPress admin account. Then, follow the process below.
Install Jetpack Plugin
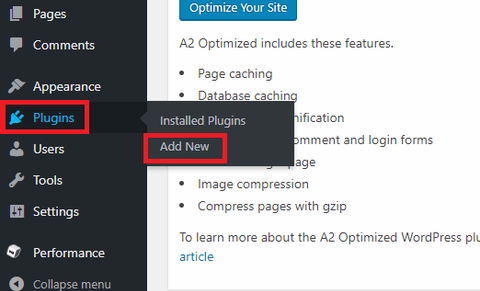
When you are on your WordPress site dashboard, from the left side panel, you have to navigate Plugins > Add News. Jetpack is a highly popular plugin, so you’ll find it listed on the top of your page. Otherwise, you can type ‘Jetpack’ in the search box located on the upper right side.
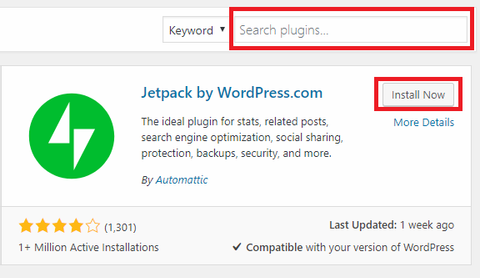
Once you find Jetpack, just click on the “Install Now” button. Within 15-30 seconds (based on your internet speed), the Jetpack installation process will complete.
Then, activate the plugin.. If you have already left the screen, you have to follow – Plugins > Installed Plugins > Navigate Jetpack on the list > click on Activate. The process will take a couple of seconds to complete.
Link Jetpack With WordPress
The next step is to connect Jetpack with WordPress because Jetpack’s features can’t be accessed without WordPress linking.
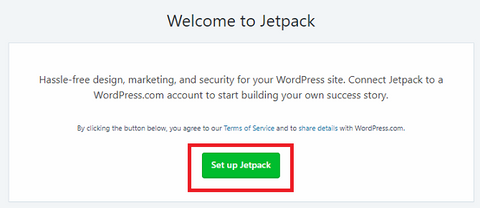
You have to click on Setup Jetpack, and you’ll be automatically redirected to WordPress. Here, you can sign in to your existing account or create a new one.
Now, you need to select your payment plans. However, if you don’t want paid Jetpack features yet, you can immediately start with a free plan with one click.
Customize Jetpack Settings
In the next step, you have to customize Jetpack settings as per your requirements. For that, move to Jetpack > Settings and resume customization. You have five tabs to customize Jetpack – Writing, Sharing, Discussion, Traffic, and Security.
Furthermore, I’ll share steps to customize each tab to set up Jetpack on your WordPress site. After customizing you can use Jetpack as one of the best WordPress plugins for business to drive more sales. Features such as summarized real-time stats, blog post tracking, user metrics, mobile optimization services, and website monitoring give great insights to scale the business and improve sales conversion.
Writing Tab Settings
As the name suggests, this tab contains options related to content creation. There are numerous options that you can play with, but you should pay specific attention to editing CDN settings. Once you install and set up Jetpack, you’ll notice improvement in page load time. However, if you are already using third-party CDN service, you should avoid it.
Additionally, to improve your site’s loading speed, especially for mobile users, you should enable Lazy Load feature too. On the Writing Tab, you can adjust numerous other writing settings like a spellchecker, write content in plain text Markdown and create new posts by email.
Sharing Tab Settings
On the Sharing tab, you only have three settings. There you can automatically share your content on social networks by clicking on a toggle. You can add the “Like” button to each post.
To activate social sharing, you have to slide the toggle to On and click on Connect your Social Media Accounts option. Next, you’ll be redirected to WordPress to connect with your social media handles.
Discussion Tab Settings
Under the Discussion tab, you can define how people can interact with your website. The first setting is the most important – it facilitates your visitors to use their WordPress, Facebook, Twitter, and Google accounts to comment on your post.

By enabling this setting, you can make the comments section look impactful. Also, a photo and name of the user will appear, which helps in social proofing your website.
Next, you can add a subscribe button to your site. Your visitors have to enter their email address, and they will receive email alerts whenever you publish new content. Subscription can boost your traffic rate dramatically. You can also display popular posts from your blog right after the article ends. This improves the chances of more interaction between users and the website.
Traffic Tab Settings
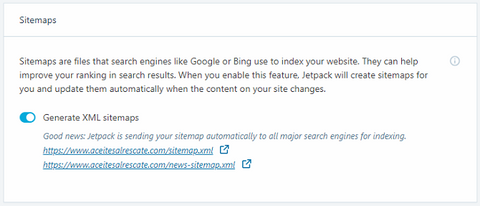
Your site verification code and XML sitemaps are available under the Traffic tab. By creating XML Sitemaps, the SEO score of your website can be improved. It tells search engines how your website is panned out. And, verification codes allow you to add Google, Yahoo, and Yandex webmaster consoles to your website.
However, if you are using another plugin to produce verification codes and sitemaps like Yoast, you should not enable Jetpack’s setting. By generating two sitemaps and verification codes, you’ll unnecessarily increase problems for you.
Security Tab Settings
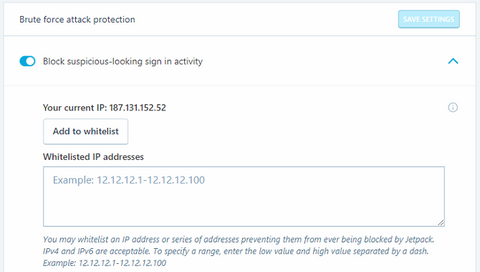
Finally, the last Jetpack settings tab is Security. With Jetpack, you’ll get brute force protection and a downtime monitor. You can customize both options as per your preferences.
The downtime monitor will instantly send you an alert whenever your website goes offline. It will allow you to quickly fix the issue so that not a single visitor leaves your site.
With a simple on/off toggle, the brute force protection can be enabled or disabled. However, if it doesn’t work, you have to manually whitelist IP addresses from the drop-down menu. This above easy steps conclude the question of how to install and setup Jetpack in your website for good.
Wrap Up
Once you have installed Jetpack, you can save yourself from the trouble of getting so many other plugins. And, when you have fewer plugins on your site, you can expect faster website loading speed.
However, enabling all these Jetpack settings might slow down your site. But, if you are using a good hosting service provider’s services, you don’t have to worry. WordPress’s recommended hosting provider is BlueHost, but you can use any other reputable hosting service.
Now, you know how to install and setup Jetpack on your WordPress website. So, don’t waste any more time and just get Jetpack.

Leave a Reply