Learn How to Create Order Forms in Your WordPress Website
If you’re running a physical store, a non-profit organization, or a restaurant, you probably don’t want to develop an entire store online. Nevertheless, you don’t want to miss out on the opportunity to receive orders and payments online.
Fortunately, there’s a way by which you can get customers to fill an online order form without the eCommerce feature and a shopping cart solution. All you need is a simple online order form, which lets you receive payments online, upon order pickup, or delivery. In this article we’ll show you how to create order forms in WordPress using WP Forms plugin.
Order Forms?
Order forms simplify the process of ordering products from your online store. They are used to gather customer information, collect order details, and secure payments. Order forms can be used for product purchase, food order, donation, gift cards, and more. Speaking of donations, WP Forms also offers donation forms for non-profit organizations.
Why Do Businesses Need Order Forms?
Order forms streamline business operations, giving you an efficient way to collect orders. They allow you to collect data, arrange it in order, and also save employee’s time to process. Order forms include all necessary fields to collect customer information and order details.
When it comes to commercial businesses, there are many other important and beneficial forms apart from order forms. For example, signature forms and abandonment forms are two such entities that can help businesses collect virtual signatures and reduce cart abandonment, respectively. Here’s how you can easily create signature forms in WordPress and reduce form abandonment using WP Forms.
Benefits of Order Forms
Before you decide to include an order form on your website, there are some important benefits you should keep in mind.
1. Variety of Form Templates: WPForms provides access to more than 100 pre-made form templates. This means that you can create any type of form to attract different types of target audience and capture relevant data.
2. Less Time-Consumption: Custom order forms are easy to fill and help employees save time on processing orders. These order forms are compiled in specific columns leading to easy invoice filing. Moreover, the chances of errors are also low.
3. Multiple Payment Method: Order forms allow you to integrate with a payment partner of your choice. As a result, payment collection is organized and you don’t have to worry about it.
Why Choose WPForms?
There are multiple paid and free WordPress plugins available in the marketplace. However, we recommend using WP Forms for any kind of form creation.
WPForms is the best WordPress form builder plugin. It allows you to easily create any kind of order form and include it on your website without any coding skills. WPForms also allows to you easily accept payments on WordPress Website.
The form builder plugin is used by more than 3 million websites, and if you are looking to generate business online, there’s no reason why you shouldn’t learn how to create order forms in WordPress.
With WP forms, you can sell merchandise, collect donations, or get hassle-free booking orders. You can skip the entire process of writing customer details and waiting for payments. What’s more, you can set shipping rates, product variations, taxes, and other commission charges to automatically calculate the order amount.
Many business owners want to learn how to create order forms in WordPress, and through this guide, we will teach you how to do that.
You can create an online order form to generate order information from customers. Stripe, Authorize.Net, and PayPal payment integrations allow you to create the order form in a few minutes and receive customer payments when they place an order.
How to Create Order Forms in WordPress?
Most of the businesses use WPForms to create contact forms in WordPress. However, as mentioned in previous sections, there are many other forms that it offers to its users. Creating order forms in one such facility.
It’s not as difficult as it sounds. Once you learn how to create order forms in WordPress, you can create as many as you want for different webpages on your website. So, without further ado, let’s guide you through the simple step-by-step process.
Step 1: Create Order Form in WordPress
Start with the installation and activation of the WPForms plugin. Click on Add New to create a new form.
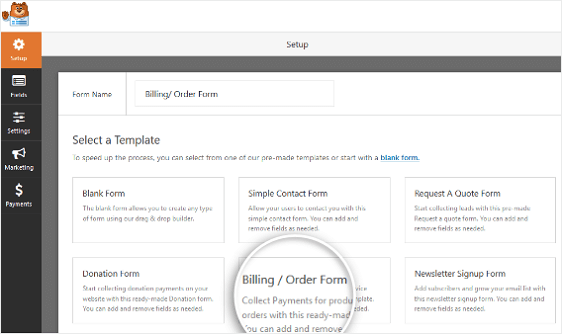
Give your form a name, and in the options given below, choose the Billing/Order form template.
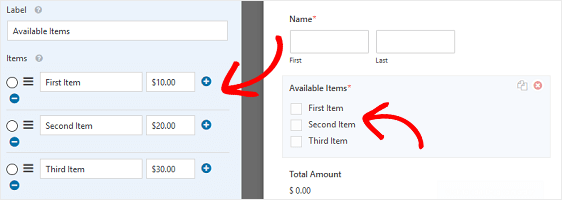
Next, you need to set up the items you are offering for sale. Scroll down to the label for “Available Items” on the right. The Field Options will appear on the left panel. Enter the right names, add or remove items, and fill in prices.
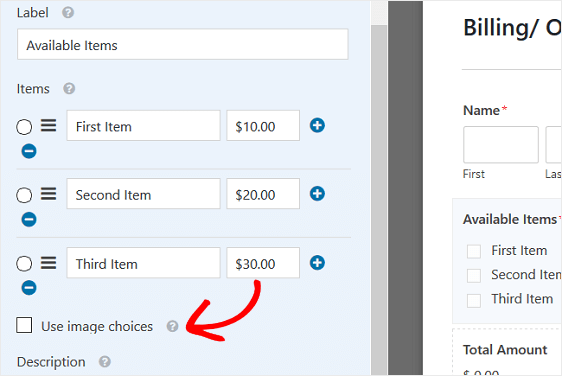
Some business owners need to add images in the online order form to give customers a view of what they are ordering. For this, click on the Use image choices checkbox.
Lastly, take a look at all the additional fields on the left-hand side and drag the ones you need to the right-hand side.
Click on Save to proceed further.
Step 2: Form Notification Configuration
It is important to receive notifications for new orders received on your website. There are three types of emails that you can choose to send. The first is an email notification to yourself.
WPForms sends these emails automatically, provided you don’t disable the setting. The second is an email to a member of your team – the order processing team, for example. In the Notification settings, you can enter the email address of this member in the Send to Email Address field.
The third is an order confirmation email to the customer. For this, you need to use smart tags. In the Form Builder, click on the Settings tab and then Notifications.
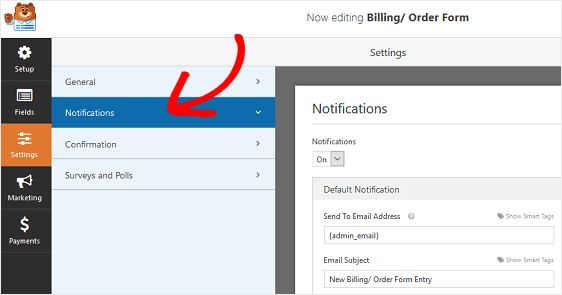
Here, you can change the email address to which you want to receive the notification when a new order is booked.
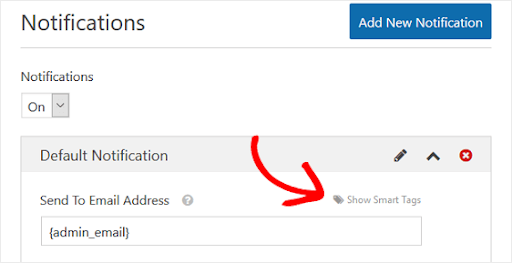
In case you want to send an email to the customer, click on Show Smart Tags near the Send to Email Address field.
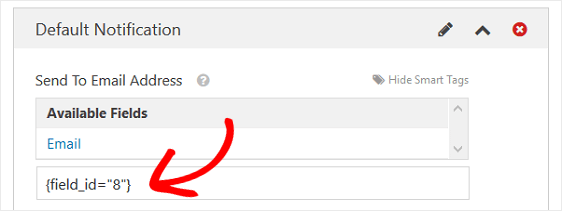
In the Available Fields, choose Email to tell WPForms that they need to send a notification to the customer’s email address.
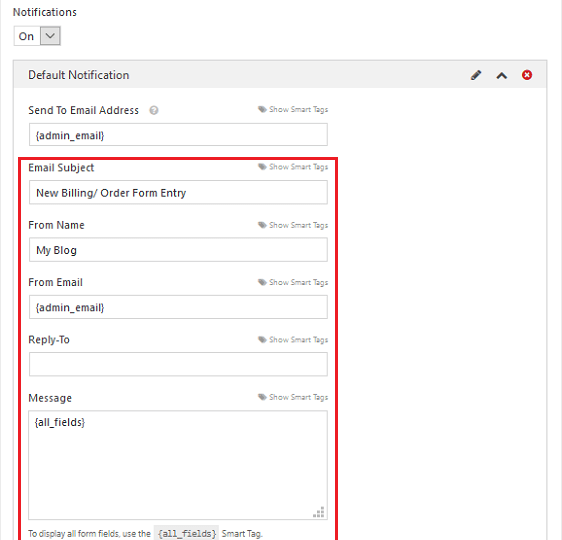
Moving on, you can customize details like – From Email, Reply-To, From Name, and Email Subject. You can also create a personalized message, in case you are sending the email to the customer.
Remember to use the {all_fields} smart tag if you want the email to include all the information entered by the customer.
Step 3: Form Confirmation Configuration
The next setting is form confirmations. After a customer fills out the order form, they see a form confirmation.
Form confirmation is of three types
1. Message: The default confirmation type in WPForms is Messages. As soon as a customer completes the order form, he or she will receive a simple message informing them that the order is received.
2. Show Page: With this type, customers will be taken to a particular web page saying – Thank you for the Order.
3. Go to URL (Redirect): The purpose of this type is to send customers to another website.
To set up form confirmation, click on the Confirmation tab under Settings.
Choose the type of form confirmation you would like to use. If you choose Message, you can customize the confirmation message as per your liking and click on Save, when it is done.
Step 4: Configure the Payment Settings
As you learn how to create order forms in WordPress, you must include payment settings by connecting to your payment provider so that online payments from the customers can be received.
WPForms allows payment integrations with Stripe, Authorize.Net, and PayPal. It is a good idea to provide more payment methods to lessen the chances of form abandonment.
It is important to install and activate the right payment addon to configure the payment information settings on your order form.
After you have done that, choose the Payments tab in the Form Editor. Select the payment processor, fill out all the details as required, and click Save.
Step 5: Add your Form to the Site
With WPForms, you can add forms to different places on your website. The most common is the post/page embed option.
Create a new page or post in WordPress. Click on the first block and click on the icon for Add WPForms.
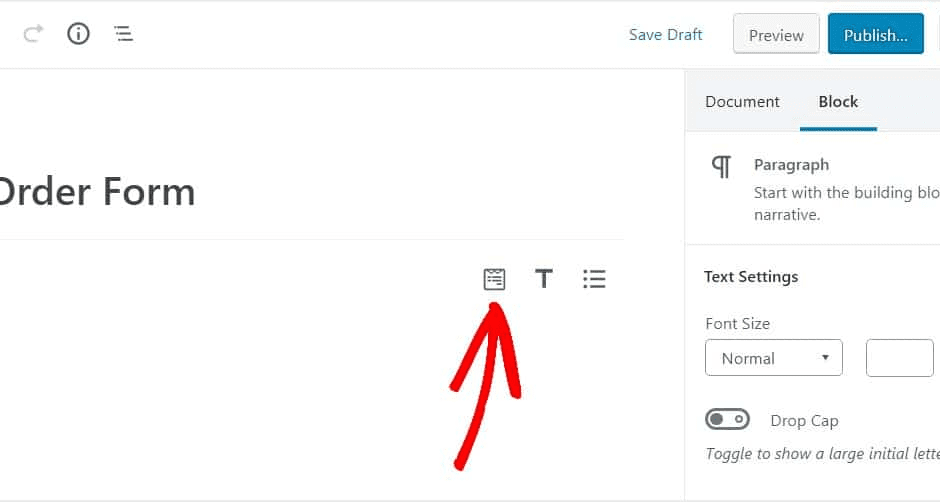
You will now see the WPForms widget. Using the dropdown, pick the forms you want to include on the page.
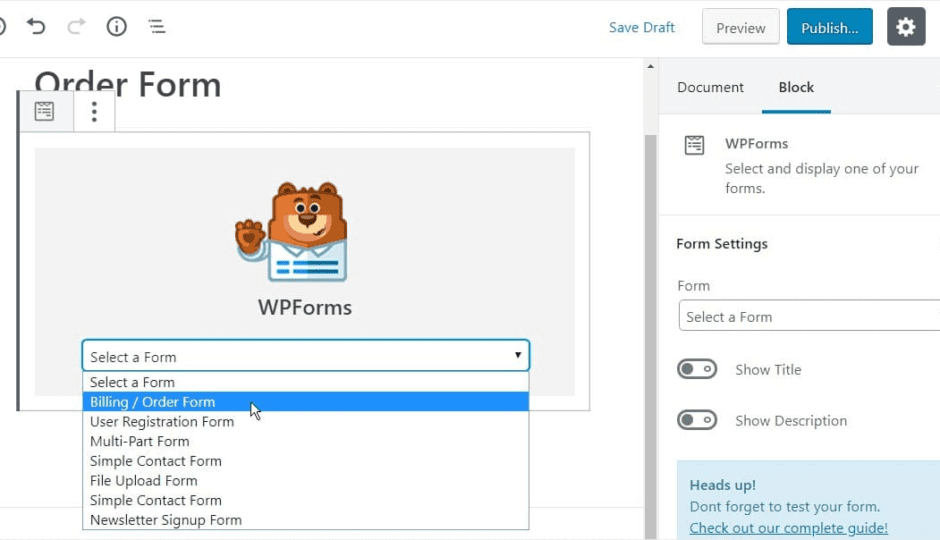
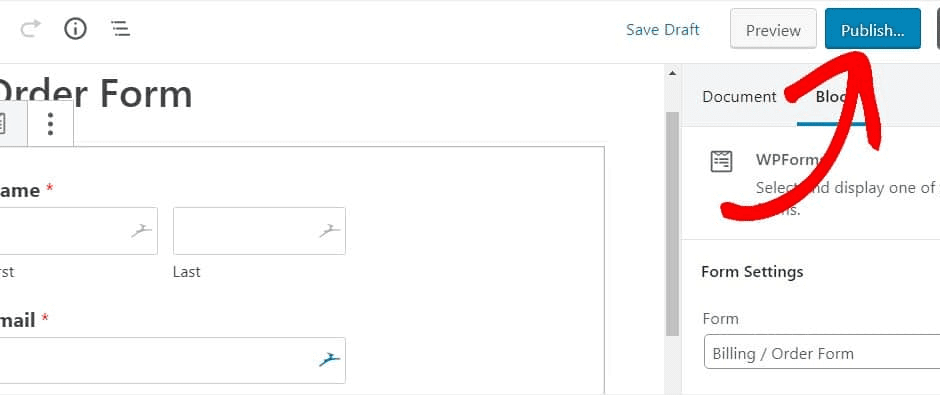
After that, click on the Publish button on the right-hand side for your form to appear on the website.
If you want to add the form to the sidebar widget area, click on Appearance – Widgets. Next, add a WPForms widget to the sidebar. Use the drop-down menu to choose the form you would like to add and save changes to the widgets area.
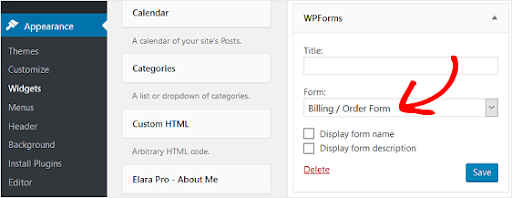
Save the settings.
Your form is now live on your website. Make sure you test the form.
And there you go! You now know how to create order forms in WordPress and are all set to receive orders with online payments.
Conclusion
So, what are you waiting for? Get started with WPForms today and give users a chance to easily complete orders on your website. Receive order form notifications instantly to smoothly process the orders.

Comments are closed.